PC Plus HelpDesk - issue 271
 |
This month, Paul Grosse gives you more
insight into some of the topics dealt with in HelpDesk.
|
 |
HelpDesk
Characters without keyboardsIn the past, we've covered how to change your keyboard so that you can input characters from different areas of the utf-8 spectrum and you should all be typing using Gurmukhi characters by now. However, suppose you only need to input the occasional character. It wouldn't be worth using a different keyboard layout each time because there are so many. So, what is the alternative?
Gnome's Character Mapping program ('Utilities', 'Editor', 'Gnome Character Map' - screenshot on the right) which will run equally well under KDE as Gnome will do this job for you and being lightweight, takes about a second to load. One thing that you will find is that if a character is not within a particular font, it will be displayed if it is in any font that is installed on your system - this gives you the advantage of being able to see what your system has to offer, without having to search through every font, looking for a 'Devanagari Candrabindu' or a 'Zhuyin Fuhao' ('Bopomofo') 'Eng'. Double-click on the character (remember that this is a Gnome program) and it will be copied to the text at the bottom of the window. With this character mapping program, you can edit the
text so if you make a mistake, you can delete the
unwanted parts and double-clicking on a character
actually places the character where the cursor is, rather
than only at the end of the test string. |
 Once you are ready, just click on
the copy button. Pasting it into a suitable image editor
will make it select a font that contains those characters
- this is what happens with The GIMP. Once you are ready, just click on
the copy button. Pasting it into a suitable image editor
will make it select a font that contains those characters
- this is what happens with The GIMP.If you have a particular font already identified then just use that. |
 You can use OpenOffice.org's 'Insert',
'Special Character' to put them on the clipboard and then
paste them into your image editor but you need to know
which font they are in and that means searching through
them until you find one (and then, it might not be the
one that you would be happiest with - correct weight or
style?). So, is there an easier way?
You can use OpenOffice.org's 'Insert',
'Special Character' to put them on the clipboard and then
paste them into your image editor but you need to know
which font they are in and that means searching through
them until you find one (and then, it might not be the
one that you would be happiest with - correct weight or
style?). So, is there an easier way?3D cloning correctionsUsing a humble camera, you can create 3D images. Instead of using a red and green system, you can place the images side by side and then cross your eyes so that the images superimpose (the alternative to this is to relax the convergence on your eyes but this has limitations on the image size and not everybody can do it). So, take an image and then move to the side and take another. Through the view finder, get the composition you want and then rock to the left so that your weight is on your left foot, take a shot and then rock to the other side so that your weight is on your right foot and take another shot. By doing this, you can hold the camera rigidly so that you are not changing the angle or direction of the shot. By doing that, you are avoiding having to perform rotation and perspective corrections on the image when you get it onto your image processor. The distance you move between shots will determine how much 3D effect you will get - move around 65mm (roughly the distance between your eyes - look into a mirror, holding a ruler up to your eyes and zero it using one eye and read the distance using the other) and you will get the same level of 3D effect that you normally see. If you use a larger displacement, the effect will be exaggerated. For views where there is little in the foreground (say, nothing for 10 metres or so) then try moving twice the normal distance and take another shot at four times the normal displacement and see what effect you get when you look at the pictures. One thing to be aware of is that if you have reflective surfaces (such as the red handrail in the bottom pairs of images in this section), you can end up with sets of reflections that are too different for you to look at comfortably. You will learn a lot from playing around before you use the only opportunity you will have to take your holiday snaps. So, this is what such an image pair looks like - this is InfoSecurity 2008 which was held at Olympia at the end of April. Cross your eyes so that the images superimpose and
then focus them. |
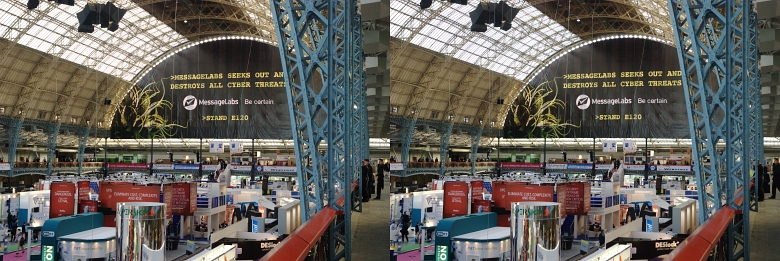 |
| If you look at the images above, they
seem at first to be identical but on closer inspection,
there are differences. The image on the right - the one
that you look at with your left eye - has a different
view point. The most obvious artefact of this is the 'D'
of 'AND' on the right of the top row in the advertisement
at the back of the hall. However, there are more such as
in the superstructure and so on. With one image being
for the left eye and the other for the right, you can get
them the wrong way around. Look at the composite below
and you will see that the superstructure behind pokes out
at you. |
 |
| In the composite below, it is the right way around. So, we have established that the images have to be a particular way around and that lateral displacement is the key to the perception of depth here. |
 |
| However, there is another point and that
is if you are using one camera to take two images at two
places, you can't take them at the same time (without an
attachment of some sort). So, anything that moves will
cause a displacement within the image pair that will put
it in the wrong place - a few people moving is manageable
but if you are taking pictures of a beach with waves, you
need to be careful (it's not impossible, just stretching
it a bit - large waves will be virtually impossible but a
small wave breaking should be correctable using the
method below). You will need to correct these differences
if they are too much and the way to do that is by using
the clone tool.
On modern Image processors - PaintShop Pro, Photoshop CS3 and The GIMP - nothing has changed that much. The only real difference between Photoshop and The GIMP being that on Photoshop, the layer you are copying from needs to be made visible (layers dialogue box) in order to use it as a source. So, in The GIMP, assuming that you have your stereo pair loaded up as two separate images. You can, if you want, create several transparent layers over the top of the base image so that you can clone onto them instead. Make the layer in the destination image that you want to clone to, the current layer. Make the image you want to clone from in your source image its current layer. Finally, make them the same magnification, align the two windows side by side and make sure you can see the same parts of each. Next, click on the part of the source image you want to copy over whilst pressing [Ctrl] and then [Alt][Tab] to the other (destination) image of the pair. Align the mouse so that the detail you clicked on in the source image is in the same relative place in the image as its depth requires - a static part of the top of the stairs was used in the InfoSec 2008 image - and then start painting. Remember that for different depths within the image pair, you need to use a different lateral displacement so, for the man that is half way up the steps on the first landing, you need to use a different offset. This is where using different layers comes into its own. You can clone to a layer that is below the top (nearest) layer without overwriting it so that your image remains clean looking. Another advantage of cloning to a transparent layer (as opposed to directly into the base image) is that you can play around with pixel-sized displacements so if you make a tiny error in selecting which pixel to clone to, you can correct it without messing up your image. If you have a good picture, it is worth the effort. |
 Here, you can see the difference between two
images, being the time take between them (one had an EXIF
time stamp of 55:42 and the other of 55:43 so somewhere
between just over one and just under three seconds). Here, you can see the difference between two
images, being the time take between them (one had an EXIF
time stamp of 55:42 and the other of 55:43 so somewhere
between just over one and just under three seconds). |
 And, here is the same image after the
cloning process. And, here is the same image after the
cloning process.You can access these images to have a play around with them by clicking here (a new window will open up). Have fun. |
 Most of us have used the clone tool to copy
from one part of an image to another but this tool is far
more powerful than that. Even as far back as Micrografx
Picture Publisher 7 (1997) and probably before that, you
could clone from one image to another without having to
make it one image.
Most of us have used the clone tool to copy
from one part of an image to another but this tool is far
more powerful than that. Even as far back as Micrografx
Picture Publisher 7 (1997) and probably before that, you
could clone from one image to another without having to
make it one image.Running up to speed
The test that we ran in PC Plus last month showed a measurable increase in speed when they were configured in a particular way but DDR400 chips running at 333MHz? This is not what they were bough for. |
 So, reboot the machine and press [Del] to
get into the BIOS CMOS Setup utility. So, reboot the machine and press [Del] to
get into the BIOS CMOS Setup utility.Select 'Advanced
Chipset Features' and press [Enter] for 'DRAM
Configuration'. |
 Set 'Timing Mode' (the top parameter) to
Manual' by pressing [Enter], selecting 'Manual' and
pressing [Enter] again. Set 'Timing Mode' (the top parameter) to
Manual' by pressing [Enter], selecting 'Manual' and
pressing [Enter] again.The 'MemClock index value' is
set to 166MHz here so press [Enter] and change the
frequency to 200MHz, remembering this is doubled (DDR
stands for Double Data Rate - the clock is tripped on the
rise and the fall of the 200MHz clock signal so that you
get effectively a 400MHz frequency). |
 Reboot the machine and this time, you can
see that it is set for DDR400 (previously, this read
'DDR333'). Reboot the machine and this time, you can
see that it is set for DDR400 (previously, this read
'DDR333'). |
 Everything else in the configuration menu is
set at 'Auto' so nothing should come to any harm - the
memory sticks can work at 400MHz quite easily. Everything else in the configuration menu is
set at 'Auto' so nothing should come to any harm - the
memory sticks can work at 400MHz quite easily.However, if you feel that you need to tweak the other settings, go ahead - remember that if you don't actually break it, you can turn it back. |
 If you
have installed two different pairs of DDR400 memory
sticks, you might have found that even though it says
that each of the sets is capable of working at a data
rate of 400MHz, the BIOS tells you that they are instead
working at a lower rate - in this case, the system thinks
that they are better off running at 333MHz.
If you
have installed two different pairs of DDR400 memory
sticks, you might have found that even though it says
that each of the sets is capable of working at a data
rate of 400MHz, the BIOS tells you that they are instead
working at a lower rate - in this case, the system thinks
that they are better off running at 333MHz.Locate and format
You (or a friend at work, a relation, et cetera) tried installing an OS onto a USB flash drive but it installed it on the external USB hard drive instead. The external USB hard drive partitions were deleted using Darik's Boot and Nuke and now, you (someone else) can't find the drive on the system anywhere when it is plugged in. It refuses to recognise the drive sda. Have you (you know who) got to buy a new disc? Well, Darik's Boot and Nuke ( http://dban.sourceforge.net/ ) appears to have done a rather good job. However, not all is lost (although the data certainly is). The following is for SuSE but you can do the same on other systems. First of all, you need to see which drive you are using so either press [Ctrl][Alt][F10] to get you to the message screen or open up a terminal, su to root and type ... tail -f /var/log/messages ... which will do pretty much the same thing on any
system. Next, plug in the USB drive. With a normal drive
that is formatted and recognised by the system, you
should get something like the output in the screenshot
above-right. |
However, if you have nuked it, you
should get a message that looks like ...Apr 29 15:03:02 zircon kernel: sda: test WP failed, assume Write Enabled Apr 29 15:03:02 zircon kernel: sda: assuming drive cache: write through ... repeated. You now know for certain that your drive (in this case) is sda - this is important. If, instead of using a terminal, you used the messages screen, press [Ctrl][Alt][F7] to get back to your session (may be a different function key on different systems).
Select 'sda' and click on the 'Create' button. Select your drive - '/dev/sda' - and then click on 'OK'. Select the partition type - 'Primary Partition' - and then the create dialogue opens. Select the file system to format the drive with and, for the reason that it is a removable drive, make sure the 'Mount Point' is empty (you don't want it searching for this drive on boot up and then failing to find it). Click on 'OK'. Finally, click on 'Apply' and then in the green
warning box, click on 'Apply' and watch it work. For a
120GB USB, formatted with ext3 it can take just a couple
of minutes. Remember that whilst it might look as though
it has stuck at some percentage point of the job, the
busy light is still flickering on the drive. |
 Last of all, click on 'Quit' and the job is
done. You might have to unplug it and plug it in again to
see it, depending upon your hardware configuration but
now you have your drive back. Last of all, click on 'Quit' and the job is
done. You might have to unplug it and plug it in again to
see it, depending upon your hardware configuration but
now you have your drive back. |
 You might
be familiar with this scenario or something like it ...
You might
be familiar with this scenario or something like it ... Next,
select 'KDE', 'System', 'YaST (Administrator Settings)',
enter your root password. In Control Center, select
'System' and then 'Partitioner'. Click 'Yes' on the
Warning dialogue box. The Expert Partitioner loads.
Next,
select 'KDE', 'System', 'YaST (Administrator Settings)',
enter your root password. In Control Center, select
'System' and then 'Partitioner'. Click 'Yes' on the
Warning dialogue box. The Expert Partitioner loads.Boot and Nuke
The dban version 1.0.7 ISO file is only 2.0MB and version 2.0.0 is 5.7MB - the intention being that it can be run from a floppy diskette or a USB drive if necessary. To run it from a floppy diskette, download the dban-1.0.7_i386.exe file and then unzip it using the unzip command. Next, copy the image file to the floppy diskette by typing ... dd if=dban-1.0.7_i386.ima of=/dev/fd0 ... and when the light has gone out on the drive, you can reboot and run the program - remembering that the floppy diskette should be on your boot list in your BIOS. |
 There are
many programs for deleting partitions on hard drives but
most of them need you to have a specific OS or type of OS
installed in the first place. Darik's Boot and Nuke
(www.dban.org) runs from a live CD so that the installed
OS is completely irrelevant.
There are
many programs for deleting partitions on hard drives but
most of them need you to have a specific OS or type of OS
installed in the first place. Darik's Boot and Nuke
(www.dban.org) runs from a live CD so that the installed
OS is completely irrelevant.