PC Plus HelpDesk - issue 232
This month, Paul Grosse gives you more insight into
some of the topics dealt with in HelpDesk and HelpDesk
Extra
|
 |
HelpDesk
Liquid Icons
|
 Here, the
idea is that the icons or buttons or whatever you
are designing, look as though they are made from
something that is flat that has on its surface, a
globule of bright liquid that reflects the light.
Here, the
idea is that the icons or buttons or whatever you
are designing, look as though they are made from
something that is flat that has on its surface, a
globule of bright liquid that reflects the light. Here,
we can see our basic button design. It is just a
yellow with 'OK' on it in black. It also happens
to be 128x128 pixels which is larger than we need
(our aim here is to make one that is only 48x48
pixels but you can make them any size you want.
At the end of the process, we shrink down anyway
which makes things easier to work on and have a
finer effect).
Here,
we can see our basic button design. It is just a
yellow with 'OK' on it in black. It also happens
to be 128x128 pixels which is larger than we need
(our aim here is to make one that is only 48x48
pixels but you can make them any size you want.
At the end of the process, we shrink down anyway
which makes things easier to work on and have a
finer effect). Inside
the globule, the light entering it from above
hits the inside over the lower half and is
reflected internally onto the lower half of the
button.
Inside
the globule, the light entering it from above
hits the inside over the lower half and is
reflected internally onto the lower half of the
button. Next,
make sure that your image has the focus and then
press [Ctrl][I] to invert the mask.
Next,
make sure that your image has the focus and then
press [Ctrl][I] to invert the mask. Next,
press [Ctrl][A] to select all of the image and
then 'Select', 'Shrink...' and then 20 pixels.
Press 'OK'. After that, 'Select', 'Grow', and
then 10 pixels which will give it round corners
of 10 pixels radius to simulate the globular
effect of the surface we are trying to create the
illusion of.
Next,
press [Ctrl][A] to select all of the image and
then 'Select', 'Shrink...' and then 20 pixels.
Press 'OK'. After that, 'Select', 'Grow', and
then 10 pixels which will give it round corners
of 10 pixels radius to simulate the globular
effect of the surface we are trying to create the
illusion of. You
can, of course, use different amounts of
shrinkage or growth or even choose a different
way of highlighting the image. In addition to
that, you can drag the gradient fill down to only
50 percent or whatever you need - the image on
the right is the same as above but only dragged
50 percent.
You
can, of course, use different amounts of
shrinkage or growth or even choose a different
way of highlighting the image. In addition to
that, you can drag the gradient fill down to only
50 percent or whatever you need - the image on
the right is the same as above but only dragged
50 percent.MIDI (Musical instrument Digital Interface)
|
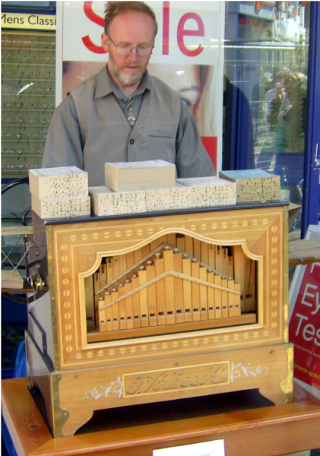 Midi
information is simply any digitisable data that
describes a piece of music.
Midi
information is simply any digitisable data that
describes a piece of music.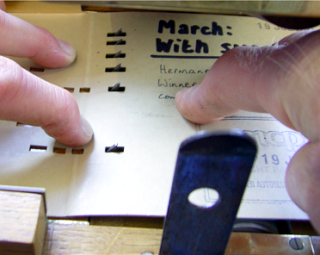 Here,
you can see the pins that read the notes. They
are fed from left to right. The pins have a
sloping left side so that as the card is pulled
through, the pin pushes through the hole and then
as the note ends, it is gently pushed back.
Here,
you can see the pins that read the notes. They
are fed from left to right. The pins have a
sloping left side so that as the card is pulled
through, the pin pushes through the hole and then
as the note ends, it is gently pushed back.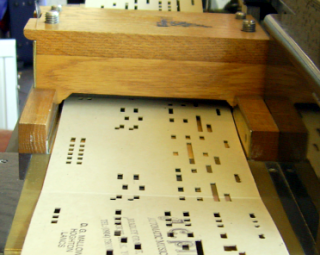 Here,
you can see the holes as they are pulled towards
us with high pitched notes on the left. You can
see that as each pin represents a note to be
played, it has a series of holes that play it -
in this case, the card has a span of 36 holes
across its width.
Here,
you can see the holes as they are pulled towards
us with high pitched notes on the left. You can
see that as each pin represents a note to be
played, it has a series of holes that play it -
in this case, the card has a span of 36 holes
across its width.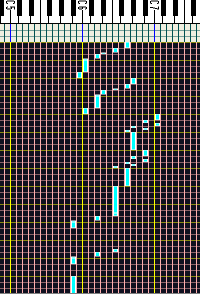 This
image is from a MIDI file editor (CakeWalk) and
you can see how each note has a particular
position.
This
image is from a MIDI file editor (CakeWalk) and
you can see how each note has a particular
position.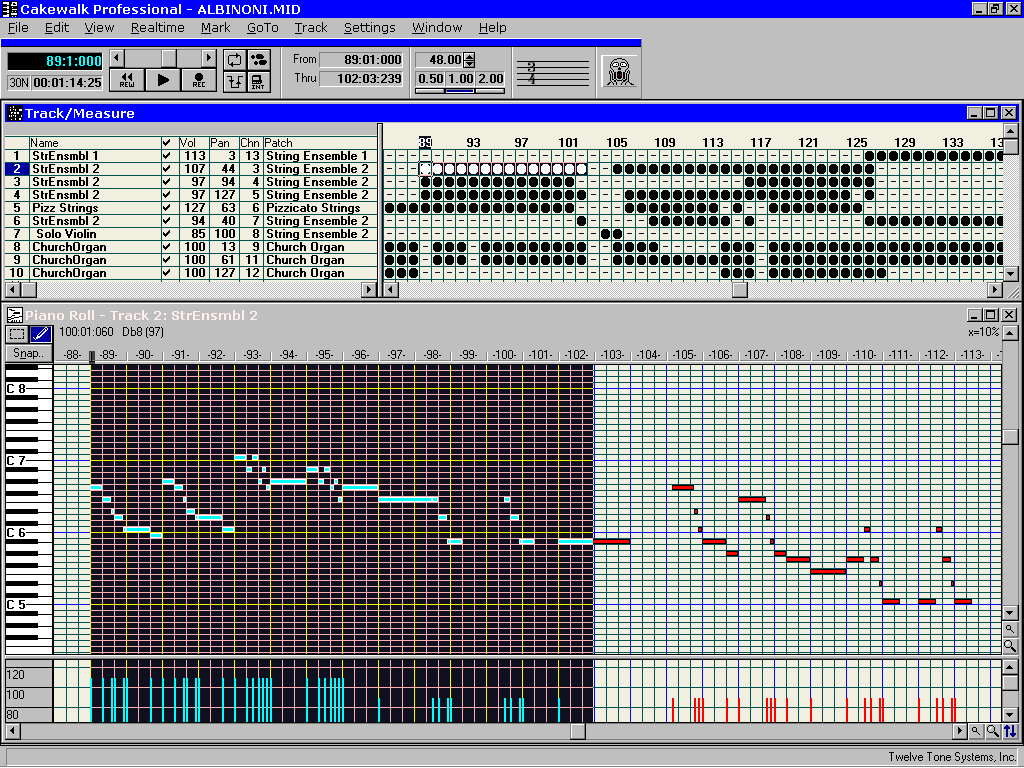
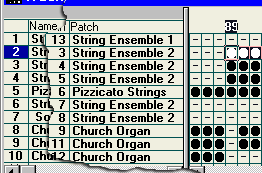 Each
MIDI file can have 16 channels and they can be
patched through to any instrument the MIDI card
is capable of producing. In this case, channel 1
is patched through (mapped) to the 'String
Ensemble 1' voice. On that channel, the piano
role produces the notes that that voice produces.
Channel 2 is mapped to a different sound and so
on, so, it is like having up to 16 organs of
which 1 (normally channel 10 although sometimes
channel 16) plays the drums. Clearly, a snare
drum is not capable of having dozens of
distinctly different notes (to the untrained ear)
played on it so with the drum channel, each note
plays a different instrument or one in a
different way such as a hi-hat being tapped
closed, open, closing and so on.
Each
MIDI file can have 16 channels and they can be
patched through to any instrument the MIDI card
is capable of producing. In this case, channel 1
is patched through (mapped) to the 'String
Ensemble 1' voice. On that channel, the piano
role produces the notes that that voice produces.
Channel 2 is mapped to a different sound and so
on, so, it is like having up to 16 organs of
which 1 (normally channel 10 although sometimes
channel 16) plays the drums. Clearly, a snare
drum is not capable of having dozens of
distinctly different notes (to the untrained ear)
played on it so with the drum channel, each note
plays a different instrument or one in a
different way such as a hi-hat being tapped
closed, open, closing and so on.HelpDesk Extra - HTML coding
BasicsHTML (Hyper-Text Mark-up Language) is based on SGML and has some very simple concepts at its core - this allows you to write your own HTML without having to rely upon bloated packages that are really designed so that any noddy can spurt out dozens of low-content web pages very easily.
The concepts are that the information goes on the page as plain text and that this text can be formatted or positioned and have other visual and logical elements in with it by the use of tags, each of which start with a '<' and end with a '>'. |
Overall LayoutHTML, like many other file types starts off with some information about what it is and being HTML, it uses tags. The document itself has two sections - a head and a body. The head tells the browser what the document is about, such as its title, and the body has all of the information in it that you need to convey in the document. Note that with only a few exceptions, all tags start formatting a piece of text and have a corresponding finishing tag - exceptions are usually where something happens at a point rather than over a piece of text. The opening tag has the tag name and any attributes and the closing tag has the tag name preceded with a slash. So, for a HTML file that is called 'My first web page' and has the content 'Hello World', you would write something along the lines of this... <html>
<head>
<title>
My first web page
</title>
</head>
<body>
Hello World
</body>
</html>
You can see that these tags are nested (within one pair of tags, you can have another pair that start but they must also finish before leaving the tags they are nested within). The whole document is within the <html> </html> tag pair. Next is the 'head' tag pair within which is the title tag pair. Each level of tags closes before the one it is within closes. Also worthy of note is that new lines are not needed - they are ignored as are multiple spaces. In addition to this, it doesn't matter what platform you wrote the text file on as long as it is encoded in ASCII (so EBCDIC is out unless you convert it first). Line ends from different platforms (UNIX (0a), Mac (0d), Windows (0d0a)) are all treated the same regardless of which platform the browser is running on - they are all ignored. In effect, the following line will render in exactly the same way as the lines above (copy them into a text file and try it out - just save your text file as something.html and load it into your browser). <html><head><title>My first web page</title></head><body>Hello World</body></html> In addition to the title, the head can also carry a special tag that tells the browser to load another page after a certain delay. If you have an image that needs to be uploaded regularly, there is nothing stopping you from reloading the same page (if it is small). That tag in context looks like this... <html>
<head>
<title>
Reloading page
</title>
<meta http-equiv="refresh" content="10;
url=some_other_page.html">
</head>
...
Which will load this other page after ten seconds. Note that you cannot use spaces in the URL so use %20 if you have a space or use proper file names for your web pages. The body tag takes some attributes bgcolor=colour, text=colour, link=colour, vlink=colour, alink=colour where 'colour' is either the name of a colour such as 'red' or 'blue' or is a hexadecimal value for example: <body bgcolor="#cceecc"> which will give a pale green - the colours are #RRGGBB where RR is the red colour with a value from 00 to FF (note that you need leading zeros) and similar for GG and BB. You can also have a background image by specifying its URL. Note that you should also specify a similar colour so that your text is still legible if your background image is a long time loading or fails to load for some reason. <body
bgcolor="#cceecc" |
Paragraphs and breaksThe body text can go on a long way but as newlines and multiple spaces are all treated as though they were spaces, there is no way of breaking up a long document unless you use the paragraph tag <p> or the break tag <br>. Both of these can exist on their own but the paragraph tag us usually used as a tag pair in the form <p>some text.</p>. BreakThe break tag can carry information about how it
breaks up the text. If, for instance, you had an image
(see below) and you needed a clear left margin for your
text, you can add an attribute to the tag so that your
next line of text is clear on the left <br
clear="left"> this can also be
"right" and "all" <br clear="all"> ParagraphThe paragraph also takes attributes, allowing for
alignment (align="left", "right",
"center" and "justify" although the
latter only has limited support and also makes text
harder to read. <p align="center"> There is also a <center> tag which aligns text in the centre and so on. If you have an area of text such as a page, table cell (see below) or some other block that is right justified and you want to justify a paragraph, you can use the <center> tag HeadingsYou can also format text to form headings and these can be centred if you want. They go from 1 to 6 in the form <h1> and so on. Heading 1Heading 2Heading 3 centredHeading 4 right justifiedHeading 5Heading 6Horizontal ruled lineTo break up the text with a horizontal ruled line, you use the <hr> tag. You can specify how wide it has to be, whether it has a shadow, what colour and so on. <hr align="right" size=8 width="50%" color="#8080d0" noshade> and it looks like this BlockquoteFinally, you can indent blocks of text so that they stand out from the surrounding text by being indented on the left and the right. This is done using the <blockquote> tag pair.
|
ListsThe two most common list types are those with numbers (ordered lists having the <ol> tag) and those with bullet points (un-numbered lists with the tag <ul>). Each list item in a list starts off with an <li> tag although it is optional as to whether you want to finish each list item with a </li> tag as there are only two other things that are going to come after it if you don't and they are the next list item or the end of the list tag. List items are nested sequentially within the list type tags thus... <ul> <li>first thing</li> <li>next thing worth mentioning</li> <li>and the next</li> <li>and so on</li> <li>last thing</li> </ul> which end up looking like this...
You can nest lists like so <ul>
<li>first thing</li>
<li>next thing worth mentioning</li>
<li>introduce this other list
<ul>
<li>first thing in the new list</li>
<li>next thing worth mentioning</li>
<li>and the next</li>
<li>last thing</li>
</ul>
some more text
</li>
<li>last thing</li>
</ul>
which renders like this
The numbered list (with the <ol> tag instead of the <ul> tag) looks like this...
|
TablesTables allow you to split up the page in a logical way so that text can be set into tables. However, you can use tables for other things as well. A table starts off with the table tag and then each table row is defined with table data elements. The header cells of the table can have a special 'table header' tag which changes the representation of the text like so <table border="1">
<tr>
<th>IP address</th>
<th>Machine<br>name</th>
</tr>
<tr>
<td>10.0.21.15</td>
<td>Titanium</td>
</tr>
<tr>
<td>10.0.21.103</td>
<td>Vanadium</td>
</tr>
<tr>
<td>10.0.21.195</td>
<td>Bismuth</td>
</tr>
</table>
which looks like this...
You can apply various alignment attributes such as.
along with colour attributes for bgcolor="#ef00ad" and background images in the same way as with paragraphs, pages and so on. These attributes can be applied to the whole table, to rows or individual cells. If you wanted a cell to cover two rows or columns, you use colspan="2" or rowspan="2" or whatever you need. In this way, you can have generalised headers or cells that make up all manner or patterns like so...
You can also specify:
Additionally, you can specify the colour of the borders and much more than we have space for here. |
|||||||||||||||||||||||||
Linksyou can link a block of text to another document or even a part of the same document using the anchor tag. As this specifies a block of text, it has a beginning and end tag. It works entirely off its attributes, that is to say that without them it is useless. To link a piece of text to another document, you would use the following... <a href="some_document.html">click here</a> If you wanted to link to somewhere within the same document, you need to have a place to link to as well as a way of linking from somewhere. The place you want to link to looks like this... <a name="halfway">Halfway through the page</a> and the way of linking a piece of text to it (from the same page) is as follows <a href="#halfway">click here</a> You can link to a specific part of the page in the same way from another page or even a page on a different server by including the relative URI or the whole URL as required like so... <a href="otherpage.html#halfway">click here</a> or <a href="http://www.some.domain.tld/otherpage.html#halfway">click here</a> |
ImagesWords can only carry so much information so images are a good idea. They are separate entities in their own right so have to be loaded from a URL which, like href in links above, can be relative or absolute. As they appear anchored to one point in the document, the have no closing tag as they do not enclose a block of text. Like anchor tags they are all powered through their attributes and they have the usual set although the img tag uses a source (src) tag instead of href. <img src="images/some_image.gif" hspace="2" vspace="2" height="215" width="320" align="right" border="0"> Note that images occupy space on the browser and some browsers will not display anything on the page unless it knows how to lay it out. If you do not specify the height and width of the image, the only way that it can find out how big it is going to be is by starting to load it and if there are many images as there are some times, this can be after a long wait. The hspace and vspace are the horizontal and vertical spaces around the image in both directions measured in pixels. This is so that you don't end up with text running up to the edge of the image. This can be left at zero if you are using a table to position images to make a bigger picture with, say, clickable links on it. You can also use images as hypertext links by putting them between anchor tags (<a>) but unless specified otherwise, the border usually becomes "2" so if you want borderless image links, use border="0". |
Special CharactersThere are a number of special characters. We need a way of expressing line breaks as these are ignored by the browser and we have already seen that this is accomplished using the <br> and <p> tags. However, we do need to be able to define multiple spaces, greater than and less than signs along with a number of others. Many have a special, easy to remember code but where there is no code, the ASCII code can be used. Easy to remember codes are:
If you want something that is not in the full list (see the w3c documentation for the full list) then you can use the ASCII code as follows. — for an 'm' dash. You can use the ASCII codes for those that have got easy to remember names but beware that not all fonts have every character that you have in the font version that you are using (possibly the Euro sign as an example). |