PC Plus HelpDesk - issue 258
 |
This month, Paul Grosse gives you more
insight into some of the topics dealt with in HelpDesk.
|
 |
HelpDesk
Editing Fonts in LinuxFont support for rendering text in image files on some systems can be limited and you either end up drawing the characters yourself or you pay for a special font to be made where the glyphs for the range you are interested in are within reach of unmodified keys from the keyboard. On Windows systems, you can get virtually an character from 0x00 to 0xFF by using the following trick:
You can either take an existing font and for your own use (or whatever the terms of use for the font you have in mind) copy the Runic fonts down to the normal key range; or, you can create the ones you need. Two fonts that do carry Runic characters amongst many, many more groups are 'Caslon' and 'FreeMono'. Unfortunately, these do not appear under Windows. However, if you are lucky enough to have, or know someone with a computer with a recent Linux on it (SUSE 10.2 will do), you can run a program called FontForge (You can use Cygwin to run this program but it is essentially built for UNIX-like OSes such as Linux, BSD (and Mac OS X), OpenVMS and so on). To copy a segment of font glyphs, start FontForge and
then go to '/usr/share/fonts/truetype/' and select a font
that has the 'Runes' range. Click on 'OK' and it will
load. |
 Go to the glyph number 0x16a0 and drag the
mouse down to 0x16f0 thus highlighting the Runes range.
Press [Ctrl][C] to copy them, then press [Ctrl][N] to
bring up a new font workspace. Go to 0x0021 and press
[Ctrl][V] to paste the set in the new font. Go to the glyph number 0x16a0 and drag the
mouse down to 0x16f0 thus highlighting the Runes range.
Press [Ctrl][C] to copy them, then press [Ctrl][N] to
bring up a new font workspace. Go to 0x0021 and press
[Ctrl][V] to paste the set in the new font.You can edit/create any of the glyphs by double-clicking on them - you get the glyph editor and you can make the glyphs any shape you like (not entirely unlike the Softy Font Editor). Finally, click on 'Element', 'Font Info', 'General', set the 'Em' size to 1024 and click on 'OK'. Finally, click on 'File', 'Generate Fonts...', select 'TrueType' and click on 'Save'. Transfer this to your Windows machine and install it in the usual manner assuming that this is within the font's license or you have edited your own glyphs. |
 So,
suppose you need to be able to display Runes on your
computer. The Unicode range for Runes is U+16a0 to U+16f0
and Notepad won't display this even if with the trick
with the [Alt] key.
So,
suppose you need to be able to display Runes on your
computer. The Unicode range for Runes is U+16a0 to U+16f0
and Notepad won't display this even if with the trick
with the [Alt] key.
|
 Caslon ranges
 The
Unicode handling on Windows is not ideal and perhaps a
little bit simplistic in some areas.
The
Unicode handling on Windows is not ideal and perhaps a
little bit simplistic in some areas.
|
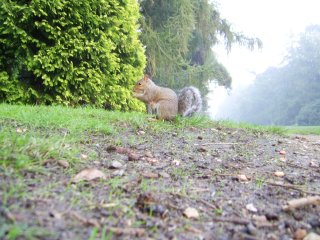
 However, there is a distinct disadvantage to
this and that is, if your image isn't supposed to be
overall neutral, it is going to balance it all out in the
wrong place. However, there is a distinct disadvantage to
this and that is, if your image isn't supposed to be
overall neutral, it is going to balance it all out in the
wrong place.The rabbit above-right is grey and has
come out grey. However, when the colour averaging
technique modifies the levels of the three layers, you
get something like the rabbit on the right - slightly
magenta on a greyed out lawn. |
 The image on the right is the two-colour,
abstract version of the grey rabbit above The image on the right is the two-colour,
abstract version of the grey rabbit aboveand... |
 ...when you apply PaintShop Pro's 'Fade
Correction', you get the image on the right. This is
largely due to the fact that the synthetic image above
has such a small dynamic range. ...when you apply PaintShop Pro's 'Fade
Correction', you get the image on the right. This is
largely due to the fact that the synthetic image above
has such a small dynamic range.However... |
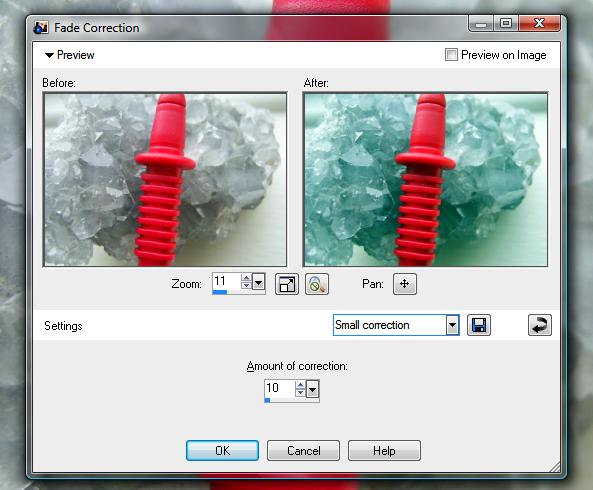 There are real images that will do this
using that tool. There are real images that will do this
using that tool.On the right, 'Fade Correction' is being applied to an image of smoky quartz with a multimeter lead in front of it (not that this is particularly likely, but it is a real image). You can see that the grey smoky quartz has taken on the complimentary colour of the red plastic. Clearly, this is not the right tool for the job. The solution to this is to correct it by hand. You can do this in PaintShop Pro by clicking on 'Adjust', 'Brightness and Contrast' and then clicking on either 'Levels...' or 'Curves...'. Both of these dialogues will allow you control over each colour channel individually: Levels allowing you to trim the top and bottom of the density range and define the gamma; and, Curves allowing you to do a lot more if you need it. Each of these controls allows you to change the image overall or a colour channel at a time. Other image processors also have these two controls and you can see the histogram either in Log or linear scale behind them so that you know which tones already exist. |
 Colour correction
Long FAT file namesMP3 players are all right as long as you know what is happening when something seems to have gone wrong. If you have been using one ripping program and have then either switched to another or have played around with the settings, you might find that your MP3 player has started playing funny tricks on you. These are the symptoms:
And, this is what is wrong. This is a classic 8.3 DOS name problem. The file system in MP3 players is almost always a FAT file system of some sort. FAT stores names in the 8.3 format and then there is an extra file system reference for the human interface. The program that ripped your original MP3 files most likely used a file name format that went along the lines of 'track-number_song-title.mp3' producing, for example, '03_just-what-i-needed.mp3' and '04_drive.mp3'. Your new ripper (or old ripper's new settings) probably saves the 'artist' first. Your new files might look like 'david-bowie_01_future-legends.mp3' and 'david-bowie_02_diamond-dogs.mp3'. In the first case, the 8.3 names will be '03_jus~1.mp3' and '04_dri~1.mp3' and will play in order because the track number appears within the first six characters of the file name so the results of an alph-numeric sort preserve the order. However, in the second case, they all start with
'david-bo' so it depends upon the order they were
transferred to your MP3 player. It might be that 'Diamond
Dogs' was copied before 'Future Legend'. The MP3 player
just sees them as 'david-~02.mp3' and 'david-~04.mp3' and
plays them in that order, regardless of the fact that
'Future Legends' comes first in the long file names.
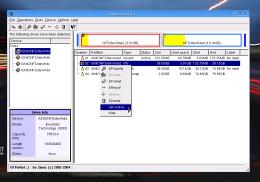
However, with the artist name first, the track number is no where to be seen and you can see in the 8.3 column of the table that the order could be anything. In the screenshot on the right, you can see that I created a number of files of sizes that show up with their size the same as the number in their name. These were then copied across to another directory. In the image on the right, the left hand form shows
that they have kept their long file names correctly and
using the operating system, anybody would think that
there was nothing wrong. However, you can see in the
right hand form that the same files in the same order
(comparing their file sizes) have adopted file names in a
different order - this happened when they were
transferred over. |
|||||||||||||||||||||||
 Really, you only need the name of the artist
first if you put all of your songs all in one directory -
normally, you would keep your artists in separate
directories like so... Really, you only need the name of the artist
first if you put all of your songs all in one directory -
normally, you would keep your artists in separate
directories like so...For new tracks, the solution is to configure the ripping program to put the track number first. For those you already have, just rename the files, putting the track name first. |
|||||||||||||||||||||||
 You can see that with
the track number first, the 8.3 numbers preserve the
order.
You can see that with
the track number first, the 8.3 numbers preserve the
order.Two network interfaces in WindowsYou might have network shares on your LAN that look like this... |
 |
However, if you have two network interfaces with one plugged into your LAN (which probably goes to the router via a firewall) but the second goes directly into your router you might well find that when you plug in the second lead, all of your network shares disappear from my network folder. So, should this happen?
The reason is that Windows is keeping your LAN - with all of its shared resources - secure. If you were to change this behaviour, Windows would need to know how to handle two network cards with different firewall properties and routes (traffic is only permitted to start connections from one of the cards; only certain ports are open on the other; maybe the traffic on some ports has to be routed to a specific IP address on the LAN; and, so on.). It is safer for the average user not to have to think about this and for Windows not to give them the option. Opening a dual-homed machine with access to a LAN can allow unauthorised users access to resources if they compromise any program that has initiated a connection - web browser plug-in buffer overflows, plug-ins with vulnerabilities and so on. So, it is in your interests not to play around with this and remember that if you just unplug or disable your second connection (ie, take down the link), your shares will appear automatically again. |
 Well, yes
it should happen and you really shouldn't do anything to
change it. If you have a wireless card on your machine,
when you activate that, you should see the same thing
happen.
Well, yes
it should happen and you really shouldn't do anything to
change it. If you have a wireless card on your machine,
when you activate that, you should see the same thing
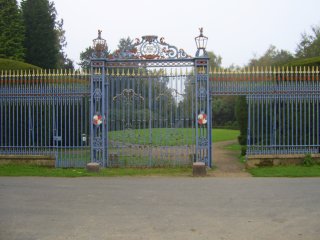
happen.Motion blurYou will find that motion blur normally equates to camera shake. However, there are ways of applying this effect so that it makes it look like motion blur and not camera shake. Supposing you need to have an object on your website to have motion blur and be transparent so that you can put it on any background.
Normally, we imagine blur as the moving object with a trace of itself following its movement, with a stationary background. So, let's create that. First of all, straighten up your image then copy it to
the clipboard (highlight all of it - normally this is
done by pressing [Ctrl][A]) and paste it as a new image
(so that we don't mess up the original). We need this so
that we can scale the moving object so that it looks
okay. |
 Next, select your moving object (this should
be lit similarly to the background so that it looks as
though it could be in the same picture [good old
British weather giving us overcast days so that the
lighting is flat]), straighten it up and cut it out
- pasting it into a new image will do. Next, select your moving object (this should
be lit similarly to the background so that it looks as
though it could be in the same picture [good old
British weather giving us overcast days so that the
lighting is flat]), straighten it up and cut it out
- pasting it into a new image will do. |
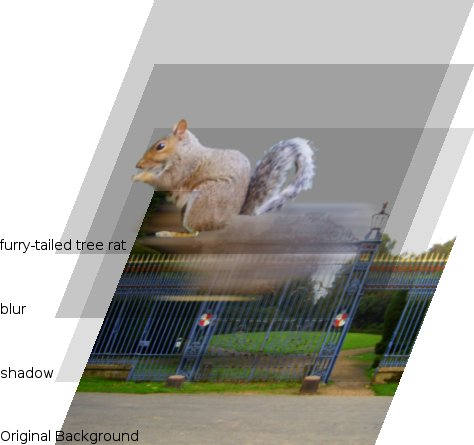 Now, put the moving object image into the
background as a new layer but do it twice. The upper
image is going to be our sharp object and the image below
it is going to be our blur. If your moving object has
highlights on it, you might want to make a third image
that has just the highlights on it (use a threshold
function to isolate them and then paste that as a new
image) and put that over the sharp object ready to be
blurred to the same extent as the other layer. Now, put the moving object image into the
background as a new layer but do it twice. The upper
image is going to be our sharp object and the image below
it is going to be our blur. If your moving object has
highlights on it, you might want to make a third image
that has just the highlights on it (use a threshold
function to isolate them and then paste that as a new
image) and put that over the sharp object ready to be
blurred to the same extent as the other layer.Now, you can scale the background or the other objects so that they look as though they are in the background image. Next, you need to blur the moving object (and its highlight layer if it has one) so select that layer and blur it by selecting motion blur and then play around with the strength and angle until you have what you want. After doing this, you can add a transparent layer and add a shadow to it if you want to. Next, change the transparency of the blurred layer and the top object layer until you have the effect you want whether that is a rocket powered squirrel or a dialogue box in motion.
|
Note that Internet Explorer has caught up with all of the other browsers and now supports intermediate levels of transparency. Click on the image on the right to open up a web page with a small demonstration of one way of putting two images together so that it looks like the one on the right. If you want to look at the code or the images, click here to open up a browser in a new window. |
 The motion
blur effect will produce a linear blurring on either the
whole image or a selection from it, depending upon how
you use it - on more advanced image editors, you can use
a zoom or radial blur in addition to a linear blur. If
you want to use it to create the illusion of motion, you
need to think about how this should be represented in
your image.
The motion
blur effect will produce a linear blurring on either the
whole image or a selection from it, depending upon how
you use it - on more advanced image editors, you can use
a zoom or radial blur in addition to a linear blur. If
you want to use it to create the illusion of motion, you
need to think about how this should be represented in
your image.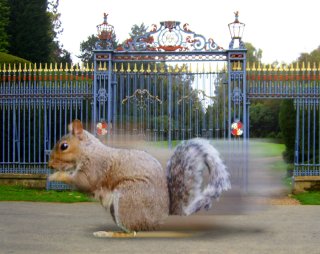
Password recovery
You might hear people telling you that all you have to do is boot up into KNOPPIX and delete the password file but deleting a file on an NTFS partition involves writing to it. Microsoft have failed to make NTFS an open standard so nobody outside of Redmond really knows how to write to it 100 per cent safely. However, it is safe to read from it. There is a bootable CD ISO that you can download called 'Ophcrack' from Objectif Sécurité (ophcrack.sourceforge.net). Burn a copy to a CD, load it into the computer in question and boot it up - it is a cut-down version of SLAX so it won't write to any disc. Ophcrack will load automatically, locate the password files and start work. Note that this is also compatible with Windows Vista
password files. |
 Ophcrack starts off with the LanManager
hashes, using various strategies, covering around 99.95
per cent of all alphanumeric passwords (80,603,140,212)
but because of a design error in the way that LanManager
works with passwords - it's case-insensitive and creates
two hashes from passwords longer than 7 characters -
these 158,967,304,308 hashes are equivalent to
6,496,866,212,035,331,404,944 passwords of length 1..14
(but only using upper case letters - if you had lowercase
letters as well, they are equivalent to
12,605,077,130,307,650,304,141,546 passwords). Ophcrack starts off with the LanManager
hashes, using various strategies, covering around 99.95
per cent of all alphanumeric passwords (80,603,140,212)
but because of a design error in the way that LanManager
works with passwords - it's case-insensitive and creates
two hashes from passwords longer than 7 characters -
these 158,967,304,308 hashes are equivalent to
6,496,866,212,035,331,404,944 passwords of length 1..14
(but only using upper case letters - if you had lowercase
letters as well, they are equivalent to
12,605,077,130,307,650,304,141,546 passwords).The LanManager passwords are the two hashes of the first 7 characters and the last 7 (depending upon the length of course). So if you had the password 'PinKyPerKy', you would end up with two password hashes, based on 'PINKYPE' and 'RKY'. You would also get the same LanManager password hashes if you used 'pinkyperky' or 'pInKyPeRkY' and so on. So, all you have to do is store the hashes for 1 to 7 character passwords, but only of one case for the letters of the alphabet. Once you have the results from the hashes for the LanManager passwords, (in our example, it would be 'PINKYPE' and 'RKY', we just have to do a binary case adjustment until we get the same password for the NT password (which is case sensitive). So, we would try: pinkyperky pinkyperkY pinkyperKy pinkyperKY pinkypeRky pinkypeRkY pinkypeRKy pinkypeRKY pinkypErky pinkypErkY ... and so on, right through to... PINKEYPErkY PINKEYPErKy PINKEYPErKY PINKEYPERky PINKEYPERkY PINKEYPERKy PINKEYPERKY Their is a saying that 'if you lose your keys at night, only look under the lap posts'. It effectively says look in the places you are most likely to find something - saving the more difficult places until last. Recovering your lost password is a little like this. People are unlikely to choose 'Y2,d94PsD2', they are more likely to choose 'j3nny6' or 'Yell0wD0g'. Taking into account the fact that many people only use letters of the alphabet in their passwords, they are the tables used first when trying to recover the passwords. Next, people will tend to add numbers to the letters. Sometimes, they will substitute letters for numbers so an 's' becomes a '5' and a 'b' becomes a '6' and so on. Some password recovery programs look for this as a separate exercise although ophcrack doesn't. Finally, hashes created using all alphanumeric and punctuation characters are compared. Some systems will not have the LanManager passwords turned on and so the only place left to try is the NT Passwords. These not only have the numbers, punctuation characters and uppercase letters in, they also have lower case letters. You can download this file and use ophcrack to break them. Of course, this tool - like every security tool - is a double edged sword and can be used to crack people's passwords in a dishonest fashion. By looking at the way it is done for an honest scenario (I have used it to recover the admin password from a friend's laptop), you can see how to make your passwords more secure (don't allow the LanManager to store hashes; use long passwords; use alphanumeric, upper and lowercase, punctuation characters). However, by making it more difficult for the dishonest user, you are making it more difficult for yourself when you need it. The best way of keeping your passwords safe is to keep the machine physically safe and to make sure that any server on it is well patched and configured in a secure manner. Ophcrack is reasonably quick - it is based upon a time/memory trade-off using rainbow tables which is a new variant of Hellman's but with better performance - the example in the screenshot above taking around 15 minutes. Now knowing the password, there is no need to write anything to the disc and you have avoided having to explain to other users why their accounts don't have a password any more. If the LanManager passwords haven't been enabled, you will need to download the full NT hash database file. |
Retaining permissions on Floppy Disc drives
So, how do you manage to preserve the file permissions on a floppy diskette? To save such information on a FAT-formatted diskette, you would need to use a file of some sort to save the information - there would be no way of protecting it. However, FAT is not the only file system you can use on a floppy disk. In the screenshot, you can see a floppy that has been formatted with Minix - OpenSUSE's YaST allows you to format floppies in Ext2, Fat and Minix. You can see that instead of inheriting the UID, GID and permissions of the user that mounted the diskette (often '-rwxr--r--') or are described in /etc/fstab, as would have happened with FAT, when Minix or Ext2 is used, permissions are preserved. Just for the morbidly curious, you wouldn't really want to use '-rwxrwSrwt' as the permissions on a midi file - this is just to demonstrate that user, group and permissions are preserved. |
 Floppy
diskettes have their place and, contrary to what some
people might think, they are current. However, because
many people first encountered floppies on machines using
MSDOS or Windows, they think that they have to be
formatted using a FAT file system (after all, flash
drives all come formatted with FAT so why should the
floppy be any different?).
Floppy
diskettes have their place and, contrary to what some
people might think, they are current. However, because
many people first encountered floppies on machines using
MSDOS or Windows, they think that they have to be
formatted using a FAT file system (after all, flash
drives all come formatted with FAT so why should the
floppy be any different?).Beryl Window Manger
Here, we have the Beryl window manager (forked from compiz) which has features that range from very useful to utterly frivolous but who is to say which camp any one falls into? Now that Microsoft Windows Vista has caught up with other OSes by having its [Alt][Tab] list form as a large row of images, depicting what each particular window looks like, we can all enjoy the same. However, it doesn't stop there. |
 On Vista, you can also get an additional
view of the images all in line (like a queue) by pressing
[Win][Tab], effectively using the Windows key like a
modifier (in the same way that [Tab], [Shift], [Ctrl] and
[Alt] are). On Vista, you can also get an additional
view of the images all in line (like a queue) by pressing
[Win][Tab], effectively using the Windows key like a
modifier (in the same way that [Tab], [Shift], [Ctrl] and
[Alt] are).Here, you can see a number of windows queued up, ready for one of them to be selected. However, you can do the same thing with a UNIX
desktop. |
 One thing that you don't have though is a
[Flag] modifier key. One thing that you don't have though is a
[Flag] modifier key.You do have a [Super] key though and on a Windows keyboard, it is the one with the Windows flag on it. If you have a Linux keyboard, it will most likely have a penguin on it (and, I dare say that if the keyboard manufacturers got enough requests from various other OS users, you could eventually find keyboards with the BSD devil, the OpenBSD Blow Fish and so on). In the Beryl keyboard shortcuts and elsewhere in the
UNIX desktop windows, you will see 'Super' as a modifier
key and on the right, you can see which one it is. |
 Here is what you get if you press it with
the [Tab] key using Beryl. Here is what you get if you press it with
the [Tab] key using Beryl.Instead of a queue, you get them going around in a circle. Whilst all of this is going on, you can see that any windows that have live content will still continue to have this content updated. Beryl and Compiz aren't about copying Windows or Mac OS X though. If you look at what is available on them, you might thing that they are about pushing Windows and OS X firmly into third place and whether they are or not, that is what they do. For a start, you can, as has been the case for many years, have more than one desktop on a UNIX system and whilst people like me might have 10 or 12, most people find that four is a good optimum. So... |
| The Beryl GUI is based around a cube
(usually) upon which you have four desktops. Each one is
what you would normally see on a Windows or Mac OS X
machine but here, you can space yourself out and improve
your way of working. |
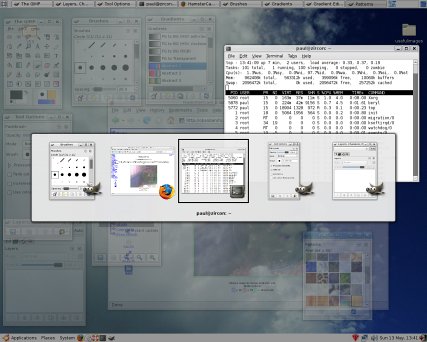
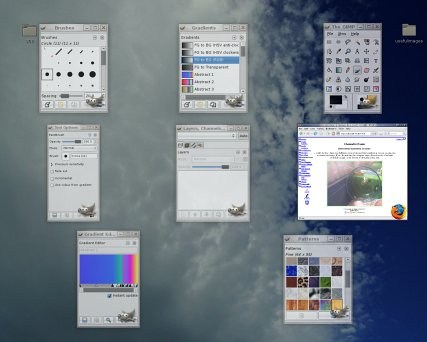 One of these is that if you have a cluttered
desktop, move the mouse to (usually) the top-right corner
and all of the windows on that desktop will spread
themselves out, with any scaling and you can click on the
one you want (or use the cursor keys and press enter).
When you click on the window, it will merely select that
window - the mouse click is not passed on to the window
so it doesn't matter where on the window you click. One of these is that if you have a cluttered
desktop, move the mouse to (usually) the top-right corner
and all of the windows on that desktop will spread
themselves out, with any scaling and you can click on the
one you want (or use the cursor keys and press enter).
When you click on the window, it will merely select that
window - the mouse click is not passed on to the window
so it doesn't matter where on the window you click.You can configure this so that it displays all of the windows for:
You can activate the corners and edges of the desktop,
assigning functions to each so, you could, as an example,
make the top-right corner display windows for the current
application, the top edge for all windows on that desktop
and the top-left corner for all applications on all
desktops. |
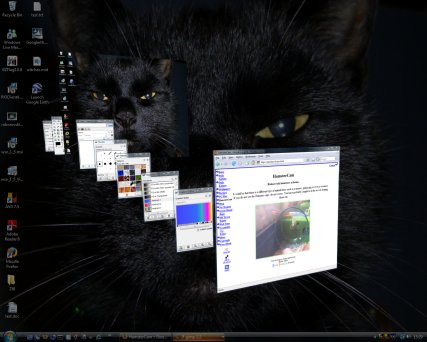
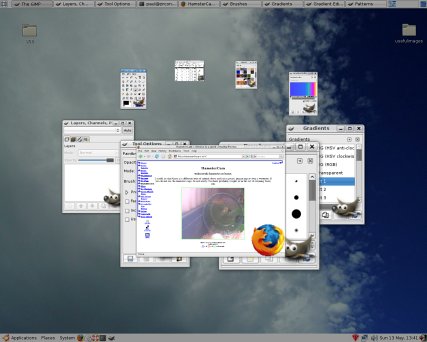
| If you want to change desktop, just hold
[Ctrl][Alt] and drag it sideways with the mouse. Whilst
you are doing that, the desktops become partially
transparent so you can see the other faces. Note that in
the screenshot below, on the face at the back, you can
see a web browser that is partially transparent and in
front of that (if you were viewing it from its front) is
an opaque browser window with a large picture at the
bottom. From that desktop's front, the transparent window
is hidden by the opaque one but because we are looking at
it from behind (all of the writing is back to front), we
can see through it to the opaque window. Also, note that
windows are displaced by different amounts from the
desktop so that when one window is covering another, it
is moved so that it is in front of it. |
 |
 You can change the transparency of
individual windows by holding down [Alt] and scrolling
the mouse although you can configure any buttons to do
these actions. You can change the transparency of
individual windows by holding down [Alt] and scrolling
the mouse although you can configure any buttons to do
these actions.Also, when you drag a window, it wobbles
like a piece of jelly and when you drop it in place, a
ripple propagates across the screen. |
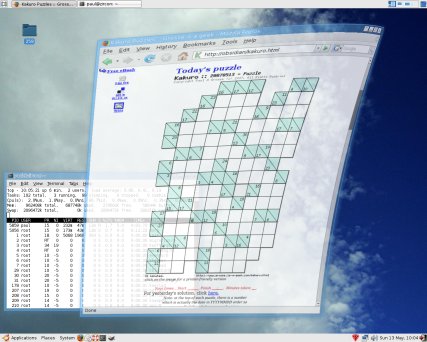
 This is a maximized window that is being
dragged from the top right. The whole thing bends,
allowing you to see what is underneath. This is a maximized window that is being
dragged from the top right. The whole thing bends,
allowing you to see what is underneath. |
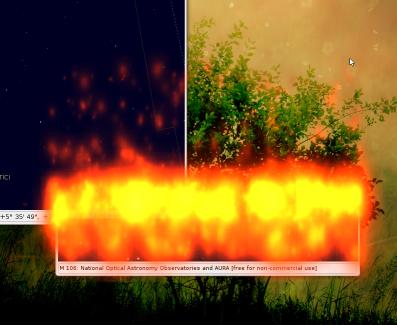
 If you hold down [Ctrl][Super], your mouse
will create a ripple which you can move around like
running your finger around a shallow bath. If you hold down [Ctrl][Super], your mouse
will create a ripple which you can move around like
running your finger around a shallow bath.Pressing [Shift][F9] creates a rainstorm (on the right) and [Shift][F8] clears it away with a windscreen wiper (pressing those keys again turns them off). The settings for the rainstorm can be changed and so as to allow you to see the effect more easily, I have increased the depth (which enhances the effect). When it is set to its default, it is quite possible to
work with it running (unless you are doing image
processing of course). |
 This is part of the shot above at normal
size so that you can see what the effect is like. This is part of the shot above at normal
size so that you can see what the effect is like. |
 If you hover the mouse over the items in the
task bar, you can also see what they look like, like so. If you hover the mouse over the items in the
task bar, you can also see what they look like, like so. |
 Minimising, maximising, killing, restoring
windows allow you to choose from rolling them up or
beaming them up to setting fire to them and there are
plenty of other effects to choose from. Minimising, maximising, killing, restoring
windows allow you to choose from rolling them up or
beaming them up to setting fire to them and there are
plenty of other effects to choose from.Some of these are genuinely useful such as the desktop switching and window picking whilst others, such as the window transitions and rain just have wow value. You have the flexibility to choose what you want. As a matter of interest, I have demonstrated these effects to some people and they do genuinely say; 'Wow.' |
 By having
such as short release cycle when compared to some other
OSes, the free world of UNIX windows managers can listen
to users and develop features very quickly.
By having
such as short release cycle when compared to some other
OSes, the free world of UNIX windows managers can listen
to users and develop features very quickly.Apochromatic lenses
The lens works because light travels slower in glass than it does in air and by using curved surfaces, the light can be bent to focus on the paper. However, not all wavelengths of light are slowed down the same. If you look towards the edge of the image, you will find that areas of high contrast will produce rainbows because of this effect - called 'dispersion'. Not all transparent media are the same though. Some have higher dispersions than others and by using crown glass and flint glass with the convex lens being stronger than needed but using a concave lens to correct this, two wavelengths of light can be made to have the same focal length. These lenses are called 'acromatic'. Hence, using three glasses, you can focus three wavelengths - these lenses being called 'apochromatic'. With careful design, the three wavelengths can be made to coincide with the peak sensitivities of the three colours used in the camera's sensor. On the right, you can see how red green and blue have the same focal length. If you were using this technique for astronomical purposes, you might want to make the lower crossover point somewhere in the infrared. Another advantage is that they are designed to correct for spherical aberration at two wavelengths instead of just one so overall, the image is at least an order of magnitude better than those produced by acromatic lenses. |
 A single
lens will focus light from a distant point - such as the
sun - to a single point (as a child, we have all burned
our names on pieces of paper using this).
A single
lens will focus light from a distant point - such as the
sun - to a single point (as a child, we have all burned
our names on pieces of paper using this).Installing Vista on occupied drives
Many people have been having problems with this: they
have unplugged all of their drives except one; and,
deleted all of their partitions, including any OSes that
were already there such as Linux. However, the user ends
up with a system with only Windows on it and only one
partition, covering the whole drive. |
This critical point is that Windows needs to be installed on the only 'Active' partition on the system so that when the computer boots up, it looks there first. It's easy to see why the average user ends up with only Windows on their system. So, how do you get it to do what you want? |
 All you need to do is to run a KNOPPIX live
CD. (You can download the ISO image from http://www.knopper.net/knoppix/index-en.html.) All you need to do is to run a KNOPPIX live
CD. (You can download the ISO image from http://www.knopper.net/knoppix/index-en.html.)Insert the CD and boot up the machine. Once KNOPPIX is running, you need to be root so click on the 'Konsole' icon at the bottom and then enter 'su'. Now, enter 'qtparted' and you will be able to see all of your drives. In the left pane, click on the drive you want to edit
and you will then be able to see its partitions in the
right-hand pane. |
 In the listing, you can see which partition
is active - this should be your other OS's partition so
make a note of which one it is. In the listing, you can see which partition
is active - this should be your other OS's partition so
make a note of which one it is.Next, right-click on the Windows partition and in the menu, click on 'Set Active...' and select 'Yes' in the confirmation dialogue. Finally, in the main menu, under 'File', click on 'Commit'. If your system is a multi-hard-drive system, you need to go through the other drives to make sure that none of the other hard drives have active partitions on them as well. If, say, you intend to install Vista on your second hard drive and you already have an active partition on your first - where your primary OS is located - you will have to click on that drive (in the left pane), right-click on the active partition in the right pane (having made a note of which one it is, of course) and you will notice that the active partition entry in the menu has a check-box that is ticked. Click on that to uncheck it and then, in the main menu, under 'File', click on 'Commit'. Once it has finished, reboot the machine. The KNOPPIX CD will be ejected and at that time, insert the Windows Vista DVD. Install Windows as normal, selecting your active partition and when you have finished, load up KNOPPIX and reset the active partition(s) to your original partition choices. Note that if you have Windows on another partition on another drive, Windows will have set it as active as well so that it can use the bootloader in that partition. You need to check these other partitions out before you know your systems is the way it was. All you need to do after that is edit the Grub menu file to include Windows. |
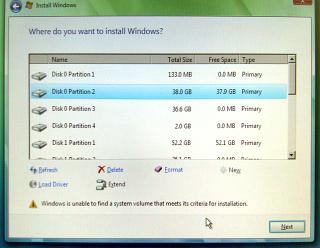 If you
have a hard drive with Linux already installed on it and
want to install Windows Vista on a spare partition on
that drive you might find that the DVD starts okay and
you type in your registration number and so on but then
it says; 'Windows is unable to find a system volume that
meets its criteria for installation'. Note that this can
happen after you have formatted a partition using the
Windows Vista install program's partitioning section.
If you
have a hard drive with Linux already installed on it and
want to install Windows Vista on a spare partition on
that drive you might find that the DVD starts okay and
you type in your registration number and so on but then
it says; 'Windows is unable to find a system volume that
meets its criteria for installation'. Note that this can
happen after you have formatted a partition using the
Windows Vista install program's partitioning section.Dual-booting into Vista
The scenario is like this... You've changed the active partition to an NTFS partition, installed Windows Vista and changed the active partition back to what it was. Now, all you need to do is configure your bootloader so that it runs Vista. For the reason that Windows does not comply to the Multi-Boot Specification, you will need to chainload it from Grub (although you might argue that that makes it easier because if Windows changes, you don't need to go changing your /boot/grub/menu.lst file). So, as root, open up '/boot/grub/menu.lst' and add the lines... title Windows Vista chainloader (hd0,1)+1 ...assuming that it is on the second partition of the first hard drive. Save the file and when you next boot up, you will get your Vista line included in the choices for an OS to load. |
 Microsoft
have failed to make Vista
Multi-Boot-Specification-compliant. However, dual-booting
into Vista isn't that difficult when you know what to do.
Microsoft
have failed to make Vista
Multi-Boot-Specification-compliant. However, dual-booting
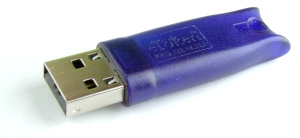
into Vista isn't that difficult when you know what to do.Aladdin eToken
The Aladdin eToken - a small USB token (above-right) - with Web Sign-On will do what we want here. There are two pieces of software to download and install: a Public Key Infrastructure (PKI) client program and the driver (XP and 32-bit Vista - it wouldn't work on 64-bit Vista). With the software installed, you plug it in, load up Internet Explorer and right-click on the toolbar. In the menu that appears, click on 'Web Sign On' which makes it appear as another toolbar. Next, browse to a password protected site and the
eToken WSO window will appear over the normal
authentication window. Enter your UID and PWD for that
site/realm and click on 'Process' and then, when the
'Save Profile' form appears, click on 'OK'. |
 Next, if this is the first time you have
used the eToken in the session, you will have to type in
your eToken password. Next, if this is the first time you have
used the eToken in the session, you will have to type in
your eToken password.Click on 'OK' and it is saved, the authentication form filled in and you are logged into the site. Now that you are logged into your eToken, it will automatically log you into any site that it knows about. You will need the driver loading onto each machine you use but all you need to do is take the eToken around with you - the UIDs and passwords are not remembered on any of the machines and as you have never typed them, a keylogger won't be able to pick them up. |
 Many
people have PassWorDs and UserIDs for many websites and,
of course, they all need to be different. However, one
solution - and not a very secure one - is to use your own
Single Sign-On (SSO) system where, effectively, you have
one UID and PWD for use on all of the sites. This might
sound convenient - you only have to remember two strings
- but if they should become compromised, you will have
awarded somebody access to all of those sites. It is
clearly better to use a different UID and PWD for each
site but then, you get the problem of having too much to
remember and the usual way of solving that is to write
the UID/PWD combinations down on a piece of paper. It is
far better to store them electronically and securely if
you can.
Many
people have PassWorDs and UserIDs for many websites and,
of course, they all need to be different. However, one
solution - and not a very secure one - is to use your own
Single Sign-On (SSO) system where, effectively, you have
one UID and PWD for use on all of the sites. This might
sound convenient - you only have to remember two strings
- but if they should become compromised, you will have
awarded somebody access to all of those sites. It is
clearly better to use a different UID and PWD for each
site but then, you get the problem of having too much to
remember and the usual way of solving that is to write
the UID/PWD combinations down on a piece of paper. It is
far better to store them electronically and securely if
you can.