PC Plus HelpDesk - issue 239
 This month, Paul Grosse gives you more
insight into some of the topics dealt with in HelpDesk This month, Paul Grosse gives you more
insight into some of the topics dealt with in HelpDesk
|
HelpDesk
Internet Survival Time
|
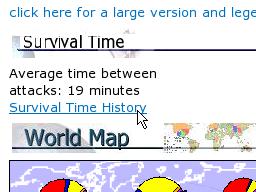 If
you are thinking about pointing a new Windows
machine at the Internet so that you can do online
updates, you need to take into account the
Internet Survival time and make sure that you
have a firewall installed and turned on.
If
you are thinking about pointing a new Windows
machine at the Internet so that you can do online
updates, you need to take into account the
Internet Survival time and make sure that you
have a firewall installed and turned on.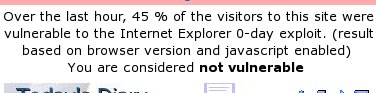
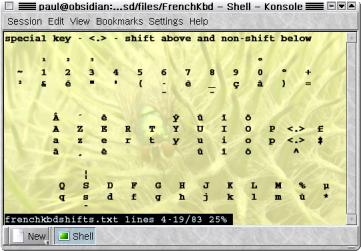
French Keyboard - Key Locations
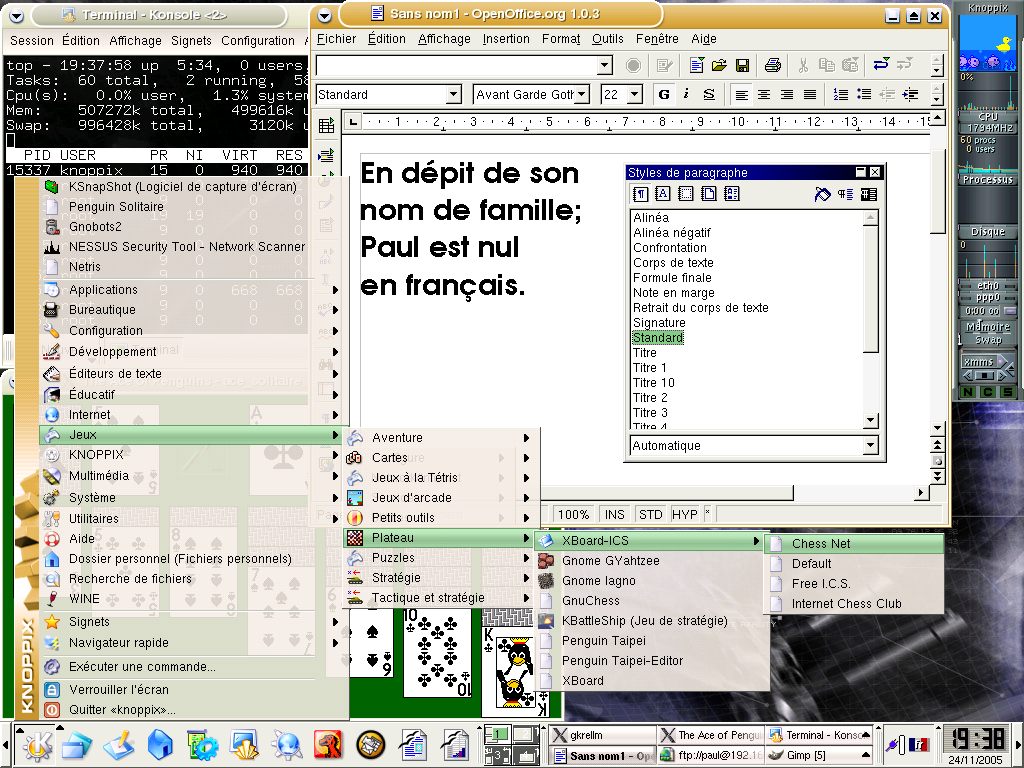
Here, we look at the French Keyboard because it produces problems that are analogous to the problems you will find if you happen to have any of the hundreds of other keyboards. Note that this poses no problem at all if you touch-type in the language of the keyboard you are mapped to - if you can touch-type on a French keyboard, it doesn't matter what legends the keys have on them as it will always come out in French if you see what I mean. I know this because a number of years ago, I used to run (as well as perform in) a modern jazz sextet and we had to have a technical specification for venues so that they would know how big a stage to provide us with, where acceptable places for power outlets would have to be (along with their ratings), the weight bearing capacity of the stage for various load types (things like speakers, drums and so on which would produce spread-out or concentrated loadings) any requirement for external amplification and so on. Not only was this in English but it also had to be in German on the back. So, I ended up typesetting a complete German translation on an English keyboard. After a while, I got used to the way that German words are spelled in the sense that when anybody types, they perform finger patterns on the keyboard. Whether you are spelling 'necessary' or 'schlagzeuger', with a bit of experience, you are performing a pattern rather than trying to remember how to spell something. Especially when you have to remember the key sequences for characters with accents. There are many ISOs out there and you can try this one out for yourself using the French MiB KNOPPIX ISO - see below in the 'Other Live CDs' section about getting yourself a copy. With French, accents dictate that the number row has special characters and the more common accents 'é', 'è', 'ç' and 'à'. These are used more commonly in French than the number keys (in normal use) so you will find that to access the numbers, you need to press [Shift] key. This is just making life easy for the people who would normally use such a keyboard. Also, we find that the [Alt][Gr] key has a use other than stopping you from using the space bar by accident when you go for the flag key. To get to '#', '{', '[', '@', ']' and '}', hold down [AltGr] and press '3', '4', '5', '0', '-' or '=' respectively (on a UK keyboard). The left side of the keyboard is different in that: 'q', 'w', 'a' and 'z' are replaced by 'a', 'z', 'q' and 'w' respectively whereas on the right side, 'm' is to the right of the 'l' instead of on the bottom row. As for punctuation, you need to look at the file - see below. To get a number of other accents and other special characters, one of the keys - the '[' key - has been taken over as a special key. You press this and then press the target key and it modifies the output. Without pressing the shift when pressing '[', you get a caret. If you press the target letter without a shift, you get the lowercase version (such as 'â') and with the shift, the uppercase version. If you press the '[' whilst holding the shift, you get an umlaut (two dots above the letter) in the same way (as in 'ä'). You can see the layout file, as gleaned from my own computer with a French OS, by clicking here - it will open up the file in a new browser. You can also see some of the basics of other keyboard layouts by clicking here although you will need to set the character encoding to UTF8 to see the Cyrillic characters properly. |
 Sometimes, we end up
with a keyboard that doesn't match the layout that the
computer is expecting and we end up pressing keys that
are labelled quite clearly but produce something
different on the screen. Normally, this happens to people
using the KNOPPIX distribution which has a default US
keyboard and we (in th UK) get the @ and " in the
wrong places although there are other keys that do this
as well.
Sometimes, we end up
with a keyboard that doesn't match the layout that the
computer is expecting and we end up pressing keys that
are labelled quite clearly but produce something
different on the screen. Normally, this happens to people
using the KNOPPIX distribution which has a default US
keyboard and we (in th UK) get the @ and " in the
wrong places although there are other keys that do this
as well.French Keyboard - Changing Layout
|
 Learning
the layout of a foreign keyboard is all right if
you are stuck at a terminal or you have no way of
changing it - or, if you are learning to use it.
However, if you are using a GUI such as the
example in the screenshot - KNOPPIX using KDE -
then there is an easier way of changing it.
Learning
the layout of a foreign keyboard is all right if
you are stuck at a terminal or you have no way of
changing it - or, if you are learning to use it.
However, if you are using a GUI such as the
example in the screenshot - KNOPPIX using KDE -
then there is an easier way of changing it.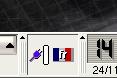 In
the system tray, you will see a flag and in this
case, it has the French flag in it. If you
clicked on it with the left mouse button, you
would get any alternatives that are available -
usually the US keyboard.
In
the system tray, you will see a flag and in this
case, it has the French flag in it. If you
clicked on it with the left mouse button, you
would get any alternatives that are available -
usually the US keyboard.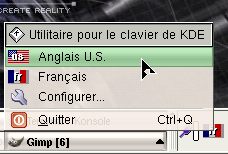 If
you right-click on it, you will see the
alternatives you have available to you.
If
you right-click on it, you will see the
alternatives you have available to you. The
key to all of this is the icons. We need to
configure the keyboard so look for the tool icon
- here, in French, it just happens to have the
word 'Configurer' next to it but you might not be
so lucky on yours.
The
key to all of this is the icons. We need to
configure the keyboard so look for the tool icon
- here, in French, it just happens to have the
word 'Configurer' next to it but you might not be
so lucky on yours.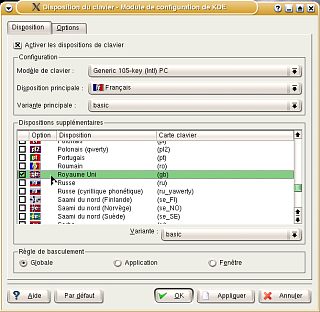 Next,
under the 'Disposition' tab, look in the
'Dispositions supplémentaires' list.
Next,
under the 'Disposition' tab, look in the
'Dispositions supplémentaires' list.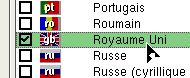 Check
the box and click on the 'OK' button.
Check
the box and click on the 'OK' button.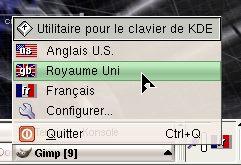 Now,
when you click on the flag in the system tray, it
includes the UK layout and you have back your '@'
and '"' in the right place which you
wouldn't have had if you had just opted for the
US layout.
Now,
when you click on the flag in the system tray, it
includes the UK layout and you have back your '@'
and '"' in the right place which you
wouldn't have had if you had just opted for the
US layout.French Keyboard - Configuring Ethernet Card (KNOPPIX)One thing that you need to do is get in the Internet and unless you have a DHCP server on your subnet, you need to do this manually.
KNOPPIX always asks for things in this order so, if you are experienced with KNOPPIX (or have read this), you should be able to do it regardless of the language used (be it French, German, Dutch or whatever) or how familiar you are with it. If you have your network configured properly - your network address is '0', your broadcast address is '255', your gateway address is '254' and your DNS is also on '254' - it should be able to give you good suggestions once you have typed in your IP address - all you have to do is click on 'OK'. Remember though that if you are typing in IP addresses and masks, that either you need to know where the requisite characters are on the keyboard or you should have already changed the keyboard. For example, on a French Keyboard, 192.168.1 80 turns into &çé:&-_:&:_à so unless you know how to get numbers and full stops (dots), you will be stuck with a job of trial and error. |
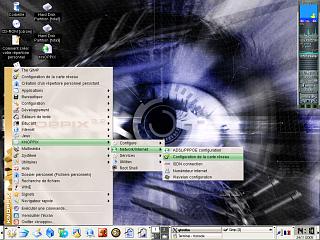 Again,
you are in a position where the only similarity
is the icon set that you can see on other
distributions. However, this is not always there
as you will see.
Again,
you are in a position where the only similarity
is the icon set that you can see on other
distributions. However, this is not always there
as you will see. and
then on 'KNOPPIX'. The KNOPPIX menu item contains
many of the configuration items that are needed
to get KNOPPIX up and running each time so it is
a good place to start
and
then on 'KNOPPIX'. The KNOPPIX menu item contains
many of the configuration items that are needed
to get KNOPPIX up and running each time so it is
a good place to start Next,
click on 'Network/Internet'
Next,
click on 'Network/Internet' 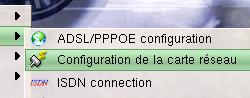 and
then on 'Configuration de la carte réseau'. So
far, we have had icons to guide us.
and
then on 'Configuration de la carte réseau'. So
far, we have had icons to guide us.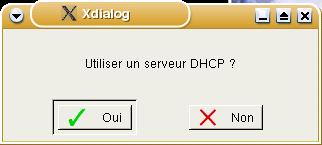 Next,
a form will appear asking; 'Utiliser un serveur
DHCP?'. Fortunately, DHCP is an acronym used
fairly universally as it is an Internet standard
that is fundamental to the way things work.
Next,
a form will appear asking; 'Utiliser un serveur
DHCP?'. Fortunately, DHCP is an acronym used
fairly universally as it is an Internet standard
that is fundamental to the way things work.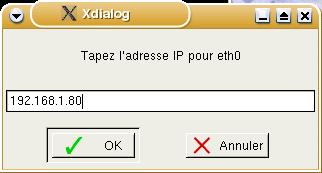 Next,
we get a form with the legend 'Tapez l'adresse IP
pour eth0'. Fortunately, it uses the term
'l'adresse IP' so we can guess that it wants the
IP address of the machine we are using.
Next,
we get a form with the legend 'Tapez l'adresse IP
pour eth0'. Fortunately, it uses the term
'l'adresse IP' so we can guess that it wants the
IP address of the machine we are using.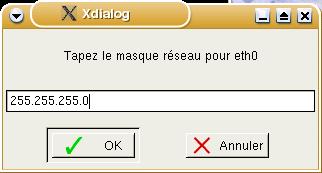 Following
this, we see 'Tapez le masque réseau pour eth0'.
Again, we recognise the word 'masque' so we can
assume that it wants to know the subnet mask.
Following
this, we see 'Tapez le masque réseau pour eth0'.
Again, we recognise the word 'masque' so we can
assume that it wants to know the subnet mask.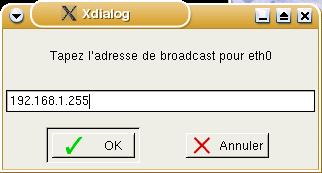 Next,
in 'Tapez l'adresse de broadcast pour eth0', it
asks for the broadcast address - it has the word
broadcast in it. This should be your network
address (in this case 192.168.1.0) ORed with the
inverse of your subnet mask (ie, 255.255.255.0
inverted is 0.0.0.255 so OR this with the network
address and you get 192.168.1.255).
Next,
in 'Tapez l'adresse de broadcast pour eth0', it
asks for the broadcast address - it has the word
broadcast in it. This should be your network
address (in this case 192.168.1.0) ORed with the
inverse of your subnet mask (ie, 255.255.255.0
inverted is 0.0.0.255 so OR this with the network
address and you get 192.168.1.255).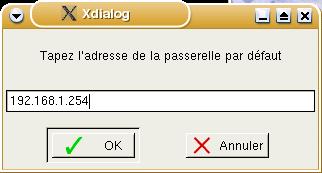 This
one has no clues for the non-French speaker:
'Tapez l'adresse de la passerelle par défault'.
It is clearly an address and it turns out that it
wants the gateway address that you use and, just
to be helpful, it suggests a number - 254.
This
one has no clues for the non-French speaker:
'Tapez l'adresse de la passerelle par défault'.
It is clearly an address and it turns out that it
wants the gateway address that you use and, just
to be helpful, it suggests a number - 254.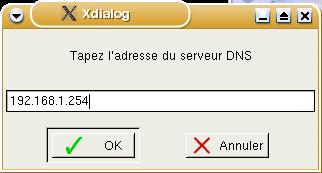 Finally,
in 'Tapez l'adresse du serveur DNS' it asks for
your DNS address and suggests 254.
Finally,
in 'Tapez l'adresse du serveur DNS' it asks for
your DNS address and suggests 254.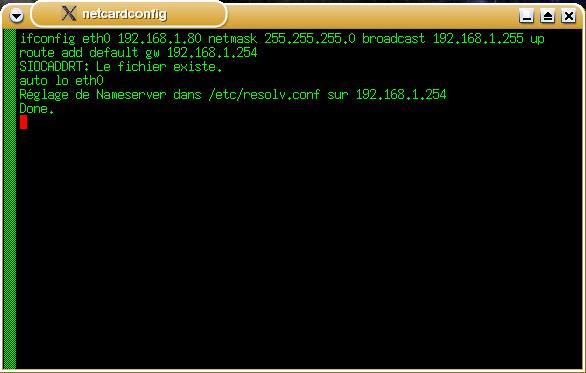
Choosing a PrinterA printer, isn't just for Christmas, if you choose carefully and maintain it well, it can last for life (well, a decade). If you choose a good printer, you can not only make it last for a long time but also, you can have it work with the hardware that you are likely to have in five years or so. This rather begs the question: 'what operating systems will I be running and what will they be capable of?' The answer to this depends on what you are (or are going to be) doing. If you are running a small office or a home office, you will probably need a printer that is capable of producing several hundred sheets within a given month and therefore one of these small printers that only cost around £50 will probably cost a small fortune to run in terms of replacement ink. So ideally, you will be looking at a printer that costs between £150 and £300 that is built to last and, whilst the replacement cartridges for an InkJet would cost, say, £25, you get a lot more mileage out of them and so the running cost is a lot less. There are other considerations though. Many printers today can cost as little as only £50 because they have a chip missing. This started around a decade ago when normal printers of the time would - if you sent an ASCII 65 to them - print out an 'A'. Manufacturers realised that there was a fair amount of computing power in the computer itself and also that when people were printing, they usually weren't doing anything more than watching the printer. With this in mind, they decided that the driver could get the computer to do all of the calculations and just send raw head matrix data down the cable to the printer. By doing this, there was no need for the printer chip that did the work. At the time, these so-called 'GDI printers' cost around £50 less than the ones with a brain. So, at that time, people would generally have a printer plugged into their machine and whenever they wanted to print, they would switch it on and print. The users were on a single-user, standalone machine that wasn't networked at all. Things have changed though. Today, people use networks and you can either buy a network server for a single printer (or up to 3 of them) or, a network printer and, being networked, you can have the printer anywhere and have anybody using it. The idea of having to have a computer switched on all of the time just so that you can use a printer is an abhorrent waste of energy and the planet's future. Also, gone are the days when Microsoft (or Apple) was the only type of OS plugged into your printer. Nowadays, users are more intelligent and use a variety of OSes. In the future, there will be less Microsoft-driven hardware on your networks as people realise that there are cheaper and more reliable alternatives and they switch over to Linux and the BSDs. We don't even know if there will still be a Microsoft in five years time. GDI printing only works with Microsoft (although there are some printer manufacturers that appear to provide MacOSX drivers for these as well) so if you get a GDI ('Brainless') printer, you will be stuck with having to boot up a Windows machine just to use it or having one switched on all of the time. Another thing to consider is whether or not Microsoft will abandon GDI printing - their increasingly inefficient operating systems drive the upgrade cycle as previous hardware fails to provide enough punch to make the new bloated OSes work adequately. So, what printer spec should you be looking for if you want to make your office hardware reasonably future-proof? You need a printer:
|
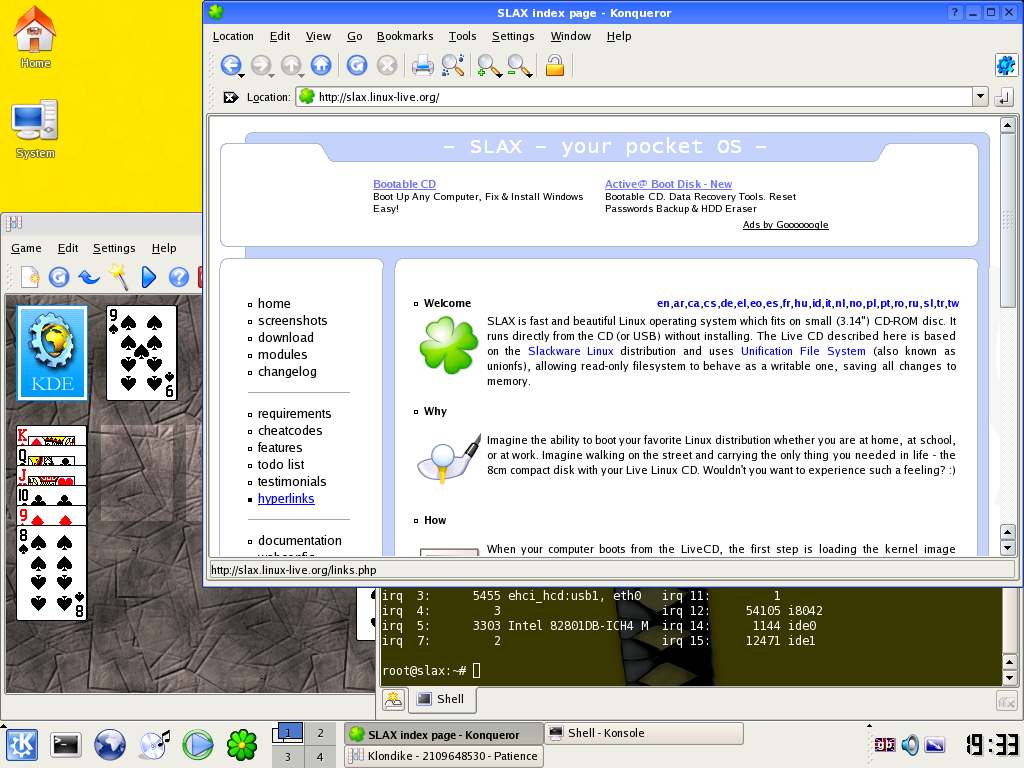
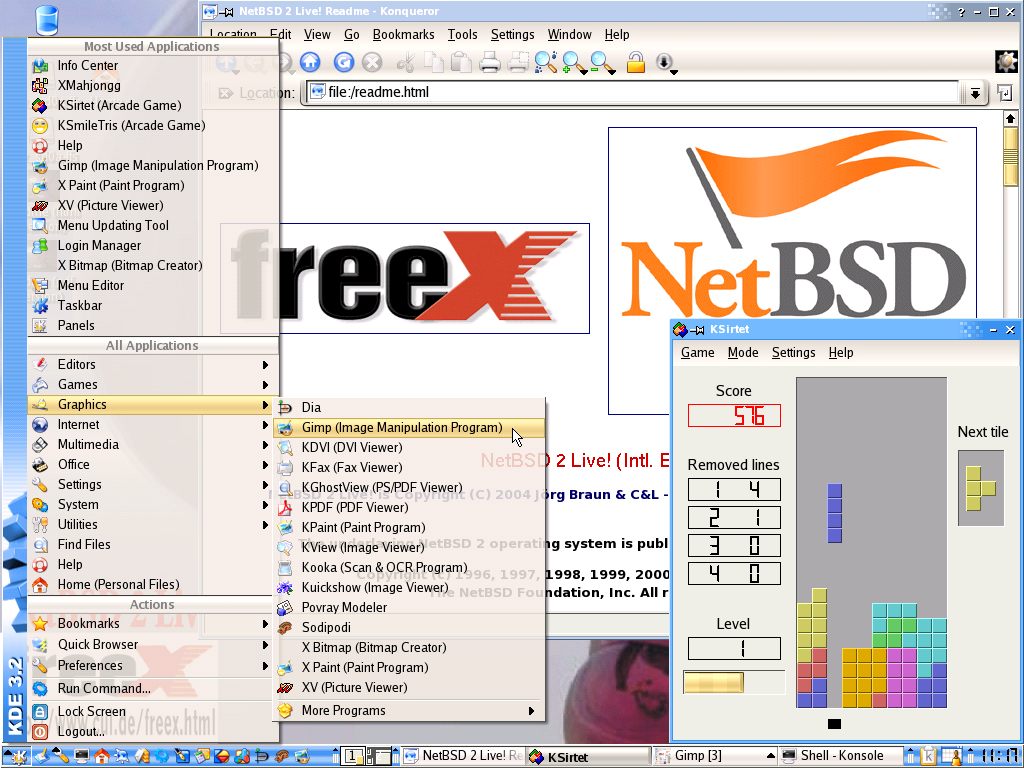
Other Live CDsA live CD distribution is where you can get an operating system up and running from just a CD - you insert the CD and then boot up (providing that your BIOS is set so that it queries the CD before the hard drive). The Live CD doesn't write to your hard drives (you can run them without a hard drive if you so wish) because it doesn't need to. You can, in effect, test out an operating system without damaging your existing, installed system at all. If you do want to write to your hard drive, you must explicitly go through a number of actions and you cannot do it by accident. CDs are, of course, write only as far as booting an operating system is concerned so it takes a special type of operating system to be put onto a live CD. You cannot have a normal version of an operating system that needs to write to a disk when it is booting so you won't find Windows as a live CD. UNIX-like operating systems such as Linux and the BSD families are far more flexible when they boot up and can be made to boot up without writing anything to a hard disk. This makes them ideal. KNOPPIX is also a very good way of recovering files from dead Windows boxes. With KNOPPIX, you can mount another drive or use network storage to copy files from the Windows machine before you try to recover Windows - this normally ends up with a clean install as Windows isn't particularly repairable if something fundamental has gone wrong with one of the files such as a Registry file that wasn't backed up. It is usually better to take the opportunity to upgrade to one of the Linux or BSD distributions than resintall Windows. One of the big differences between Windows and the UNIX-like operating systems is that Windows has a megalithic kernel and you cannot have it without the GUI - you are always tied into the GUI. You cannot change the way that Windows boots in any fundamental way. On the other hand, the UNIX-like operating systems such as Linux use a number of scripts to tell them what to do when booting up and loading X-Windows is only one part of that. In that way, you can edit what the UNIX-like operating systems load and how - it is far more flexible. So, if you want to make your own live CD you can, just by getting all of the relevant parts and assembling it all so that it fits on a CD and doesn't write anything. This flexible approach has led to many different types of live CD for many different uses from playing games in French to forensic analysis of discs. These are some of them.
|
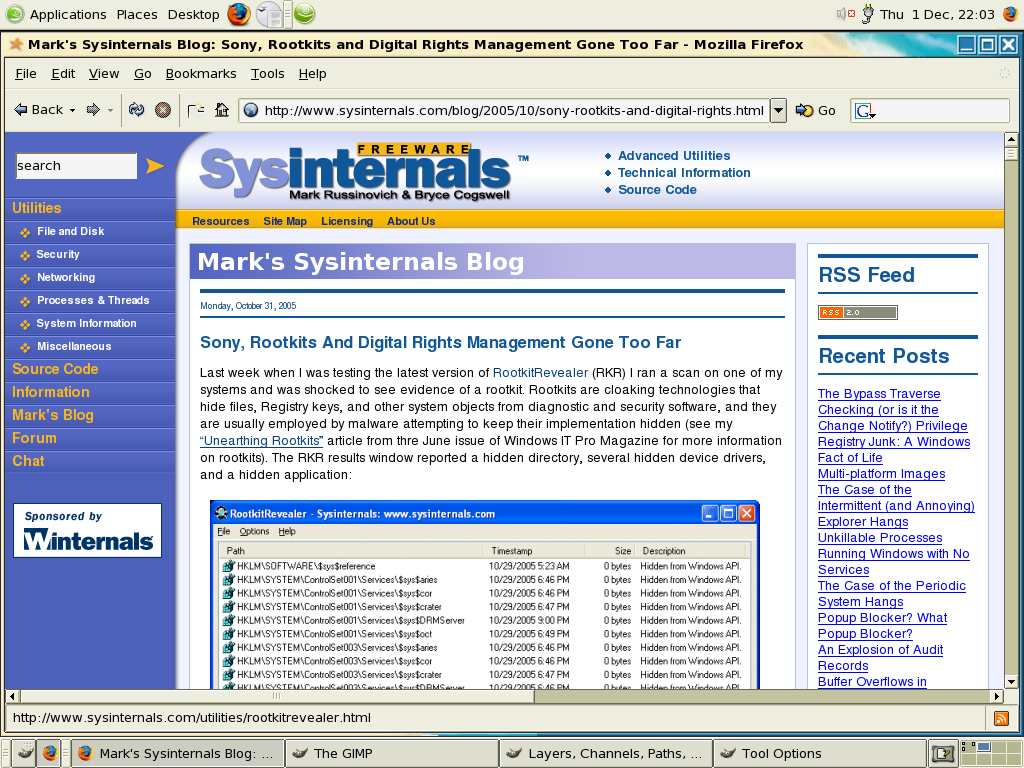
Digital Rights Management Rootkit Trojan
The big problem for any software that attempts to find out how many times a CD has been recorded is that the CD itself is read-only. You can put as many programs on there are you like but they can't save anything on the CD itself. This means that if you want to keep this data then you need to save it somewhere and on the user's machine seems to be a logical place. The problem with using the user's computer to run a program that monitors the system for any copying activity and logs any that is found is that you need to save the files on the system somewhere. Under normal circumstances, you can see the files on the system and then anybody who wants to play unfair can just delete them. So, how can they make it so that people can't see them? They alter the kernel - the heart of the operating system - so that it doesn't display them. The solution to Sony/Bertelsmann Media Group Music Entertainment's DRM problem that they are using in this case is a software product from First4Internet called 'XCP software'. This installs a kernel mode driver rootkit which patches the kernel service descriptor table making itself invisible. All right if they asked you if they could compromise your kernel in this way, except that they didn't and, to make it worse, the program obfuscates its true identity by having a mundane, system-like file name. So, there is definitely a problem and like many large companies, Sony BMG initially denied that there was a problem. They said that the XCP rootkit trojan; 'is not malicious and does not compromise security.' In an interview on US national public radio, president of Sony BMG's global digital business division said; 'Most people, I think, don't even know what a rootkit is, so why should they care about it?' Res ipsa loquitor. The sloppy implementation of this has raised a few eyebrows in the security community, especially as it slows down your computer and makes it less stable. It consumes around two per cent of processor power - polling processes around eight times per second. Another problem is that it is susceptible to race conditions which can bring down Microsoft's megalithic kernel. If that wasn't bad enough, it installs itself in such a way that it even runs when you boot into safemode. This particular version hides files, directories, Registry keys and processes that start with '$SYS$'. Just when you thought it couldn't get worse than that, if you try to uninstall it by almost any means, you may well lose your CD player drives. Sony has given people an uninstaller but apparently, instead of uninstalling the rootkit, it installs another patch and leaves the system in an even worse condition. They have now withdrawn that. So, how far has it spread? It is estimated from DNS cache queries that the Sony DRM rootkit trojan has contaminated at least one machine on at least 568,200 networks in 169 countries. and from comments on the Internet, it seems to have done a lot to make people decide to switch to Linux as it also affects Mac OSX systems as well. With their Windows installations destroyed by the installation and possibly an attempted uninstall of the Sony rootkit trojan, there seems no future and because of the way it has gained access to their machines - being illegal in many places - there is an increasing number of law suits against Sony for this including (currently) at least six class action cases in the US in addition to the State of Texas and the State of California and then there are those in other countries as well. It gets worseIf you thought that Sony's problems were limited to the XCP software, there is another DRM program in use by Sony - some people reckon that there are four such programs. MediaMax is reckoned to be installed on over 20 million CDs and is also outstandingly bad. This one installs files on the user's computer whether they accept or decline the terms of the End User License Agreement. Like the XCP software, it doesn't include any way for the user to uninstall it. Wait for it... The software then sends data about the user back to SunnComm via their Internet connection every time they listen to CDs even though the EULA is explicit that the software won't collect personal information. SunnComm's website even says says; 'no information is ever collected about you or your computer.' In order to obtain an uninstaller for the MediaMax software, users have to request it repeatedly and supply further information about themselves. And, like the XCP uninstaller, security researchers have uncovered the fact that SunnComm's uninstaller opens up more security risks. Even the US-CERT (Computer Emergency Response Team) recommends 'Do not install software from sources that you do not expect to contain software, such as an audio CD'. As Sony has it interests in many pieces of hardware as well as music, people are starting to ask if this type of pernicious DRM software is already in those other product lines. Only time will tell. |
Rootkit Trojan Exploit VirusesSony/Bertelsmann Media Group Music Entertainment's DRM rootkit trojan attempts to protect itself by hiding files, directories, Registry keys and processes whose names start with '$SYS$'. If you ignore the egregious implementation of this with its stability side effects issues, one problem is that it hides from the user, anything that starts with '$SYS$'. So, it was not long before somebody decided to write some malware that exploited this feature. Infection by this malware is not limited to Sony DRM rootkit trojan infected machines but on those machines that are infected by the rootkit trojan, detection of the offending files will be more difficult. At the time of writing, there are already Sony rootkit trojan viruses in the wild so, if you have used a Sony BMG disc that has the trojan, you might not even know it. Fortunately for those in the UK, the CDs with the trojan were aimed at the US market although it is possible for them to have been bought through Internet resellers. If this has happened to anybody in the UK, whether or not you have been infected with a virus, there may be a case against Sony under the Computer Misuse Act. |
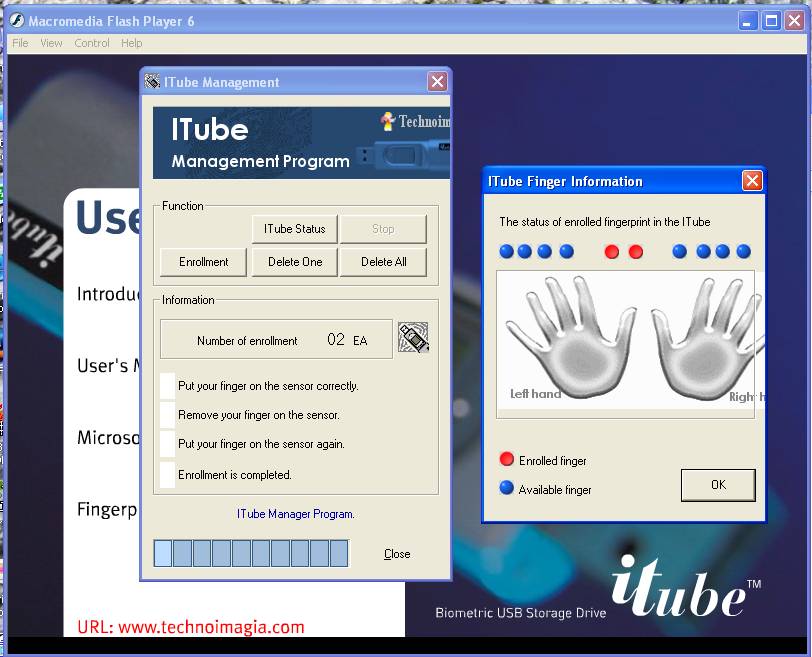
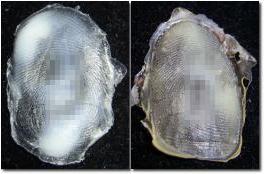
Fingerprint DriveA normal USB-style drive can be used to store a great amount of data - you can, if you are using a UNIX-like system, mount one of these in your home directory and use it for that although the access speed isn't what you would be used to if you were using a normal HDD that was connected directly to your computer. As the data on these is portable, you need to make sure that other people cannot access it. One of the problems with password systems is that the passwords can be picked up by devices as they travel from the keyboard to the computer. In addition to this, password-based devices are limited to using only systems that have the authentication software installed on them. So, ideally, we need some sort of USB flash drive that has self-contained authentication. Looking at the different methods of authentication - passwords, tokens and biometrics - one of the better solutions is to use a fingerprint to authenticate the user(s).
When you plug it into the PC, you have 30 seconds to put your thumb or other enrolled finger on the fingerprint device and it recognise you. Until then, the storage is not readable by the computer. All of the authentication process is dealt with on the flash drive itself meaning that there are no external data streams to intercept. The enrolment manager program (Windows XP) runs directly from the CD and is not installed anywhere although you do need admin rights in order to use it. So, being self-contained, this biometric USB drive should be cross-platform - running on any operating system that accepts ordinary USB drives. I tried this one out of Windows XP (on which it worked well) but on SuSE 8.2, SUSE 10.0, OpenBSD and FreeBSD, there were serious problems. Although it was recognised as a device, and mounted in the file system, the read/write rates were very slow on SUSE 10.0. The next version is currently being developed and hopefully, this will be ironed out. |
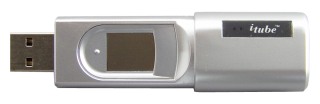 Normally, several
fingerprints would be enrolled so that if you had an
accident (I'm just talking about a cut finger - nothing
too horrible), you could still access the data. The iTube
USB token (manufactured by Technoimagia
Normally, several
fingerprints would be enrolled so that if you had an
accident (I'm just talking about a cut finger - nothing
too horrible), you could still access the data. The iTube
USB token (manufactured by Technoimagia Testing Fingerprint DevicesFingerprints have been used for many years to identify people. The first use of a fingerprint in a crime was a bloody thumb print on a wall at a crime scene. Since then, they have been used and modern electronic sensors do a pretty good job of authenticating the right people. However, the right people are not necessarily the only ones trying to get at your data - if only the right people ever were, you wouldn't have bothered with the extra security in the first place.
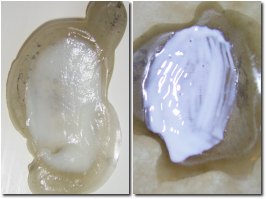
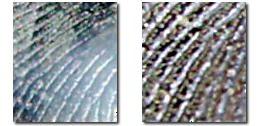
One of the easiest methods is to use a finger print that is already there. If you put your finger on the device and then carefully lift it off again, you should be able to see a fingerprint on the chip. This is not enough to spoof the sensor but if you plug the device in (ie, make it read the sensor) and then breathe on the chip, in some cases, the moisture that condenses on the chip where the fingerprint is will be enough to form a successful authentication. This used to work on some of the older chips such as the Siemens mouse but they have changed the software so that this is no longer the case but that doesn't mean that it isn't with other chips. A simple work around is (and you really want to use that product) to instruct the users that they should always drag there finger off the device once they have been authenticated so that they smudge any fingerprint that is there. For the iTube, I found that breathing on an existing fingerprint did not work (that is to say that it did not authenticate the user). So, if you want to try out another method of attack, try the following. First of all though, there are several types of sensor and this doesn't necessarily work with all of them (or any if you don't do it right). There are essentially two types of attack (assuming that the thing is cryptographically secure enough and your enrolment process is not open to enrolment fraud to a dangerous extent).
In the former case, you can take a fingerprint either by smoking it with cyanoacrylate or dusting it with aluminium, then photograph it, process the image and print it out then mask a piece of etchable surface (PCB will do, use acid to develop the print) and then use that to cast the dummy finger. In the latter case, you can do the following (the last part is the same as in the former case) to test out just how good any given fingerprint system is. To do this realistically, you need to have access to the sort of materials that anybody who wants to break in is going to use so...
You can find out more about this in the interesting document on this at http://wwwcryptome.org/gummy.htm |


Biometrics - Thoughts About User RiskBiometric devices such as fingerprint readers cannot on their own distinguish between:
Unlike passwords, fingerprints can be used when the enrolled user is unconscious. This represents a big problem. The usual way around this is to protect the access with a PIN. Whilst a PIN on its own is very insecure, using it to add to the biometric element of the authentication helps the user. If you have two PINs, one a normal one and one to be used under duress, then if they have a gun pointed at their head, the system can be told to cough up a lump of bogus information without making the assailant suspicious that anything is wrong. Meanwhile the system can contact the police. This has been done with one example being a pharmaceutical company that produces a large quantity of data from dead-end research to act as a honeypot to the assailant. The data is of no commercial value but the assailant would have to be a pharmaceutical chemist to know that it was of no value. So, whilst biometrics can protect your data from certain types of attack on the storage medium, it can put your users at risk and you need to think of ways of making it safer. |
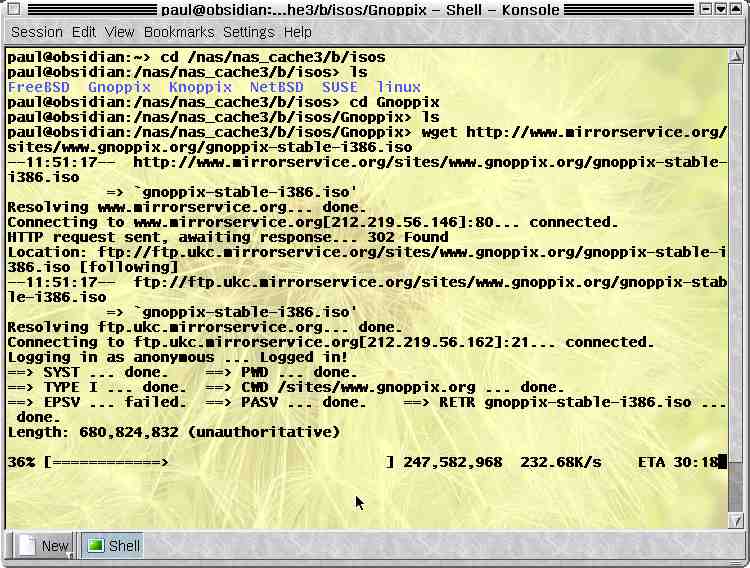
Downloading Large Files Effectively
wget is a program that operates from the command line and can be used not only to download large files but also whole websites. It respects the robots.txt files and, running from the command line, means that you can schedule it to run in the middle of the night. Unlike many programs, that run on Windows, wget is free and, it is also cross-platform so what you learn for using it on Windows will not be wasted if your company ditches Windows. You can get wget from http://ftp.gnu.org/pub/gnu/wget/ (UNIX-like systems), http://space.tin.it/computer/hherold/ (Windows) or http://www.rahul.net/dkaufman/ (DOS) |
Using MD5 HashesOne of the main areas where the accuracy of the contents of a file is required is with a file that has been downloaded. Another is where you have a file of a known state and you want to check that the contents has not change at all. For very short files, it is easy to inspect a file visually or compare it with a backed up file - bit for bit - but this becomes impractical for large files that take a long time to download for for those that it is not practical to keep two copies of. Disc images such as ISOs need to be perfect for the ISO to perform properly and if you have a disc image that is part of evidence, you need to know that it has not been tampered with. So, instead of comparing two images bit-for-bit (imagine doing that for a 700MB download) you can make a hash of the image and compare that with a hash on the server. An md5 hash is created by breaking up any length of file into small blocks and then allowing the bits within that block to interact with each other and with any previous block. In this way any change cascades through the numbers and changes them all. For example, the sentence 'How quickly daft jumping zebras vex' produces the md5 hash '8e6797c98dfac9741c1a9ad464d3bb7d'. If we change just one binary digit, making vex into vax - 'e' is 1100101 and 'a' is 1100001 - we now get a hash value of '8c6acf03b7dc0603d54d72107bfe1c9b'. Note that this is not the same as compression. You can do your own md5 hashes on your system using the command line. For a Windows system, just use 'md5 filename'. For a UNIX-like system, use the following or look up the man page for md5. openssl dgst -md5 filename So, if you download your file and the md5 sum, you can check that one with the one you generate from your ISO instead of downloading the whole thing again. For the DOS/Windows md5 program, you can open the directory in another window by clicking here. |
Blocking Used Ports on LAN with Hardware FirewallMany people use a desktop firewall to protect their machines but if you have several machines and you use network shares, whilst these machines need to be able to talk to each other, you also need to make sure that they don't talk to any machine that is not on your network. The best way to do this is to use a hardware firewall. By default, the cheaper ones will block any connection that starts on the Internet so as long as your computer doesn't start a connection to an external machine using one of these ports, you are all right. The problem is that there are ways of getting people to start connections from inside the firewall-protected LAN and these usually involve using a vulnerable browser such as IE or any browser configured to run scripts by default; or, by opening email attachments (or just viewing the email in a browser that has HTML main viewing enabled). So, how do you stop these connections? Just block them off at the firewall from the inside of the network as well as the outside. Any firewall worth having should be configurable in this way and you should be able to limit connections based on ports both inward- and outward-bound. To get a port list, look at http://www.iana.org/assignments/port-numbers. |
Network Time - Posix and RightDifferent times can be particularly confusing, especially when it comes to changing clocks. Perhaps this is most confusing when we live in the time zone at the centre of the definition of time; and coping with time zones is something that other people do. Concepts such as the date line are alien and the idea that if your computer breaks down on a Sunday afternoon in the US, it needs fixing there and then because it is already Monday morning in Japan are beyond our experience. For our annual changes between our basic time and our summer time or daylight savings time - GMT and BST in the UK - we have to rely upon little rhymes such as: 'In March, march forward; in the Fall, fall back' and so on. However, most of us can remember leap seconds - those curious times when the Greenwich pips have an extra pip - and at the time of writing (November 2005) the last one was in 1998 although by the time you read this, there will have been another one at the end of 2005. UTC forgets about leap seconds as soon as they have finished and therefore loses them. UTC keeps up with the Greenwich pips. Atomic clock time (TAI) holds onto the leap seconds so it gradually goes out of time from the rest of the world. It makes more sense to have a terrestrial time code that keeps with the seasons (albeit with modern accuracy only a few seconds) so UTC is used for everyday time as we all use the sun. So, sundials and other sun-related time events (such as crop growth and so on) all keep time with a system that forgets about leap seconds. TAI, on the other hand, is useful in you want astronomical time - say you want to know about solar eclipses going back thousands of years where UTC/TAI-type errors can build up to several hours. It makes more sense to have a time-scale that is not related to what goes on on Earth. So, although there are many other time scales, there are essentially two different ones for your computer: local time and atomic clock time. Windows was only designed to work on a non-networked, single-user basis and so - even with networking bolted on and all of the so-called multi-user Windows stuff added, it still uses local time. One interesting thing I found out about Windows is that it is considered all right for the machines to be several hours out with respect to their time - the program in Windows XP Home only checks the time server around once a week which is all right if you are not in a networked environment (ironic that it then uses a network protocol to check it though). As we all listen to the radio and therefore use local time, Windows machines trot along in an okay manner for computer beginners who probably aren't particularly aware of what their hardware is really capable of (they're running Windows after all). For an OS that was designed from the beginning to be multi-user and networked, such as Linux, the BSDs and others too numerous to mention here, having the correct time is important and you are given a choice. On SUSE Linux and a few others, you aren't given a chance to select anything other than then UTC-based time. However, on OpenBSD - which is designed to be a secure, multi-purpose OS - you are given a choice of different time standards.
|
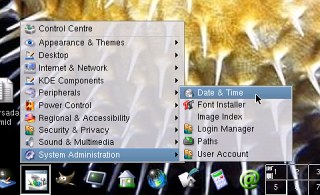 If
you find your computer clock is around 22 seconds
different, when you have set it to your local
time, you might not have actually set it to local
time as there are two representation of it on
OpenBSD.
If
you find your computer clock is around 22 seconds
different, when you have set it to your local
time, you might not have actually set it to local
time as there are two representation of it on
OpenBSD.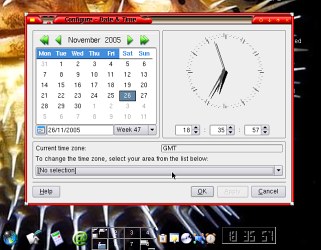 Towards
the bottom on this dialogue box, you can see a
combo box with various time zones to select.
Towards
the bottom on this dialogue box, you can see a
combo box with various time zones to select.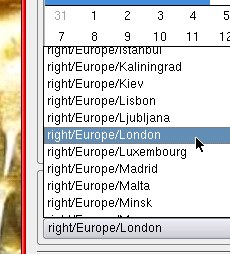 If
you click on it you will see many and this is
where the confusion arises.
If
you click on it you will see many and this is
where the confusion arises. If
you select that, your time will be out by 23
seconds (22 seconds at the time of writing which
is why you can see only a 22 second difference in
teh screenshot) which might not be what you are
after.
If
you select that, your time will be out by 23
seconds (22 seconds at the time of writing which
is why you can see only a 22 second difference in
teh screenshot) which might not be what you are
after.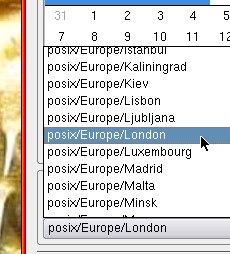 Instead,
you need to select the 'posix' version (Portable
Operating System Interface) which uses UTC.
Instead,
you need to select the 'posix' version (Portable
Operating System Interface) which uses UTC.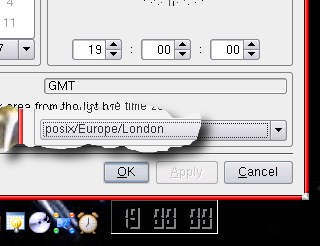 Now,
the time is correct (assuming that that is what
you want).
Now,
the time is correct (assuming that that is what
you want).Setting Time from the Command Line
|
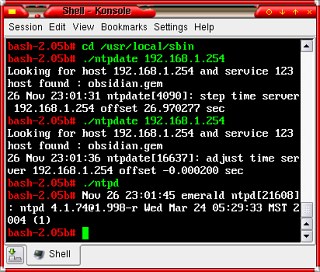 By
design, there are sanity checks in the NTP client
so that if it is more than a few minutes out, it
will bail out by design (letting you know why as
well - this isn't an NTPD crash).
By
design, there are sanity checks in the NTP client
so that if it is more than a few minutes out, it
will bail out by design (letting you know why as
well - this isn't an NTPD crash).Proposed Changes in Leap Seconds and Effects
There is a proposal that the UTC standard should stop dropping leap seconds. This has the advantage that if you want to get to TAI, you don't have to look up the number of leap seconds that have happened in a table. Although it must be said that they happen at the most only twice a year and there was a substantial gap between 1998 and 2005 which didn't really inconvenience anybody who could remember things that happened more than a few minutes ago. The disadvantage is that time will drift further away from reality - something that it is supposed to represent. The number of people on this planet that need time in relation to things that happen on a solar basis (going to work, watching TV and so on) is far greater than the number of people who need to do things in an astronomical way (astronomers for example). This has happened once before and it would do for the people making the proposal to take this into account. It was the case that we didn't take into account leap years properly (remember the year 2000 problem - it was, then it wasn't, and so on with ignorance eventually winning out). By 1752, measured time had become so far out relative to the seasons (and the sun) that it was decided that in September, we would miss out a few days in order to bring the calendar back in line with the real world. As a result, the date went from 2nd September 1752 over to the 14th September the following day, thus missing out 11 days. People who thought that their death was determined by the calendar, thought that their lives would be cut short by 11 days and there was rioting. If we stop dropping the dropping of leap seconds, our terrestrial time would become meaningless over a period of time. |
 One of the nice
things about the time system that we use is that you can
use the sun to see the time. Things like sundials and so
on can be quite accurate with the larger ones displaying
the time to within a quarter of a minute.
One of the nice
things about the time system that we use is that you can
use the sun to see the time. Things like sundials and so
on can be quite accurate with the larger ones displaying
the time to within a quarter of a minute.PostScript on Windows and ExamplesPostScript is a platform-independent and printer-independent printing language. If you have a program that can output PostScript, you can print it just about anywhere. There are some parts of it that can end up printer specific but you can make it independent if you want. The problem is that it is largely a printing industry, Mac and UNIX system and Windows, it appears, doesn't like to acknowledge anything that is non-Windows. Even though we are now entering a phase in the development of home and small office PCs where there is more than one type of machine on a LAN, this is still the case. So, if you have a .ps file on your Windows system, how do you print it or preview it?
|
 Well,
even if you are stuck with a brainless GDI
printer (a Windows printer without the necessary
processing to make it platform independent), you
can still use its Windows driver on the computer
that it needs to be plugged into in order to work
if you use ghostview
Well,
even if you are stuck with a brainless GDI
printer (a Windows printer without the necessary
processing to make it platform independent), you
can still use its Windows driver on the computer
that it needs to be plugged into in order to work
if you use ghostview
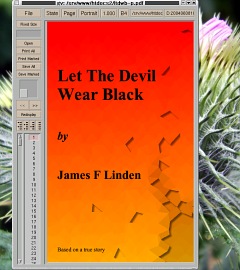 PDF
documents are also based upon PostScript so
GhostView will also let you see these as well.
PDF
documents are also based upon PostScript so
GhostView will also let you see these as well.