Linux -- Basic Image Processing with the Gimp
General
Rather than have a single MDI (Multiple Document
Interface) within which are all of the components sit,
the Gimp produces a number of small windows which, while
seeming a little bit messy to Windows users, actually
allows you to utilise the fact that under Linux, 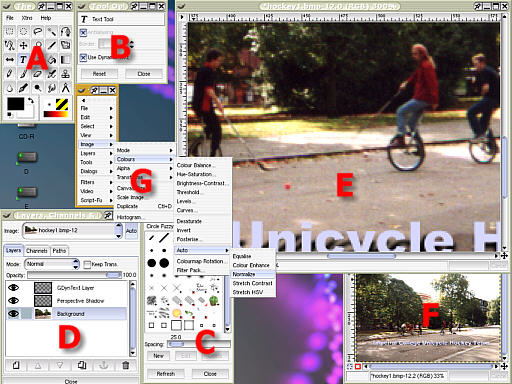 you can
have multiple desktops and therefore, you can have
different windows on different desktops as necessary
whilst using the sticky button to make other windows
appear on all desktops -- one use of this is grabbing
screenshots which need to have one background but then
can be carried over to another desktop where they can be
processed without those processing windows getting in the
way of the screenshot. But this program was not designed
just for computer journalists getting pictures for their
work. you can
have multiple desktops and therefore, you can have
different windows on different desktops as necessary
whilst using the sticky button to make other windows
appear on all desktops -- one use of this is grabbing
screenshots which need to have one background but then
can be carried over to another desktop where they can be
processed without those processing windows getting in the
way of the screenshot. But this program was not designed
just for computer journalists getting pictures for their
work.
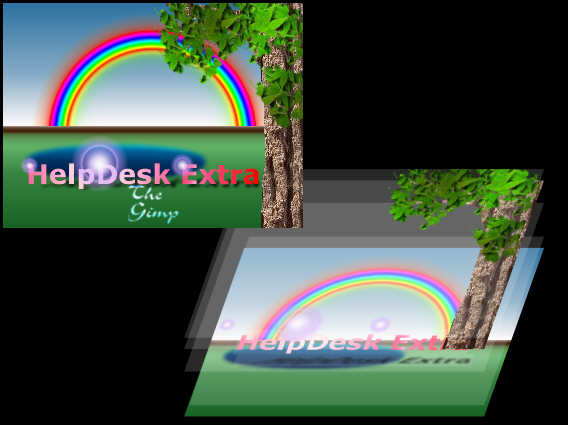
In the screenshot on the right, you can see a
selection of utilities:
- The Gimp main screen with the tools and menu on
it -- make this one sticky;
- The Tool options dialogue box -- changing for
each tool you select, whether it is from one of
the 25 buttons or from a tool that was selected
from a menu -- another one to make sticky;
- Brush selection, allowing you to choose from a
variety of brushes -- simple hard or soft,
editable brushes, through to brushes that spray a
number of different images onto the work area;
- Layers channels and Paths -- displaying the
layers that you use and allowing you to work
specifically on a selection or see the ones you
want or even adjust the transparency of each
layer. One interesting thing you can do is to
right-click on this which, like many other areas
of the Gimp, will bring down a context sensitive
menu from which you can perform various layer
oriented tasks such as merge visible layers,
flatten the image, create new layers and so on;
- The image itself which can be blown up or shrunk
down as much as you like by pressing [=] (which
has the "+" on it) or [-].
- It is also advisable if you are doing detailed
work, to have another view of the image, showing
all of it so that you can see the overall effects
of any editing you do. To get an extra image,
just right-click on the image/ View/ New View and
it will be changed in real-time.
 Detachable menus can be
generated by clicking on the dotted menu item
that appears on each menu. Once you have finished
with them, just click on it again. Detachable menus can be
generated by clicking on the dotted menu item
that appears on each menu. Once you have finished
with them, just click on it again.
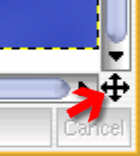 Another
general tip is that if you are displaying a small portion
of the image, you can click on the move icon in the
bottom right of the image window. Another
general tip is that if you are displaying a small portion
of the image, you can click on the move icon in the
bottom right of the image window.
 Doing this will make a small version of the
whole picture appear with the part you are looking at in
a small window. You can move this around the image and
the view in the window will move in real time. Doing this will make a small version of the
whole picture appear with the part you are looking at in
a small window. You can move this around the image and
the view in the window will move in real time.
Layers
 One of the
features that makes the Gimp more flexible than other
image editors is the fact that is uses layers -- the
equivalent to "objects" in Micrografx Picture
publisher. In the screenshot on the right, you can see
how the image is made up from various layers: each of
which alters the output from the layer below. One of the
features that makes the Gimp more flexible than other
image editors is the fact that is uses layers -- the
equivalent to "objects" in Micrografx Picture
publisher. In the screenshot on the right, you can see
how the image is made up from various layers: each of
which alters the output from the layer below.
The advantage of doing this is that should you decide
that you weren't particularly happy with the content of
one layer, no matter how long ago it was laid down, you
can still edit it.
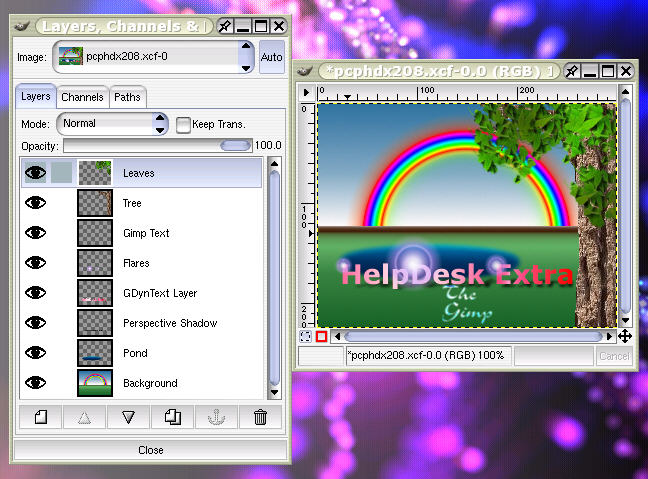 In the screenshot on the right, you can see
the composite image and the layer manager on its left,
showing the different layers. In the screenshot on the right, you can see
the composite image and the layer manager on its left,
showing the different layers.
Note that you can also change the transparency of each
of the layers.
This screenshot is from a parallel process in Micrografx
Picture Publisher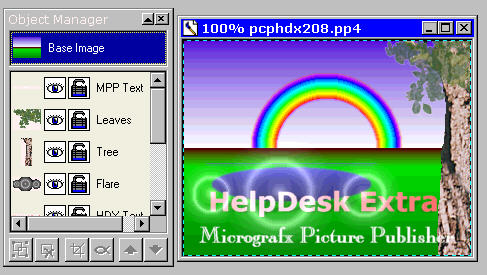 . Note that it also uses layers but these
are called "objects" . Note that it also uses layers but these
are called "objects"
Gradients
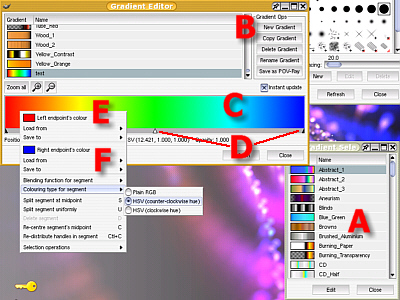 Gradients
are particularly useful for fills into masks and whilst
many images editors have a gradient fill function, the
gradients with the Gimp are particularly versatile. Gradients
are particularly useful for fills into masks and whilst
many images editors have a gradient fill function, the
gradients with the Gimp are particularly versatile.
In a number of the Gimp functions, where a gradient is
needed, clicking on the gradient box will bring up
dialogue box A in the shot on the right. Pressing the
edit button on this form will bring up dialogue box B
which has a list of all of the gradients on it. You can
edit or create as many gradients as you like with a
single use of this dialogue box and the changes you make
are live.
Here, we have a test gradient C. At the bottom of it
are the arrows (D) that define each segment. Moving each
segment's central arrow around will shift the centre
point of the segment. Holding down [shift] will allow you
to select more than one to work on at any one time.
Right-clicking on this area will bring up the menu
which has a number of options for creating and copying
colours for (E), the left side and (F) the right side.
You can also create new segments and delete them. As
always, there are a number of keyboard shortcuts and it
is worth getting to know the ones that you use frequently
as this can save a lot of time and also a certain amount
of getting confused about which mouse key to press to do
any particular action.
Note that if you create a new gradient, this will
appear only on your copy of the Gimp -- other users on
the same machine will have their own set of gradients.
This has the advantage of keeping everybody's work
separate but if you want to share your gradients with
another user, you will either have to copy them to a
shared directory or have to email them.
Tool Options
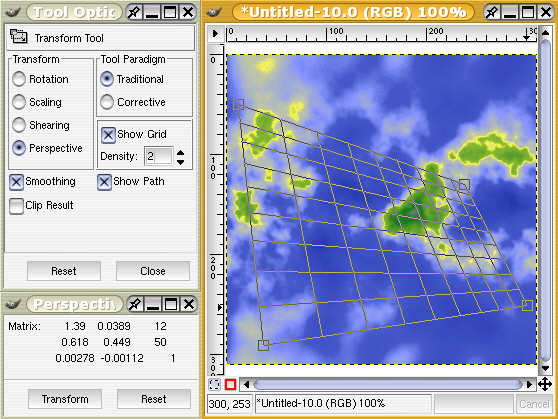 Many of
the tools in the Gimp have a number of tool options and
double clicking on the toolbox icon will bring up the
Tool Options dialogue box -- on the right, we see the
tool box for the Transform tool along with the image it
is being used on. Many of
the tools in the Gimp have a number of tool options and
double clicking on the toolbox icon will bring up the
Tool Options dialogue box -- on the right, we see the
tool box for the Transform tool along with the image it
is being used on.
Also, you can see that for the option that has been
chosen, another box has popped up showing what is going
on numerically.
You can see that there are a number of options for the
transform tool that make this effectively four (or more
-- depending on what you want) tools in one.
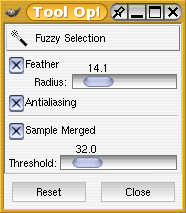 Fuzzy
Select Example Fuzzy
Select Example
Another example is the fuzzy selection tool. To use
this, you can either click on a part of the image, the
value of which (and all surrounting contiguous pixels)
you want to select or, you can click a starting position
and then drag the mouse cursor to increase the Sample
Merged value.
Changing the feather radius will also alter the extent
to which it sees neigbouring areas of similar colour.
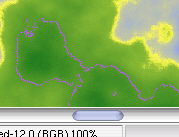 Here, you can make out the purple outline of
the selected area using this method. As you drag the
mouse across the image, you can see the selected area
grow or shrink. Here, you can make out the purple outline of
the selected area using this method. As you drag the
mouse across the image, you can see the selected area
grow or shrink.
To add other areas or take areas away, you can hold
down [Shift] or [Ctrl] whilst dragging or clicking.
Blend Tool Example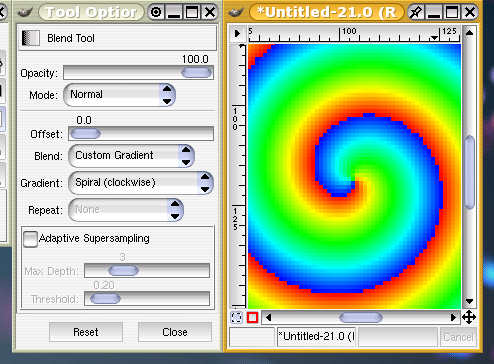
Here, we see a spiral fill with a rainbow gradient.
Note that the edge of the gradient -- the part between
the red and the blue -- is jagged and not at all
aesthetically pleasing.
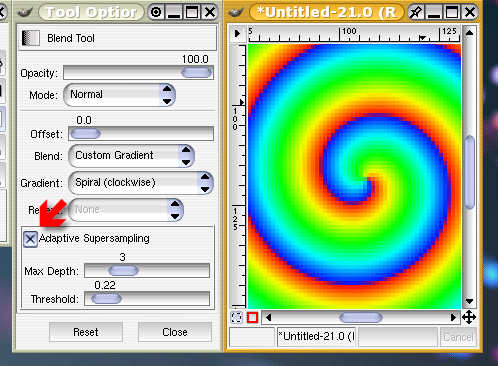 Simply by selecting the Adaptive
Super-sampling, the edge of the gradient, the transition
from red to blue is smoothed satisfactorally. Simply by selecting the Adaptive
Super-sampling, the edge of the gradient, the transition
from red to blue is smoothed satisfactorally.
You will notice that, like many of the tool option
dialogues, there are plenty of variables to play around
with in order to get just what you want.
With the gradients, there is an option to specify the
opacity of any particular part of the gradient. With the
"Blend:" option, you can select
"Dissolve". This will may any partial opacities
appear as scattered rather than blended in the
conventional sense.
|
 Using a
low-cost laptop webcam for close-up work
Using a
low-cost laptop webcam for close-up work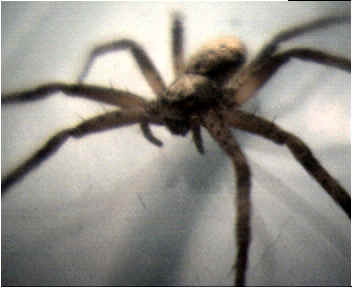 In order to make it see things that are a
little closer, I have taken the frame counter lens from a
disposable camera and (it just happened to be the right
size and about the right power) secured it in the lens
recess with some Blutak. With this in place, it will
focus on things that are around 15mm from the lens with
the sort of depth of field that you would expect from
such a short lens. Note that you can see the hairs on the
spider's legs but the plane of the object that is in
focus is fairly thin and legs in front and behind are out
of focus.
In order to make it see things that are a
little closer, I have taken the frame counter lens from a
disposable camera and (it just happened to be the right
size and about the right power) secured it in the lens
recess with some Blutak. With this in place, it will
focus on things that are around 15mm from the lens with
the sort of depth of field that you would expect from
such a short lens. Note that you can see the hairs on the
spider's legs but the plane of the object that is in
focus is fairly thin and legs in front and behind are out
of focus.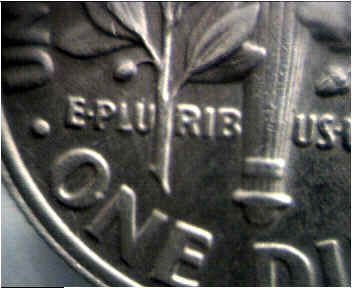 The coin
fits nicely in the focal plane but one thing to remember
is that these lenses were never meant to do this job. To
get a flat field of focus, you need a special lens that
is made for the job. However, the pictures that it does
produce are reasonable and are certainly good enough for
recording identifying scratch patterns or other details
of things.
The coin
fits nicely in the focal plane but one thing to remember
is that these lenses were never meant to do this job. To
get a flat field of focus, you need a special lens that
is made for the job. However, the pictures that it does
produce are reasonable and are certainly good enough for
recording identifying scratch patterns or other details
of things.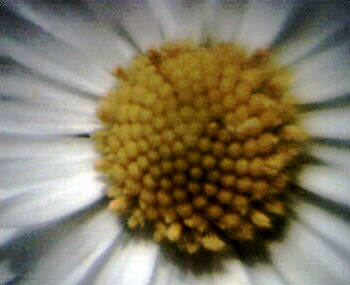 The centre
of the daisy on the right is just 5mm across. If you want
to get much closer than this, then you probably do want
to use a microscope but for this intermediate zone, this
is ideal.
The centre
of the daisy on the right is just 5mm across. If you want
to get much closer than this, then you probably do want
to use a microscope but for this intermediate zone, this
is ideal.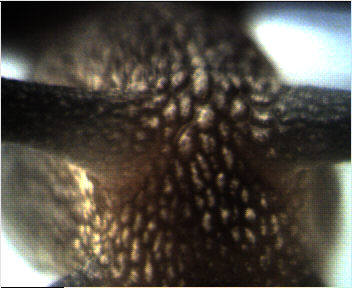 This
peculiar looking surface is not the upper surface of a
new super-bike or a space-age interior furnishing but the
head (for want of a better word) of a snail.
This
peculiar looking surface is not the upper surface of a
new super-bike or a space-age interior furnishing but the
head (for want of a better word) of a snail.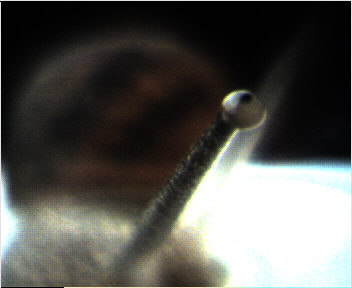 You can
see that this is even more obvious in this close-up of
the snail's eye, where only the eyeball and a small part
of the stalk are in focus.
You can
see that this is even more obvious in this close-up of
the snail's eye, where only the eyeball and a small part
of the stalk are in focus.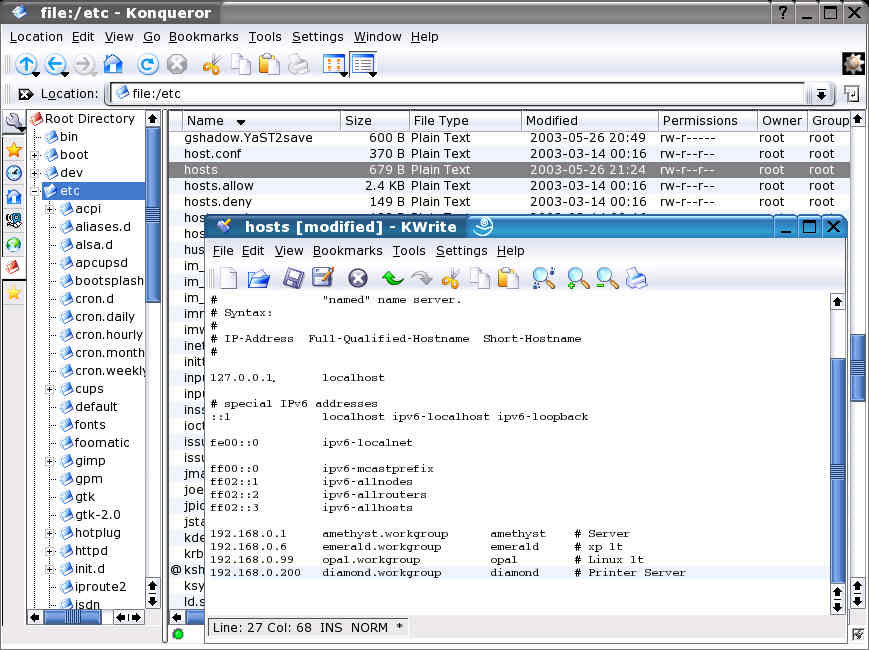 Once you have followed the instructions on
the printer server, you will need to let the machines on
your network know that it is there. One way of doing this
is to put its address and name in a file with the list of
hosts.
Once you have followed the instructions on
the printer server, you will need to let the machines on
your network know that it is there. One way of doing this
is to put its address and name in a file with the list of
hosts. With the hosts file containing the name for
the network printer address, things can look a little
friendlier -- note that the hosts file is really only a
solution for small networks with a fairly static
population.
With the hosts file containing the name for
the network printer address, things can look a little
friendlier -- note that the hosts file is really only a
solution for small networks with a fairly static
population.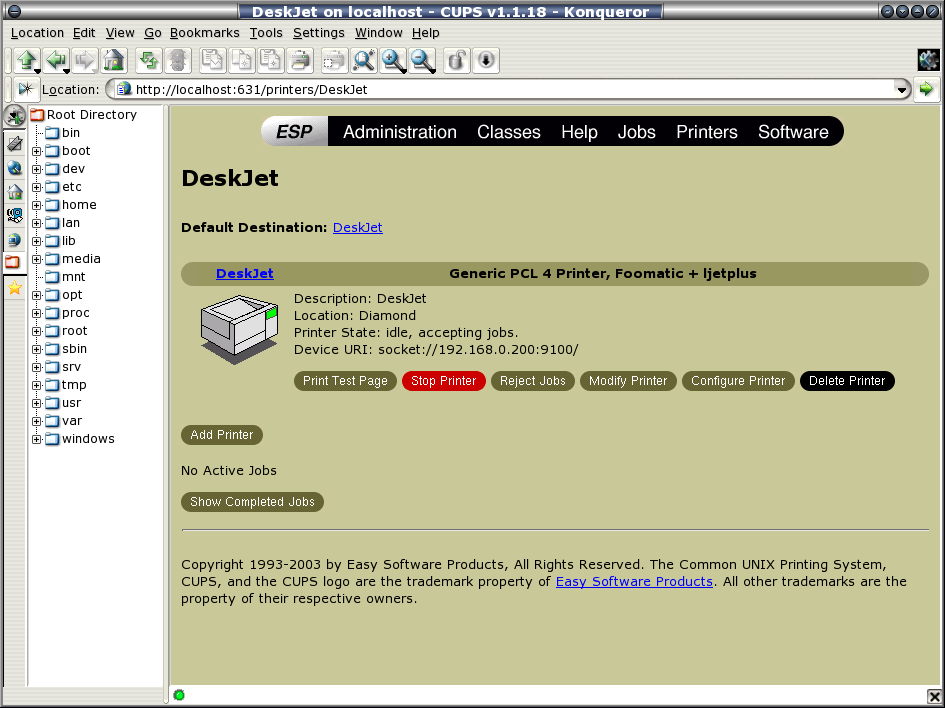 With the printer
installed, you can configure CUPS on the local host using
a web browser. Note that here, we are configuring
effectively the CUPS printer driver/ spooler on this
computer and not the printer itself.
With the printer
installed, you can configure CUPS on the local host using
a web browser. Note that here, we are configuring
effectively the CUPS printer driver/ spooler on this
computer and not the printer itself.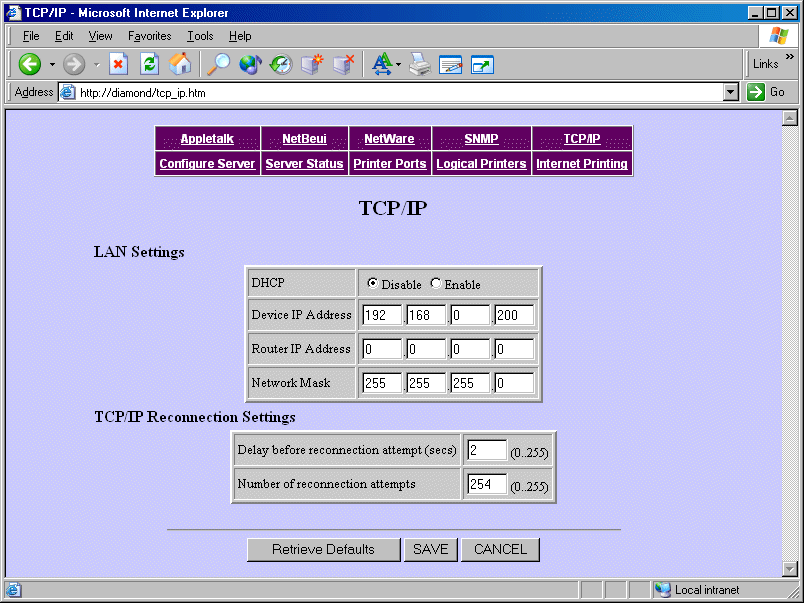 This is the Printer server configuration
screen, again on a browser although this is a different
machine, one running Windows xp. This is done by typing
http://diamond/ and from here the printer server itself
is configured.
This is the Printer server configuration
screen, again on a browser although this is a different
machine, one running Windows xp. This is done by typing
http://diamond/ and from here the printer server itself
is configured.