PC Plus HelpDesk - issue 216
This month, Paul Grosse gives you more insight into
some of the topics dealt with in HelpDesk and HelpDesk
Extra
|
 |
HelpDesk
HTML 'Alt' tagsMany websites do not use the html alt tag with images and as a result, people who either cannot download images or have no use for them are offered little useful information when browsing the site thus making navigation almost, if not actually, impossible.
The alt text is put into the html page either as alt text in an image properties dialogue box on your WYSIWYG html editor or in the html code itself as follows... <img src="images/sheep.jpg" alt="flock of sheep" align ="right">
You have to be careful with tags though because you can put together images with descriptions that, whilst sounding innocent in their own right, can produce curious effects. For example...
So, if your site is intended to be a useful and useable source of information that is easy to navigate, as opposed to just some pointless graphics, you need to use the alt tags and also be careful so that their content is not ambiguous or consists entirely of "blue bullet, red bullet, red bullet, yellow bullet..." .png images - graceful degradationOne other thing to remember about images is the format of them. Many people have started to use Portable Network Graphics (.png) files and like .gif s, they carry alpha channel (transparency) information. However, where a pixel in a gif is just on or off, in a png, it can be set to any level therefore drop shadows or other images can be used so that detailed backgrounds can be made use of. One of the principles of the Internet is that the browsing experience should be made as good as possible and as inclusive as possible. Unfortunately, some people make sure that their site is aimed at only IE6 or whatever so everybody else has to put up with a degraded experience. The same is true with png files - not all browsers are advanced enough to support alpha channel levels between the extremes. The graphic below is a png file on a blue background and makes use of a drop shadow.
As you can see, under GNU/Linux (Konqueror), it is reproduced properly but under Microsoft Internet Explorer 6 it is not - IE6 is not as advanced at this stage so you should really use png files without transparency if you are to make your site available for people with Microsoft systems that do not yet understand how to use png files properly. If the image of the png file on the left appears properly, your browser is ready for this new (20th Century) innovation. |
||||||||||||||||||||
 The Alt
tag has been supported since Netscape 2 and Internet
Explorer 2 and since Netscape 4 and IE 3, moving the
mouse over an image displays the alt text in the same way
that tool-tips are; for example in the screenshot snip on
the right. Alt text is now considered 'required' if your
pages are going to be useable.
The Alt
tag has been supported since Netscape 2 and Internet
Explorer 2 and since Netscape 4 and IE 3, moving the
mouse over an image displays the alt text in the same way
that tool-tips are; for example in the screenshot snip on
the right. Alt text is now considered 'required' if your
pages are going to be useable.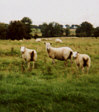 ...which
would present itself as the picture on the right. Just
hover the mouse over the image if your browser does this.
...which
would present itself as the picture on the right. Just
hover the mouse over the image if your browser does this. If you
have your images turned off, it will look like this...
If you
have your images turned off, it will look like this...

Spam siftingThe Problem and Existing SolutionsIf you need to have your email address on a website, you have a problem with spiders crawling for mail addresses and this then being passed on to spammers as; "buy our list of 10 million genuine email addresses for only $xx" One solution to this was to put "NOSPAM" into the address so it might read "joeNOSPAMbloggs@foobar.com" with the intention of the user removing it before they sent you the mail thus leaving "joebloggs@foobar.com". However, there are programs that will remove this automatically. Other tactics include presidents names and so on but you are assuming that the genuine sender has the requisite knowledge. Interestingly, I receive spam email to addresses that have never existed - they are either guesses (find a mail domain and prefix it with "info@", "sales@" "admin@" and so on) or completely made-up "o8hllln@", "f64gopp98@" and so on. Clearly, even the people selling the millions of email addresses are padding out the thousands they have harvested with others that they have just made up to fill the gaps. Spam is effectively one of a group of email activities that you can call "unauthorised" and therefore use an authentication system to block unauthorised email. Instead of trying to guess if it is unauthorised, 'know' that it is authorised. Body Content Filtering SystemsNormal mail filtering systems rely on trying to guess whether or not a message is spam by looking at the type of wording of the mail and whether there are certain clues such has heavily disguised URLs and so on - using escape characters instead of normal typeable characters such as http://. If you look at the source for a lot of spams, the 'forbidden words' are divided up with html tags that are just made up - html that is not understood is just ignored - so when the words are displayed, they appear as though they were meant to by the spammer so, a text containing the 'forbidden word'; "finance" would appear in the email source as... fina<lkasjhdflk>nce ...and appear on the recipient's mail program reconstructed as... finance All the anti-spam engine needs to do is strip out the html tags to see the message. In response to this, the spammers have started doing the following... Enla<font size="1">i</font>rgement so that when the anti-spam engine strips out the html, it is left with Enlairgement and is passed through. However, when the end user sees Enlairgement the word is corrected by their brain. Tackling spam this way is basically just a guessing game with the spammers hitting the email address target every time so, why not look at it from the other side and make it a double bullseye to hit? Upping the Cost of SpammingThis particular solution relies on the fact that most (if not all) spammers will have obtained your email address by buying it off somebody else and have never visited your website in the first place. Simply by visiting your website, they can authenticate themselves by reading the string but this will up the cost of emailing 10 million people if they have to visit all of their websites first. If they are prepared to put this amount of effort into contacting you, you can at least read through it (or at least the first bit of the email) before you delete it. Note that this will stop email from people that have not visited your site but the scammers (Nigerian bank scams and so on) might well visit your site first as there is so much more for them to gain. Subject Line Content RequirementThe solution is to have on your website a string that must be included in the mail - the subject line being the easiest to see - whose inclusion is the key to going somewhere instead of straight to the deleted folder. If, on your website, you say... my email address is foo@bar.com and you must include "JD3Y" in the subject line ... then any mail that does not include this can just be deleted. If everybody did this then spammers would have to visit all "10 million email" addresses' sites to find the string - they would have to know where the sites were to start with :-). If you are going to implement this, you need to make sure that the known genuine senders that will fall outside the net can get their email through so one logical filtering procedure to set up on your mail client is...
By doing this, you can get your machine to sort out the half dozen or so genuine emails from the 200 spams you get each day. |
Images - negatives and colours.
|
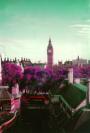
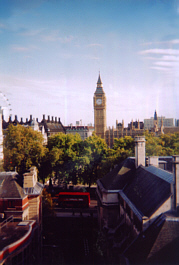 This
is our original photograph of the Big Ben tower
in London.
This
is our original photograph of the Big Ben tower
in London.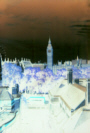 If we just make a
straight negative, we see that blacks have become
whites, reds have become cyans (bus) the
blue-cyan sky has become brown (our eyes are
better able to distinguish between reds, oranges,
yellows and greens than cyans and blues - this is
why there are so many words that describe them
and so many people think that cyan is blue) and
so on. To return the colours to their individual
values (ie, red back to red and so on), we have
to rotate the hues by 180 degrees.
If we just make a
straight negative, we see that blacks have become
whites, reds have become cyans (bus) the
blue-cyan sky has become brown (our eyes are
better able to distinguish between reds, oranges,
yellows and greens than cyans and blues - this is
why there are so many words that describe them
and so many people think that cyan is blue) and
so on. To return the colours to their individual
values (ie, red back to red and so on), we have
to rotate the hues by 180 degrees.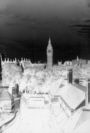 Instead
of doing that, we could just separate the image
in to HSL channels (Hue, Saturation and
Luminosity) and then, make a negative out of the
luminosity before recombining them back into the
composite - ie turning the HSL back into an RGB
image.
Instead
of doing that, we could just separate the image
in to HSL channels (Hue, Saturation and
Luminosity) and then, make a negative out of the
luminosity before recombining them back into the
composite - ie turning the HSL back into an RGB
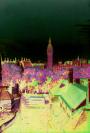
image.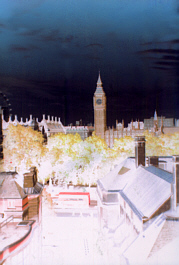 Both
of these methods produce the image on the right
which still has a blue sky, red bus and
yellowy-green leaves on the trees but instead of
a near-white sky at the horizon, it has turned
close to black.
Both
of these methods produce the image on the right
which still has a blue sky, red bus and
yellowy-green leaves on the trees but instead of
a near-white sky at the horizon, it has turned
close to black. Separating
the Luminosity out and processing it on its own
(thus saving having to reprocess the hue later on
in order to recover the colours of the picture)
has the advantage that we can mess around with it
in any way we like. On the right, I have
solarized (or more correctly when talking about
image processing on the computer,
pseudo-solarized) it so that the highlights
become inverted and the shadows stay the same -
it is just as easy to do the opposite, either by
inverting the pseudo-solarization transformation
graph or by inverting the luminosity image after
it has been pseudo-solarized.
Separating
the Luminosity out and processing it on its own
(thus saving having to reprocess the hue later on
in order to recover the colours of the picture)
has the advantage that we can mess around with it
in any way we like. On the right, I have
solarized (or more correctly when talking about
image processing on the computer,
pseudo-solarized) it so that the highlights
become inverted and the shadows stay the same -
it is just as easy to do the opposite, either by
inverting the pseudo-solarization transformation
graph or by inverting the luminosity image after
it has been pseudo-solarized. On
the right, we have the final composite image with
the highlights, mid-tones and shadows
pseudo-solarized as you would expect but the hue
information in the colours in both the normal and
inverted portions of the image has been retained.
On
the right, we have the final composite image with
the highlights, mid-tones and shadows
pseudo-solarized as you would expect but the hue
information in the colours in both the normal and
inverted portions of the image has been retained. Pseudo-solarization
best works where there are bright skies and
intricate structures that protrude into them.
Whilst a lamp post is not particularly intricate,
it does demonstrate that this can work even when
the intrusion is only a pixel or two across
Pseudo-solarization
best works where there are bright skies and
intricate structures that protrude into them.
Whilst a lamp post is not particularly intricate,
it does demonstrate that this can work even when
the intrusion is only a pixel or two across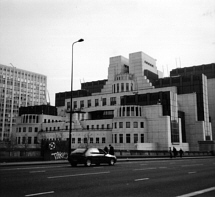 So, we make a copy of this and then
turn that into a greyscale image so that the
luminosity information makes sense (remember that
greens are brighter than blues and so on).
So, we make a copy of this and then
turn that into a greyscale image so that the
luminosity information makes sense (remember that
greens are brighter than blues and so on). Next, use the threshold function so
that we create a black and white mask. Here, it
is done at 50 per cent but you can use other
values if you are prepared to sort them out later
on (you could adjust the luminosity mid-point of
the image to start with so that the 50 per cent
threshold separates the image the way you want it
and then change it back later).
Next, use the threshold function so
that we create a black and white mask. Here, it
is done at 50 per cent but you can use other
values if you are prepared to sort them out later
on (you could adjust the luminosity mid-point of
the image to start with so that the 50 per cent
threshold separates the image the way you want it
and then change it back later). Next, go back to your original
colour image and select the alpha channel (this
should be all black as you haven't got anything
masked off yet). Then, paste the threshold image
you generated into the alpha channel and, if
necessary for your image processor, combine it
with the alpha base.
Next, go back to your original
colour image and select the alpha channel (this
should be all black as you haven't got anything
masked off yet). Then, paste the threshold image
you generated into the alpha channel and, if
necessary for your image processor, combine it
with the alpha base. Next, and with the mask still there,
rotate the hues by 180 degrees. In the picture on
the right, the sky has become blue again.
Next, and with the mask still there,
rotate the hues by 180 degrees. In the picture on
the right, the sky has become blue again.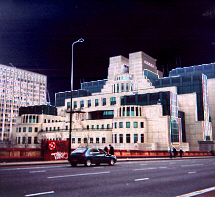 Next, remove the mask and then
adjust the tone balance so that it covers the
whole range, brightening up your image.
Next, remove the mask and then
adjust the tone balance so that it covers the
whole range, brightening up your image.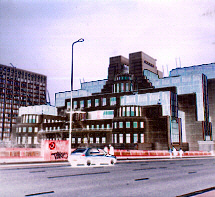 If you wanted the sky the other way
around, either invert your threshold mask or take
the image you have just created, invert it and
rotate the hues - you get the same result.
If you wanted the sky the other way
around, either invert your threshold mask or take
the image you have just created, invert it and
rotate the hues - you get the same result.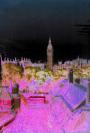
HelpDesk Extra
Running KNOPPIXSystem requirementsBased on Debian, KNOPPIX is a GNU Linux distribution that runs entirely off a CD ROM. It only needs you to have a computer that will boot off the CD ROM (or a floppy disk and then the CD ROM) and have enough RAM (I have run it on a 200MHz Pentium MMX with 96MB of RAM with no problems). In fact, it doesn't matter whether or not your machine has a hard drive, it will work just as well without it as long as it has at least 82MB of RAM or, if you want to use it in text only mode, 20MB of RAM. Getting a copy on CDRFirst of all, you need to have a copy on CD. On the SuperDVD this month, we have the ISO image for KNOPPIX 3.3 which you should burn to a CDR. Instructions of how to do this are elsewhere on this disc but for those who cannot wait, you just copy the ISO file to a suitably large and fast drive on your computer and then burn it to a CDR. In Nero, get rid of the Wizard and click on File/ Burn Image, select the image from where you stored it, click on 'Write' and let it get on with it. Running KNOPPIX
|
 KNOPPIX will load up
and present a desktop environment that is very similar in
many ways to Windows. On the desktop, you will see the
trash can and any disks and other media that you might
have on that machine.
KNOPPIX will load up
and present a desktop environment that is very similar in
many ways to Windows. On the desktop, you will see the
trash can and any disks and other media that you might
have on that machine. You will note that there are some - or at
least one - cryptic looking labels for your hard disks.
Instead of drive C:\, D:\, E:\, F:\ and so on, where, say
C:\ and D:\ are the same physical drive with two
partitions and E:\ and F:\ are another drive with two
partitions, you will see something else. Physical drives
are given letters and the partitions are given numbers.
So, in this case, C:\ will be hda1, D:\ will be hda2, E:\
will be hdb1 and F:\ will be hdb2. If you have a usb
drive - whether it is a flash drive or a large external
drive - it should be called sda1 (and so on).
You will note that there are some - or at
least one - cryptic looking labels for your hard disks.
Instead of drive C:\, D:\, E:\, F:\ and so on, where, say
C:\ and D:\ are the same physical drive with two
partitions and E:\ and F:\ are another drive with two
partitions, you will see something else. Physical drives
are given letters and the partitions are given numbers.
So, in this case, C:\ will be hda1, D:\ will be hda2, E:\
will be hdb1 and F:\ will be hdb2. If you have a usb
drive - whether it is a flash drive or a large external
drive - it should be called sda1 (and so on).USB FlashDisk or LANFor backing up or rather, recovering data, the big question is: "Ethernet or sneakernet?" If you have a LAN that you can plug the computer into, everything is a lot easier to do even if it is just one other machine and a crossover link. If you have not, you will have to use some other form of storage device to act either to hold the lot or as a bucket brigade to ship the data chunk by chunk to another machine. A bit about the GNU/Linux file system compared to WindowsWindows uses the drives as a root to the directory tree and more recently, has the desktop as the tree root with My Computer and Network Neighbourhood running off that with the drives under My Computer and other network shares under Network Neighbourhood. (This is ignoring all of the other stuff in there like recycle bins and so on). Thus...
GNU/Linux has a similar directory structure with the root directory (not to be confused with 'root') at the base of everything with various directories off that. Within this semi-virtual/ semi-real file structure, various disks are 'mounted' in various positions as are network shares. It is irrelevant what file system each uses as they are considered (broadly) equivalent by the file system. Extra drives (those that are not part of the GNU/Linux system) are usually mounted in a subdirectory called /mnt (the leading slash meaning that the directory path is absolute). The devices are to be found in a directory called /dev so this is what you will find when you look at the properties box - something like /dev/hda1 which will be mounted at /mnt/hda1. If you were going to look at the contents, you would look at where it was mounted because there, it is translated into the file structure. If you look at it in the /dev directory, you will see the raw data on the disk. If we created a directory called /lan and mounted the network shares on that (remembering to create the subdirectories first) we could end up with a structure that is very easy to navigate. Thus...
Windows likes to inhabit the entire and only partition on the first hard drive so if it is Windows that will not boot up, it is likely that you will find any data that you need on hda1 as the other drives should be okay (unless you have Windows spread out and it is one of these that has become corrupted). FlashDisk or USB DriveIf you have a flaskdisk or another USB-based mass storage device, it will probably appear on the desktop as sda1. Before you click on it, you want to make sure that it is mounted into the operating system as writeable rather than read-only.
Setting up the LAN
|
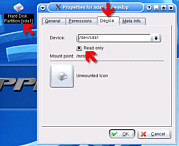 Right-click on the icon (sda1) and
then, in the Device tab, uncheck the Read Only checkbox.
Click OK and then click on the desktop icon to mount it
and display it in the file browser
Right-click on the icon (sda1) and
then, in the Device tab, uncheck the Read Only checkbox.
Click OK and then click on the desktop icon to mount it
and display it in the file browser If your LAN uses DHCP (Dynamic Host
Configuration Protocol), all you have to do is click on
the KNOPPIX penguin on the taskbar - the second from the
left - and select Network/Internet | Network card
configuration and when asked if you want to use DHCP
broadcast, click 'yes' - the computer will do the rest.
If your LAN uses DHCP (Dynamic Host
Configuration Protocol), all you have to do is click on
the KNOPPIX penguin on the taskbar - the second from the
left - and select Network/Internet | Network card
configuration and when asked if you want to use DHCP
broadcast, click 'yes' - the computer will do the rest.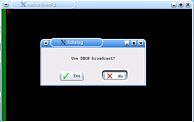 If your LAN does not use DHCP or
you want to specify the settings yourself, click on the
KNOPPIX penguin on the taskbar, select Network/Internet |
Network card configuration and when asked if you want to
use DHCP broadcast, click 'no'. Next, enter the IP
address - eth0 is the ethernet card (it might be that you
are using something different or that you have two cards
(if it is the latter and you don't know which is eth0,
set up eth0 and if it does not work, you can go back to
this dialogue as many times as you like until it works
the way you want it)). Next, enter the network mask - it
will guess at this (see previous PC Plus HelpDesks for
how) - then the broadcast address, the default gateway
and the name servers and then it will set up the card for
you.
If your LAN does not use DHCP or
you want to specify the settings yourself, click on the
KNOPPIX penguin on the taskbar, select Network/Internet |
Network card configuration and when asked if you want to
use DHCP broadcast, click 'no'. Next, enter the IP
address - eth0 is the ethernet card (it might be that you
are using something different or that you have two cards
(if it is the latter and you don't know which is eth0,
set up eth0 and if it does not work, you can go back to
this dialogue as many times as you like until it works
the way you want it)). Next, enter the network mask - it
will guess at this (see previous PC Plus HelpDesks for
how) - then the broadcast address, the default gateway
and the name servers and then it will set up the card for
you. 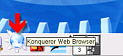 Just to test it out, load up a copy
of Konqueror and point it at a webserver
Just to test it out, load up a copy
of Konqueror and point it at a webserver Pushing or pulling data on the LANGNU/Linux was built from the bottom up with networking and compatibility in mind therefore it has a lot of options of how to transfer data. You can either pull it across the network using FTP from another machine or you can use Server Message Block (SAMBA) to push data to a Windows machine. If you have your network neighbourhood configured, you already have SAMBA. Otherwise you need to set up network neighbourhood on Windows. |
smb:/ as an alternative
If you encounter the problem of having navigated part of the way to your destination, only to be told that you cannot get there for some reason (not found and so on), try deleting the workgroup name in the address thus: smb:/workgroup/john/webpages/ becomes smb://john/webpages/ WARNING: if you are copying the files to a drive on the machine you are running KNOPPIX on, do not copy to a partition that is formatted as NTFS unless you know for sure (have checked yourself) that the version of GNU/Linux you are using will write safely to NTFS. As an aide-mémoire, think of NTFS as Not That File System. |
Just drag and drop
With your files now safe, you can locate SCANDISK, if you have not already (use the find option in KDE under the Tools menu) and then you are ready to start recovering your Windows functionality.
You might toying with the idea that you prefer GNU/Linux over Windows any way and decide to install it instead - with KNOPPIX, you have an opportunity to play around and get a feal for it without damaging your existing installation (such that it is). |
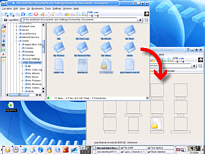 If you have two browser windows open, one at
your source directory and one at your destination
(whether it is an smb connection across your LAN or
directly onto an sda or another hda) you can now simply
highlight the files you want, drag them from one browser
window and drop them into the other.
If you have two browser windows open, one at
your source directory and one at your destination
(whether it is an smb connection across your LAN or
directly onto an sda or another hda) you can now simply
highlight the files you want, drag them from one browser
window and drop them into the other.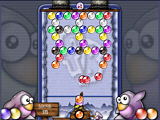 One word of warning - whilst you are in
KNOPPIX, your hard drive is protected so that you cannot
damage it (unless you have made it writeable) so you have
an unfamiliar, professional operating system that is free
to explore. In the games menu, under 'Tetris-like', you
will see a game called 'Frozen Bubble'. By all means,
have a play with it but when you realise that you can
hear the dawn chorus outside, remember that this is
highly addictive and you should limit your time spent
playing with it (strictly). For those who are
morbidly curious, the screenshot on the right is at level
70.
One word of warning - whilst you are in
KNOPPIX, your hard drive is protected so that you cannot
damage it (unless you have made it writeable) so you have
an unfamiliar, professional operating system that is free
to explore. In the games menu, under 'Tetris-like', you
will see a game called 'Frozen Bubble'. By all means,
have a play with it but when you realise that you can
hear the dawn chorus outside, remember that this is
highly addictive and you should limit your time spent
playing with it (strictly). For those who are
morbidly curious, the screenshot on the right is at level
70.