PC Plus HelpDesk - issue 248
This month, Paul Grosse gives you more insight into
some of the topics dealt with in HelpDesk
|
 |
HelpDesk
|
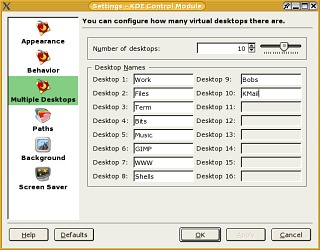 Next, select 'Multiple Desktops' and then
make sure that you have selected the number that you want
to have. Next, select 'Multiple Desktops' and then
make sure that you have selected the number that you want
to have.Now, you can organise your desktops as well as
you want. I have 10 on my general account and usually
have mine displayed as two rows so I tend to use the left
half of these (1, 2, 3, 6, 7 and 8) for work, the bottom
right one (10) for email and the others for anything
else. So, I have given them the names you can see on the
right. |
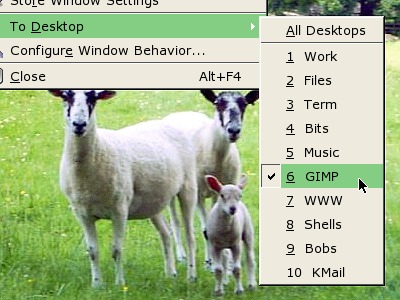 Now, when I right-click on the title bar of
a window so that I can send it to a desktop, I get a menu
with meaningful names. Now, when I right-click on the title bar of
a window so that I can send it to a desktop, I get a menu
with meaningful names. |
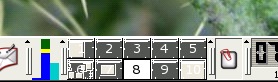 On the Pager itself, you can see the desktop
numbers. To me, they have established roles to play so I
personally don't use their names here but if you do want
them to display their names instead (you did choose short
names didn't you?) you can make it do that as well. On the Pager itself, you can see the desktop
numbers. To me, they have established roles to play so I
personally don't use their names here but if you do want
them to display their names instead (you did choose short
names didn't you?) you can make it do that as well. |
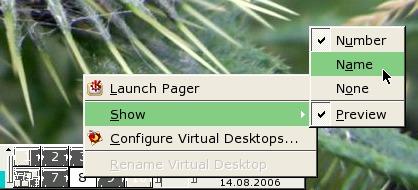 Right-click on the Pager and then select
'Show', 'Name' for it to display the names. Right-click on the Pager and then select
'Show', 'Name' for it to display the names. |
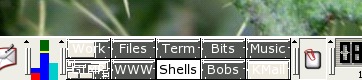 As you can see, the Pager has become wider
but you can see the names in each desktop as well as any
open Window (KMail at the bottom right is full screen) As you can see, the Pager has become wider
but you can see the names in each desktop as well as any
open Window (KMail at the bottom right is full screen) |
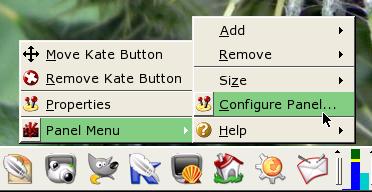 Alternatively, you can configure the panel
so that it produces tool-tips - including the Pager. Alternatively, you can configure the panel
so that it produces tool-tips - including the Pager.To
do this, right-click on the panel or a panel icon and
select 'Panel menu', 'Configure Panel...'. |
 Next, click on Appearance and then make sure
that the Show tooltips checkbox is checked. Next, click on Appearance and then make sure
that the Show tooltips checkbox is checked.Then click
on 'OK'. |
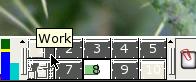 And there you have it. The desktops in the
Pager are reasonably small, you can see which desktop is
being pointed at but also see the name in the tool tip. And there you have it. The desktops in the
Pager are reasonably small, you can see which desktop is
being pointed at but also see the name in the tool tip. |
 Sensible names for desktops in KDE (or
similar)
Sensible names for desktops in KDE (or
similar)
|
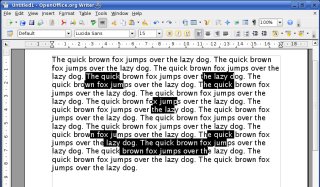 Here, we
see OpenOffice.org's cross-platform word processor with a
number of pieces of text highlighted in exactly the same
way. Here, we
see OpenOffice.org's cross-platform word processor with a
number of pieces of text highlighted in exactly the same
way.Text is highlighted by dragging the mouse across it - releasing it when the other end of the piece of text has been reached - and then, when further pieces of text are required this action is repeated only this time, whilst holding the [Ctrl] key throughout the action. This works the same across platforms. |
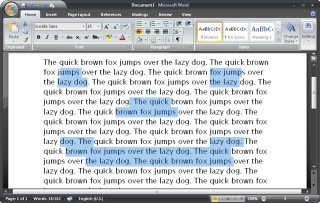 On the
right, you can see the result of doing exactly the same
thing but in Microsoft's Office 2007 word processor 'Word
for Windows' running on Windows Vista. On the
right, you can see the result of doing exactly the same
thing but in Microsoft's Office 2007 word processor 'Word
for Windows' running on Windows Vista.Note however that in this case, where a drag operation has started and transcended across to another word, the word in which the drag operation started has been selected entirely, regardless of whether or not it was to start with. This bug/feature does not happen in OpenOffice.org's word processor so, there you are free to format parts of words within multiple, multi-word selection operations. |
 Highlighting
several portions of text
Highlighting
several portions of textSuspending Windows and LinuxIf you want to stop working on a session but resume the session just where you left off, there are a number of things you can do:
Just switching off the monitor and hard drives is not particularly green as the computer still needs to use power to keep the session alive and if you have a power cut, you are in trouble. However, saving to disc does take a bit of time although not that much. So, what are the options and how is the performance?
|
||||||||||||
 This is the
tool-tip for Hibernate. Click on it and it will lock the
session, save the system to the hard drive and power off. This is the
tool-tip for Hibernate. Click on it and it will lock the
session, save the system to the hard drive and power off.When you power-up again, it loads everything the way it was and then you get to log in from the locked screen (so you are still protected by a password or whatever system you have for protection from a locked screen. |
||||||||||||
Linux
Just putting the system into sleep mode is not really very good for the environment so it is not included here (I'm not going to comment on Windows being a US OS and the Kyoto agreement along with Linux being non-US and more environmentally aware). Basically, it does the same but this time into its
swap partition. |
||||||||||||
In both OSes, you can leave the machine off for any
amount of time or even takes disks out and run other OSes
between sessions - I have, and it works exactly how you
would expect it to.PerformanceSo, how quick is it?
These were done on the same machine and both include the BIOS logon although the Linux time also includes GRUB OS selection as that was done on a disk with two OSes on it whereas the Windows Vista Beta 2 disk is dedicated to Windows (it needs to be as it takes up well over twice the disk space as the Linux OS with the equivalent set of programs). NoteRemember that any programs that were online or had shares in other network resources will have undergone time travel as far as they are concerned. This is a bit like the associated artefacts of the 'twins paradox' - not the paradox itself as that is fairly easy to understand, just the victim of the paradox trying to get to grips with the things that have changed while it was not experiencing time in the same way that the rest of the computer's resources were. |
 Windows
Vista
Windows
Vista This is it
in Linux (KDE). You only get to 'Suspend' the system -
this is the same as Windows' 'Hibernate'.
This is it
in Linux (KDE). You only get to 'Suspend' the system -
this is the same as Windows' 'Hibernate'.
|
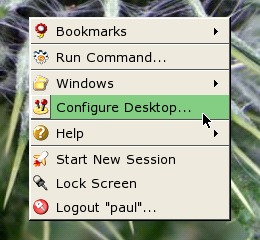
 Right-click
on the desktop and select 'Properties'. Right-click
on the desktop and select 'Properties'.In the
'Properties' dialogue box, under the 'Appearance' tab,
click on 'Advanced'. |
 In the
'Advanced Appearance' dialogue box, click on the 'Item:'
list box and select 'Active Title Bar' (or just click on
a title bar in the diagram) and then reduce the font
size, possibly to '8' (or whatever you want). In the
'Advanced Appearance' dialogue box, click on the 'Item:'
list box and select 'Active Title Bar' (or just click on
a title bar in the diagram) and then reduce the font
size, possibly to '8' (or whatever you want).Then reduce the size of the window to as small as it will go for that size of font. If it is not small enough, you can make the font smaller. Click on 'OK' and 'OK' again. |
 Now you
can see how much smaller the window decorations are. You
can now see much more of the contents of the windows
(which is why you bought the OS in the first place). Now you
can see how much smaller the window decorations are. You
can now see much more of the contents of the windows
(which is why you bought the OS in the first place). |
 Shrinking
XP Window Decorations
Shrinking
XP Window Decorations
|
 Next,
click on 'Visual Appearance' [sic]. Next,
click on 'Visual Appearance' [sic]. |
 Then, in
the 'Appearance Settings', click on 'Advanced' in the
bottom-right. Then, in
the 'Appearance Settings', click on 'Advanced' in the
bottom-right. |
 Then,
select 'Active Title Bar' and reduce the size of the font
and the size of the bar in the same way as you would for
XP. Then,
select 'Active Title Bar' and reduce the size of the font
and the size of the bar in the same way as you would for
XP. |
 This is the
result in Vista. Unlike XP where the icons change size,
you are stuck with a large icon size in Vista so there is
not much that you can do about reducing the size of the
title bar in Vista. Remember though that this is still
Beta 2 and there is time for Microsoft to get around to
correcting this fault/feature. This is the
result in Vista. Unlike XP where the icons change size,
you are stuck with a large icon size in Vista so there is
not much that you can do about reducing the size of the
title bar in Vista. Remember though that this is still
Beta 2 and there is time for Microsoft to get around to
correcting this fault/feature. |
 Shrinking
Vista Window Decorations
Shrinking
Vista Window DecorationsNetwork Games traffic
The idea is that there are several types of game of which free-for-all and hunt the flag are two. These games are played between people all over the world using servers that are logged into when you start playing the game. Being a live game, you need to cut down on any latency
and as a result, it doesn't really matter what order
packets are received in. So, UDP is the obvious choice
for this. |
 As a
result, there are many packets travelling both in and out
of your network connection with the Internet. As a
result, there are many packets travelling both in and out
of your network connection with the Internet.But how
much traffic does this add up to? |
 If you run
KDE System guard, you can monitor the packets going in
and out of your network. If you run
KDE System guard, you can monitor the packets going in
and out of your network.In the screenshot on the right, blue is travelling out onto the Internet and red is travelling in from it. The top display in each pair is the amount of data in kBytes/second averaged over 2 seconds and the bottom display is the number of packets/second averaged over 2 seconds. You can see that there is hardly any data travelling
out, not reaching 1kByte/s and averaging around 4
packets/s and the inbound traffic is 2 to 3 kBytes/s with
around 40 packets per second. |
 If you run
Ethereal, you can see what is in the packets. If you run
Ethereal, you can see what is in the packets.On the
right, you can see a part of a typical session. |
| Below is part of the screenshot and shows that all of the packets are only 73 bytes long with the destination port of 5158 in this case. |
 |
 As you can
see, the data part is not that much of the packet
(highlighted in black at the bottom). As you can
see, the data part is not that much of the packet
(highlighted in black at the bottom). |
 To get a
decent, low-latency game, the ping time needs to be small
as well. To get a
decent, low-latency game, the ping time needs to be small
as well.On the right, you can see a ping to that site
with the time being very consistent and only around 32ms. |
| In all, a game like BZFlag does not produce that much traffic and at roughly 13MB/hour, is unlikely to exceed any ISP's quota for traffic. |
 BZFlag is
a network game that can actually be played on many
operating systems although it is preferred that the game
is played on a non-proprietary OS.
BZFlag is
a network game that can actually be played on many
operating systems although it is preferred that the game
is played on a non-proprietary OS.Drivers in Vista
Driver installation disks are often powered by JavaScript and this relies upon the JavaScript engine on the OS working properly. Unfortunately, the one on Vista doesn't seem to work well enough and can chuck out errors that prevent the disc from working the way it needs to in order for you to get your PC working the way you want it to. The driver installation JavaScript that worked on XP fails on Vista will most likely only start a program called something like 'setup.exe' for each driver you chose to install. The drivers on these CD ROMs are usually located in directories of their own so, the chipset drivers are likely to be in a subdirectory of the 'drivers' directory called something like 'chipset' and so on. Then, for each OS, you will have subdirectories within that called 'Win98SE', 'Win2000', 'WinXP' - the 'setup.exe' programs being located in these along with any relevant '.cab' files, '.ini' files and so on that each respective setup.exe program needs in order to function. So, open up Windows Explorer and work you way through the labyrinth of directories until you find the one you are looking for and double-click on the 'setup.exe' files that you need and hopefully, they will run and install your drivers. You might find that you need to go into safe mode to do this but almost certainly, you will need to confirm in a dialogue box that you really do want to install a program - I counted 17 times for one driver. At boot-up, you will be offered safe mode as an option (press [F8] and select 'safe mode'). If the program fails, Vista will/probably/might tell you that the installation failed and ask you if you want it to run again using the recommended settings. If this happens, accept the offer. You will of course have to reboot every time you have a go because the GUI driver is part of Windows' monolithic system and not a separate process that can be started or restarted on its own. Eventually, you will get it to work. Well, probably. Sort of. This is new territory so good luck. |
 To set the
screen resolution, go into 'Control Panel', 'Appearance
and Personalization [sic]' and... To set the
screen resolution, go into 'Control Panel', 'Appearance
and Personalization [sic]' and... |
 ...click on
'Adjust screen resolution'. ...click on
'Adjust screen resolution'. |
|
 If you've
installed Windows Vista Beta 2, you might have found that
your hardware isn't recognised by the OS. In 16 colours,
many of Vista's controls fail to display properly. Many
of the subtle colours that Vista uses come out as the
same colour when reduced to 16 colours and so the
boundaries and contents of some controls disappear.
Examples include: checkboxes; some tabs; and, the window
decoration buttons such as close, maximise and so on. As
the drivers already work on your hardware under Windows
XP, it is probably worth trying to install them on Vista
as well.
If you've
installed Windows Vista Beta 2, you might have found that
your hardware isn't recognised by the OS. In 16 colours,
many of Vista's controls fail to display properly. Many
of the subtle colours that Vista uses come out as the
same colour when reduced to 16 colours and so the
boundaries and contents of some controls disappear.
Examples include: checkboxes; some tabs; and, the window
decoration buttons such as close, maximise and so on. As
the drivers already work on your hardware under Windows
XP, it is probably worth trying to install them on Vista
as well.SMB (Samba) share limitsWindows Vista is supposed to be more network oriented
than previous versions although there are a number of
things that just haven't changed - such as ftp which is
covered below. Vista, when it is eventually released in
all of its incarnations, will, no doubt, have had many of
the security fixes installed by default. |
 However,
SMB (known in the Linux world as 'Samba') will have some
limitations put in place to the number of simultaneous
SMB peer network connections. In the 'Home Basic'
version, you will be permitted to have only five and in
the 'Home Premium', 'Business', 'Enterprise' and
'Ultimate', you are allowed to have 10. However,
SMB (known in the Linux world as 'Samba') will have some
limitations put in place to the number of simultaneous
SMB peer network connections. In the 'Home Basic'
version, you will be permitted to have only five and in
the 'Home Premium', 'Business', 'Enterprise' and
'Ultimate', you are allowed to have 10.The problem with this is that I didn't know that there was any limit before reading this (Microsoft's official documentation on Windows Vista) so I tested out some other Windows systems to see if there already existed a similar limit. I did this by creating a number of shares (20 for arguments sake - being well over the 10 that were permitted in Vista) on both Windows 98SE and Windows XP and then opening them all on another machine, so that they all worked simultaneously. Certainly a limit of 5 or 10 shares is a new feature of Vista. On the right, you can see 20 different SMB shares
from a Windows 98SE machine displayed in Windows Vista. |
 So, if you
want to use Windows for SMB, don't bother to upgrade to
Vista unless this limit changes in the mean time. If you
still want to upgrade your system, the Linux operating
systems run Samba a lot more efficiently than Windows
does - estimates clock this at around 4 times faster on
Linux. So, if you
want to use Windows for SMB, don't bother to upgrade to
Vista unless this limit changes in the mean time. If you
still want to upgrade your system, the Linux operating
systems run Samba a lot more efficiently than Windows
does - estimates clock this at around 4 times faster on
Linux.On the right here, you can see 20 different SMB shares from a Windows XP machine displayed in Windows 98SE. As far as we can make out, there is no arbitrary limit to the number of shares in 98SE or XP - certainly, SMB is capable of providing many more shares than the 10 on Vista. The only conclusion is that Microsoft want SMB to be replaced which is a pity because it already works quite well on Windows networks and other operating systems can integrate with Windows resources using Samba - both as client and server. |
FTP Multiple File transfer (command line)
FTP (File Transfer Protocol) has been around for a long time and you can tell this to some extent by the fact that a way of finishing a session is to type 'bye'. As far as post-Win95 PCs are concerned, the Windows FTP client has remained (virtually) unchanged between Windows 98SE and Windows Vista (Microsoft, as of 19th August 2006, it's not too late to update this). One could speculate that they include the command line FTP client so that the 'command line die-hards' will not complain but should really be using some GUI-based program at extra cost instead. Unfortunately, personal computers - whether they are PC, Macs or other platforms - are increasingly network-based and so FTP is more important than ever. Being able to use FTP is a good ability to have because if all else fails, you can still use the command line FTP client. So, what have we got as far as clients go? If we start the FTP client by typing 'ftp' at the command line prompt then typing 'help' at the FTP command line prompt, you get a list of the commands that that FTP client supports. I have highlighted those that we have in common here: ClientsWindows 98SEftp> help Commands may be abbreviated. Commands are: ! delete literal prompt send ? debug ls put status append dir mdelete pwd trace ascii disconnect mdir quit type bell get mget quote user binary glob mkdir recv verbose bye hash mls remotehelp cd help mput rename close lcd open rmdir ftp> Windows Vistaftp> help Commands may be abbreviated. Commands are: ! delete literal prompt send ? debug ls put status append dir mdelete pwd trace ascii disconnect mdir quit type bell get mget quote user binary glob mkdir recv verbose bye hash mls remotehelp cd help mput rename close lcd open rmdir ftp> As you can see, nothing at all has changed in the list of commands between 98SE and Vista - it is almost as though Microsoft wants command-line-based FTP to go away and die. Linuxftp> help Commands may be abbreviated. Commands are: ! features mls proxy size $ fget mlsd put sndbuf account form mlst pwd status append ftp mode quit struct ascii gate modtime quote sunique bell get more rate system binary glob mput rcvbuf tenex bye hash msend recv throttle case help newer reget trace cd idle nlist remopts type cdup image nmap rename umask chmod lcd ntrans reset unset close less open restart usage cr lpage page rhelp user debug lpwd passive rmdir verbose delete ls pdir rstatus xferbuf dir macdef pls runique ? disconnect mdelete pmlsd send edit mdir preserve sendport epsv4 mget progress set exit mkdir prompt site ftp> There is a lot more to it with Linux and the other Unices. However, the basic functionality that we need to put multiple files onto a remote FTP server is in all of the clients. Starting a sessionJust type 'ftp' at the command line prompt or, if you are in Windows 98SE, click on the 'Start' button, click on 'Run' and in the text box, type 'ftp' then click on the 'OK' button. You now have your ftp program running and should be looking at a command line prompt that says: ftp> Next, you need to log into a server. So, type: open 192.168.20.58 Where you would replace 192.168.20.58 with the IP address or domain name of the server you want to log into. You should now have something like this on the screen (note that these may vary from client to client; and, from server to server): ftp> open 192.168.20.58 Connected to 192.168.20.58. 220 "Welcome to Azure FTP service." User (192.168.20.58:(none)): You now need to type in your userID and password like so... User (192.168.20.58:(none)): paul123 331 Please specify the password. Password: 230 Login successful. Have fun. ftp> Note that the password is not echoed on the screen. However, ftp is not encrypted so it will be passed over the network in the clear (ie, not encrypted). ExplorationIf you want to find out what files are in a subdirectory on the server, you can either type the DOS 'dir' (directory) command or the UNIX 'ls' (list) command. On a UNIX-type FTP client, they are the same and give you the same information. However, on a Windows FTP client, typing 'ls' and 'dir' will give you different results: ftp> dir 200 PORT command successful. Consider using PASV. 150 Here comes the directory listing. -rw------- 1 500 100 79110 Aug 16 11:18 1.png -rw------- 1 500 100 54973 Aug 16 11:18 2.png -rw------- 1 500 100 49330 Aug 16 11:18 3.png -rw------- 1 500 100 70160 Aug 16 11:18 4.png -rw------- 1 500 100 70747 Aug 16 11:18 5.png -rw------- 1 500 100 68694 Aug 16 11:18 6.png drwxr-xr-x 3 500 100 72 Aug 17 13:31 web 226 Directory send OK. ftp: 439 bytes received in 0.33Seconds 1.33Kbytes/sec. ftp> ls 200 PORT command successful. Consider using PASV. 150 Here comes the directory listing. 1.png 2.png 3.png 4.png 5.png 6.png web 226 Directory send OK. ftp: 47 bytes received in 0.05Seconds 0.94Kbytes/sec. ftp> For some reason (I might be accused of being cynical if I were to suggest that Microsoft wants to discourage people from using UNIX commands) the 'ls' command is broken and just gives you a list of names and doesn't differentiate between files and directories. In the Windows client, the 'dir' command gives the same results that the 'ls' and dir' commands both do in the UNIX FTP client. This broken FTP client was broken back in Windows 98SE (and probably before) and yet Microsoft has never bothered to fix it so Windows users (or perhaps more importantly, the users of other OSes using the Windows FTP client) are stuck with only one directory listing command. Now, you can see the listing along with some other attributes. Let's look at the proper listing... ftp> dir 200 PORT command successful. Consider using PASV. 150 Here comes the directory listing. -rw------- 1 500 100 79110 Aug 16 11:18 1.png -rw------- 1 500 100 54973 Aug 16 11:18 2.png -rw------- 1 500 100 49330 Aug 16 11:18 3.png -rw------- 1 500 100 70160 Aug 16 11:18 4.png -rw------- 1 500 100 70747 Aug 16 11:18 5.png -rw------- 1 500 100 68694 Aug 16 11:18 6.png drwxr-xr-x 3 500 100 72 Aug 17 13:31 web 226 Directory send OK. ftp: 567 bytes received in 0.27Seconds 2.10Kbytes/sec. ftp> This is the same listing that you get if you type 'ls -l' at the console prompt (UNIX - you don't get this on Windows with a command-prompt 'dir' command). As you can see, there are several columns and most of the time, you will only be interested in the first letter of the first column and the content of the last column. The first character of the first column tells you whether or not it is a directory - the other characters telling you which permissions are set for the file or directory. For files, you should see at least '-rw-' at the beginning, possibly '-rwx' - the 'x' meaning that it is executable although the only place you should see this if you are FTPing to a web server is if you are looking around the cgi-bin directory or any subdirectories of that. For directories, you should see 'drwx' at the beginning, meaning that: 'd' - it is a directory; and, 'rwx' - that you can read, write and enter the directory. After that, there is a number that is usually 1 for a file (although it can be more than one) and more than 2 for a directory that has some content. Following that, you have the UserID and GroupID for the owner of the file - sometimes as numbers, sometimes as names. Next you have the length (if you look at a directory on a UNIX system, these sizes should be pretty small unless there are a lot of files in there). Next, you have the date and finally, the name of the file/directory. NavigationNow that you can find out what is in any particular subdirectory, you need to know how to get from one to another. This is just like using a normal command line. Suppose, we have the following directory structure...
If we are in /abc/def/ and want to go up to /abc/, we can do this on a UNIX-like FTP client by either typing cdup or cd .. If we are on a Windows FTP client, we have to type cd .. If we now want to go up to /abc/ghi/, we can either type cd /abc/ghi or cd ghi The first one uses the absolute path and the second one uses the path that is relative to where we currently are. Note that by using the double-dot file in the cd path, it is possible to do what we have done above in only one stage (of course, if we wanted to do something while we were in the /abc/ directory, we wouldn't do it on one step). Supposing we are back in /abc/def/, you can do this like so... cd ../ghi Supposing we are back in /abc/def/, and wanted to get to /jkl/mno/, you can do this like so... cd ../../jkl/mno Creating and deleting directoriesCreating directoriesCreating a directory is quite simple. Again, you can use absolute or relative paths in the same way as we used them in Navigation above. The command is 'mkdir' and, as an example, if we wanted to make a directory called 'zyx' in the current directory, we would use the command... mkdir zyx Deleting filesIf we want to remove a directory, we would need to make sure that the directory is empty first. To delete a file, you can use 'delete [filename]' So, if we want to remove a single file called 'flux.png', we would enter the following... delete flux.png If you want to delete a number of files, use 'mdelete' with a file specification including wildcards. So, if we wanted to get rid of a number of files called '20608*pic.png' in the current directory, where * is a set of characters (most likely application of this would be if the 200608 was the date and you wanted to remove a month's images) we could use... mdelete 20608*pic.png mdelete would then ask you to confirm each delete operation. However, mdelete will expand the wildcards as much as it can and if you wanted to delete files using the following pattern - '*pic.png' - then it would expand the initial asterisk to include '../*pic.png', '../abc/*pic.png' and so on. So, make sure that you include a non-wildcard character at the beginning of the string if you can. Deleting directoriesWith all of the files deleted in a directory, you can now removing a directory. You do this similarly to the way that you make a directory... rmdir zyx File transfersIn the same way that we can put a single file using the 'put' command, we can also transfer multiple files using the 'mput' command. This is done in the same way that we used mdelete. Like mdelete - where a set of files already exists that can be parsed with a regular expression - mput has available to it a set of files that it can parse with a regular expression. So, if you want to upload all of the contents of the current local directory to the remote current directory, just type... mput * |
FTP Recursive File Transfer in a mouse click
|
 If you log
into your ftp account using a normal browser like so... If you log
into your ftp account using a normal browser like so...ftp://[account name]:[password]@[domain name]/ ...you will be able to log on and see the contents (you will probably have seen your browser do this with anonymous ftp sites any way). Once you have logged on, you will see in the address bar 'ftp://[account name]@[domain name]/ like so (although here, I have moved up into a directory called 'public_html'). In the directory pane, you should now see file listings and if you have a 'tree' view, you should be able to expand any of these directories. |
 |
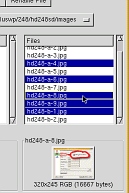
 Now, open
up a file browser window and go to the root directory of
the files you want to upload (ie,
/home/paul/files/some_directory_or_other'). Now, open
up a file browser window and go to the root directory of
the files you want to upload (ie,
/home/paul/files/some_directory_or_other').Next,
highlight any files or directories you want to upload but
only those that are in the root - ie, don't highlight any
files or directories that are in its subdirectories - as
you can see in the screenshot. |
 After
that, drag the files and/or directories to the
destination ftp directory... After
that, drag the files and/or directories to the
destination ftp directory... |
 ...and
click on 'Copy Here'. It is just as easy as dragging and
dropping on any GUI-based system. ...and
click on 'Copy Here'. It is just as easy as dragging and
dropping on any GUI-based system. |
 Now, if
you look at the directories, you can see that the whole
structure, including subdirectories and files, has been
copied across to the server. Now, if
you look at the directories, you can see that the whole
structure, including subdirectories and files, has been
copied across to the server. |
| Unfortunately, this does not work on every browser.
This was done on SUSE Linux 8.2 professional and I know
that it also works on KDE on OpenBSD 3.5. If you find that you cannot get it to work, you could try the following or failing that, do it manually with the command line version of FTP. |
 or 'a
really neat way of doing this'.
or 'a
really neat way of doing this'.
|
 In the
dialogue box that appears, click on 'Get More
Extensions'. In the
dialogue box that appears, click on 'Get More
Extensions'. |
 A new
browser window will appear (unless you have configured
new browser windows to appear as a new tab instead) and
in the top right, in the search box, type 'ftp' (no
quotes). Click on 'Go'. A new
browser window will appear (unless you have configured
new browser windows to appear as a new tab instead) and
in the top right, in the search box, type 'ftp' (no
quotes). Click on 'Go'. |
 Part way
down the page of results, you will see 'FireFTP'. Getting
you to search for it rather than giving you a URL or a
file ensures that you get the most up to date version for
your browser. Part way
down the page of results, you will see 'FireFTP'. Getting
you to search for it rather than giving you a URL or a
file ensures that you get the most up to date version for
your browser.Click on the 'FireFTP' link in the title
(here 'FireFTP 0.94.2'). |
 This will
take you to the add-ons page. This will
take you to the add-ons page.Click on the download
link (marked here with the red arrow)... |
 ...and
your extension will download. ...and
your extension will download.Click on 'Install Now'. |
 Now, you
have FireFTP in your list of Extensions. Now, you
have FireFTP in your list of Extensions.You will now
have to close FireFox and re-open it. |
 With it
reopened, you can see that FireFTP is in the menu. With it
reopened, you can see that FireFTP is in the menu.You
can click on it here each time you want it or you can
install it as an icon in your browser tool bar. |
 Right-click
on the tool bar and select 'Customise...' (yes, with an
's'. Firefox can get their localisation right so why
can't Microsoft?). Right-click
on the tool bar and select 'Customise...' (yes, with an
's'. Firefox can get their localisation right so why
can't Microsoft?). |
 You can
now drag it to where you want on the toolbar and then
click on 'Done'. You can
now drag it to where you want on the toolbar and then
click on 'Done'. |
 Now,
FireFTP has its own Icon. Now,
FireFTP has its own Icon. |
Using FireFTP
Configuring an accountClick on 'Create an account' |
 Type in
your details - if you want, you can try this out on a
local FTP server on your LAN if you have one. Type in
your details - if you want, you can try this out on a
local FTP server on your LAN if you have one. |
Using FireFTP
You can see at the bottom of the screen the
transactions as they take place. |
 To
transfer files and/or directories to the server, just
highlight them and drag-and-drop them into the file list
on the right. To
transfer files and/or directories to the server, just
highlight them and drag-and-drop them into the file list
on the right.It is as simple as that. If you want to delete a file or directory, just highlight it on the server and delete it. You can use the green arrows in the middle to copy highlighted files instead if you want to. Once you have finished, click on 'Disconnect'. |
 FTP
Recursive File Transfer in FireFox
FTP
Recursive File Transfer in FireFox When you
click on the FireFTP icon (or choose it from the tools
menu) you will get a page like this.
When you
click on the FireFTP icon (or choose it from the tools
menu) you will get a page like this. Click on
'Connect' (just to the right of where you clicked to
enter your account details) and it will initiate an FTP
session with the remote server.
Click on
'Connect' (just to the right of where you clicked to
enter your account details) and it will initiate an FTP
session with the remote server.The first thing you do in Vista (File Names)Whilst Windows now comes with its desktop firewall turned on by default, there are still some bad default settings that they should really do something about before they release the final version of Vista. One of these is the 'Hide extensions for known file types' option being turned on by default. There is no reason why this option should even exist. I can't envisage any scenario where a user that is old enough to use a computer is going to burst into tears because they can see that their file's name ends with '.txt' or '.png'. Microsoft: file extensions don't get in the way and they are useful, so get over it. The special case (or 'only excuse') is the desktop
which is the only explicitly graphical part of the
system. Even on KDE, desktop links end with '.desktop'
(eg, 'Floppy.desktop') and are the only hidden extensions
but only on the desktop - if you look at the desktop
directory using a command line directory listing or in a
file editor, you will see them. However, Windows hides
all file extensions that it recognises throughout the
system, regardless of where or how you see them using the
GUI - although you can still see them using 'dir' in the
command line. |
 However,
hiding extensions provides plenty of opportunities for
files with malicious content to misreport their content.
We quite often see examples of email attachments where
the file has, for malicious reasons, a double extension.
For example, with extensions hidden, notes.pdf.exe
will be displayed as notes.pdf - a
normally harmless portable document file (unless you use
NTFS where even the file content doesn't mean that there
isn't an executable file that will run when you start any
given file) - but the system will know that when it is
opened, it should be executed and not simply passed on to
Acrobat. Examining the first few bytes of the file
reveals that it starts with 'MZ' instead of '%pdf' and is
therefore an executable but the user that is clicking on
what he thinks is a PDF file is really starting a program
that will be awarded his/her rights. However,
hiding extensions provides plenty of opportunities for
files with malicious content to misreport their content.
We quite often see examples of email attachments where
the file has, for malicious reasons, a double extension.
For example, with extensions hidden, notes.pdf.exe
will be displayed as notes.pdf - a
normally harmless portable document file (unless you use
NTFS where even the file content doesn't mean that there
isn't an executable file that will run when you start any
given file) - but the system will know that when it is
opened, it should be executed and not simply passed on to
Acrobat. Examining the first few bytes of the file
reveals that it starts with 'MZ' instead of '%pdf' and is
therefore an executable but the user that is clicking on
what he thinks is a PDF file is really starting a program
that will be awarded his/her rights.So, take this opportunity to turn off the 'Hide extensions for known file types' option. You can do this either by going into 'Control Panel', 'Appearance and Personalisation', 'Folder Options', 'View' tab, and un-checking 'Hide extensions for known file types' or, How to...In Windows Explorer, click on 'Organize' [sic],
'Folder Options'... |
 ...and
click on the 'View' tab. ...and
click on the 'View' tab.Next, in the 'Advanced settings:' list box, make sure that the 'Hide extensions for known file types' check box is unchecked. Click on OK and so on and they will appear. |
BSOD on reboot in Vista
However, in Vista, they might have changed their looks slightly - they now tell you more about what has happened and for a few seconds, you can glimpse into the tangled web that lies just below the surface - but they still happen. Now, when you reboot, you can again see what happened and even check online for a solution. At the time of writing, blue screens happen repeatedly when switching from one user to another, going to sleep or even just logging off. Like most BSODs, it is intermittent. |
 Anybody
who has used Windows for any length of time will be
familiar with the 'Blue Screen Of Death' (BSOD). There
have even been screensavers in other operating systems
that mimic various types of BSOD from Windows 95 through
to Windows XP.
Anybody
who has used Windows for any length of time will be
familiar with the 'Blue Screen Of Death' (BSOD). There
have even been screensavers in other operating systems
that mimic various types of BSOD from Windows 95 through
to Windows XP.Repartitioning without WindowsRepartitioning programs are usually quite good but normally require an operating system to be running so that they can run - one exception to this being Acronis Partition Expert ( http://www.acronis.com/ ) which puts itself in a separate partition and runs from that. However, if your OS won't even start because a disk is full, you are in trouble. So, how does the disk get full in the first place?
So, once you have backed up your data (use KNOPPIX to do this - this has been covered a number of times before), you can start deleting partitions. You can use the Windows partitioner that appears at the start of the Windows installation (on the right) but that's quite basic and if you want to know existing partition formats, don't bother with this as it is Windows only - 4.2BSD, ext2, ReiserFS, you can forget them all. If you want a knowledgeable visual representation of
your partitions, keep the KNOPPIX session running. |
For partitioning, you have a choice which includes:
|
 Make sure
that the partitions you want to delete are there as
read/write and the rest is pretty self explanatory. Make sure
that the partitions you want to delete are there as
read/write and the rest is pretty self explanatory.Once you have your partitions deleted, just create one big one for Windows (and any others that you might want for anything else in the future). When you reinstall Windows, it will format it for you in whatever it feels is appropriate. |
 When
installing new software on Windows, everything likes to
install on the C: drive. Some programs give you the
option of installing on other drives but largely, you
don't get the option. So, no matter how good your
intentions at making sensible partitions for Windows, C:
soon fills up and Windows won't boot.
When
installing new software on Windows, everything likes to
install on the C: drive. Some programs give you the
option of installing on other drives but largely, you
don't get the option. So, no matter how good your
intentions at making sensible partitions for Windows, C:
soon fills up and Windows won't boot.