PC Plus HelpDesk - issue 223
This month, Paul Grosse gives you more insight into
some of the topics dealt with in HelpDesk and HelpDesk
Extra
|
 |
HelpDesk
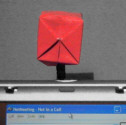
Origami Webcam Cover
To combat this, you can either unplug your webcam every time your teenage daughter leaves it to go and do a few more pages (or lines) of homework (and get moaned at both by her when she comes back and the system which has to detect it again and set up all of the drivers and so on each time it is plugged in) or you can cover up the camera. If you just put a piece of paper in front of it, this can get knocked off and so on. The origami webcam cover therefore is your ideal solution and here is how to make it. First of all, origami is just paper folding whereas this includes one cut with the scissors but that is after all of the origami has been done so please don't flame me. Secondly, for those who know origami, I'll cut to the chase - this is just a water bomb with the end cut off. For everybody else...
|
 If you have kids,
their browsing habits (running scripts and so on) might
lead to spyware being installed and executed
automatically on your computer. If you have a local
network, it might be that for someone in your house (or
office) the same situation could exist. Some spyware can
be configured to activate your webcam and either take
images at regular intervals or continuously.
If you have kids,
their browsing habits (running scripts and so on) might
lead to spyware being installed and executed
automatically on your computer. If you have a local
network, it might be that for someone in your house (or
office) the same situation could exist. Some spyware can
be configured to activate your webcam and either take
images at regular intervals or continuously.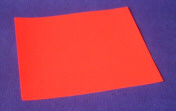 First
of all, you need to have a square sheet of paper.
In origami, this is usually coloured on one side
and white on the other.
First
of all, you need to have a square sheet of paper.
In origami, this is usually coloured on one side
and white on the other.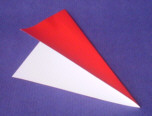 With
the white side facing upwards, make a fold so
that one corner goes over to its opposite corner.
Take care to make sure that folds are accurate
and sharp - run your finger nail along the fold.
With
the white side facing upwards, make a fold so
that one corner goes over to its opposite corner.
Take care to make sure that folds are accurate
and sharp - run your finger nail along the fold.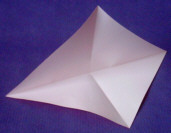 Now
open it out again and create a fold at right
angles to that by folding the other pair of
corners over to meet each other.
Now
open it out again and create a fold at right
angles to that by folding the other pair of
corners over to meet each other.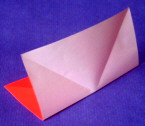 With
the coloured face on the inside, fold the paper
so that two opposite edges meet.
With
the coloured face on the inside, fold the paper
so that two opposite edges meet.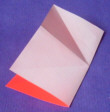 Repeat
with the other two edges, opening out again after
you have made the fold.
Repeat
with the other two edges, opening out again after
you have made the fold.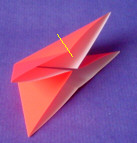 If
you push the white centre-face in so that it
becomes concave, the diagonals will fold down and
the other folds will fold up, producing a
triangular shape. If you have produced a diamond
shape, you have done something wrong and you can
either force the folds the other way or make a
frog out of it.
If
you push the white centre-face in so that it
becomes concave, the diagonals will fold down and
the other folds will fold up, producing a
triangular shape. If you have produced a diamond
shape, you have done something wrong and you can
either force the folds the other way or make a
frog out of it.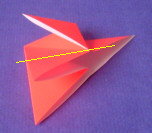 Now
repeat with the corner on the left, folding
towards you so that you end up with a mirror
image of the one on the right that we have just
done.
Now
repeat with the corner on the left, folding
towards you so that you end up with a mirror
image of the one on the right that we have just
done.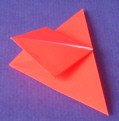 It
should now look like this.
It
should now look like this.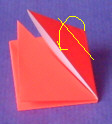 Now,
fold in the corners to the medial line that we
have been forming.
Now,
fold in the corners to the medial line that we
have been forming.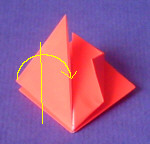 Repeat
this with the opposite corner.
Repeat
this with the opposite corner.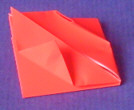 It
should now look like this.
It
should now look like this.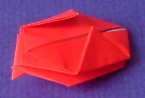 Turn
it over and do the same to the opposite side.
Turn
it over and do the same to the opposite side.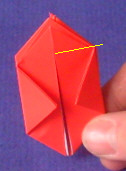 Take
one of the loose tips and fold it down so that
the tip's medial edge lies along the medial edge
of the rest of the tip that it is being folded
down onto. The yellow, fold-line is at 90 degrees
to that medial edge.
Take
one of the loose tips and fold it down so that
the tip's medial edge lies along the medial edge
of the rest of the tip that it is being folded
down onto. The yellow, fold-line is at 90 degrees
to that medial edge.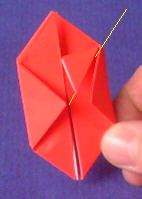 Now,
fold the folded tip over again, but so that it's
fold goes from the centre, to the corner -
following the yellow line.
Now,
fold the folded tip over again, but so that it's
fold goes from the centre, to the corner -
following the yellow line.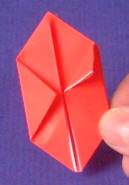 Like
so.
Like
so. Now,
we need to stuff the flap we have created in
steps 13 and 14, into the fold that we made in
step 9.
Now,
we need to stuff the flap we have created in
steps 13 and 14, into the fold that we made in
step 9.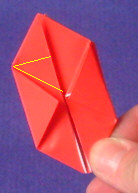 Now
repeat steps 13 to 16 for the other three tips.
Now
repeat steps 13 to 16 for the other three tips.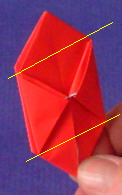 Next,
we need to create the creases that will allow the
gussets we have made to open up when we turn it
into a cube. These will be made along the yellow
lines.
Next,
we need to create the creases that will allow the
gussets we have made to open up when we turn it
into a cube. These will be made along the yellow
lines.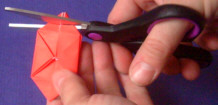 It
is now time to violate the laws of origami and
get out the scissors.
It
is now time to violate the laws of origami and
get out the scissors.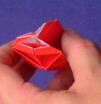 Next,
put your finger inside and pull out the shape,
working your way around, making the creases sharp
and straight.
Next,
put your finger inside and pull out the shape,
working your way around, making the creases sharp
and straight.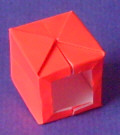 Finally,
we have our box, ready to put over the webcam.
Finally,
we have our box, ready to put over the webcam.Windows SMB shares in GNU/LinuxWindows uses a system for file and printer resource sharing called SMB. In GNU/Linux, the process is called Samba. Each machine needs to have an SMB server for other machines to see its resources and an SMB client for it to see the resources on other machines. In Windows, you just need to set up file and print sharing and all is done. In Linux, you need to configure and start the services. Although this sounds like it is a bit more of a hassle in Linux, you only need to make sure the configuration files have the correct information and you have the right services running. This is done using a text editor such as KWrite instead of working yourself through a maze of silly wizards. First of all, you need to get Linux to recognise the SMB shares. To do this, you need to run smbfs which can be done in the list in the Runlevel Editor in the Control Centre in YaST2. To view SMB shares in Linux, you can do one (or both) of two things:
|
GNU/Linux Samba (SMB) shares in WindowsThis allows you to see directories and files (and printers if you want) on Windows machines on the LAN. To get this working, you need to have the smb daemon and the nmb daemon running (you can check this in the runlevel editor in YaST2). Open up the file /etc/samba/smb.conf in KWrite and at the bottom of the file, include the shares you want. The following is an example (on a machine called 'opal') that allows read/write access (and is belt and braces as far as use of names goes so it should work with most versions) but you can limit this once you have got it working - details are in the man pages for smb.conf [NetStore] comment = Network Addressable Storage path = /nas/cache public = yes guest ok = yes create mask = 0777 directory mask = 0777 read only = no writable = yes locking = no This creates a share from the Linux machine (from a directory called '/nas/cache') that in a Windows machine appears in the network file structure as opal\NetStore\ that the user can read from and write to. Use the mask numbers to limit access - this was discussed in HelpDesk PC Plus issue 213. |
Find your real IP addressMany websites claim to be able to tell you your IP address but unfortunately, all they can tell you is the IP address of the proxy server that your ISP routes all of your Internet traffic through. This is simply because that is all that the website's webserver has been told to look for. If you search Google using ip address (http://www.google.com/) then look at the sites with 'my IP address' or 'what's your IP address' or similar, you will get a variety of IP addresses (look at just the last number in the address as it is likely that the first three will be the same in each case. This should happen unless you happen not to go through a proxy (or your ISP only uses one proxy server). To find your IP address, so that your friends can look at your web server or whatever service you wish to provide, you can go to http://checkip.dyndns.org/ where they have sorted out the problem. |