PC Plus HelpDesk - issue 244
This month, Paul Grosse gives you more insight into
some of the topics dealt with in HelpDesk
|
 |
HelpDesk
KDE Screen-layout ChoiceKDE is all about choice and as there is so much choice, you can pick the bits that you find work for you best. If you are looking at migrating to Linux or UNIX (platforms that support KDE), you can choose a screen layout that your users will already be familiar with thus saving on retraining. If you are liberating your users from the proprietary lock-in world of the Mac, you can have a menu across the top and have a similar set of icons - choosing to have icons for commonly used programs on the panel across the bottom with only a minor use of a main menu. Window decorations (the bits around the edges of the windows - using the KDE version of IceWM with its decorations allows you to make your own) and style (the controls and surfaces within the windows) can be made to look sufficiently similar that any Mac user will feel at home on their new UNIX/Linux system. Similar things can be done if you are liberating the users from Windows. One argument against migrating to UNIX/Linux that people sometimes repeat is that users will not be familiar with the controls in the GUI - KDE demonstrates that this argument is simply hollow. It turns out that the KDE GUI is just as intuitive than Windows and, as you get used to the extras, is not crippled with pointless restrictions in the way that proprietary GUIs are. The same applies to Apple's offerings. Once you have got used to your UNIX/Linux box, you can start playing around with the look and feel of it - using the system's flexibility to make it work the way that you want it to. Only then do you truly appreciate how restrictive the proprietary interfaces are. With KDE, you can have extra panels - on the sides and the top if you like. You can dispense with parts that you find of little or no use or have become redundant by other ways you have found of doing things.
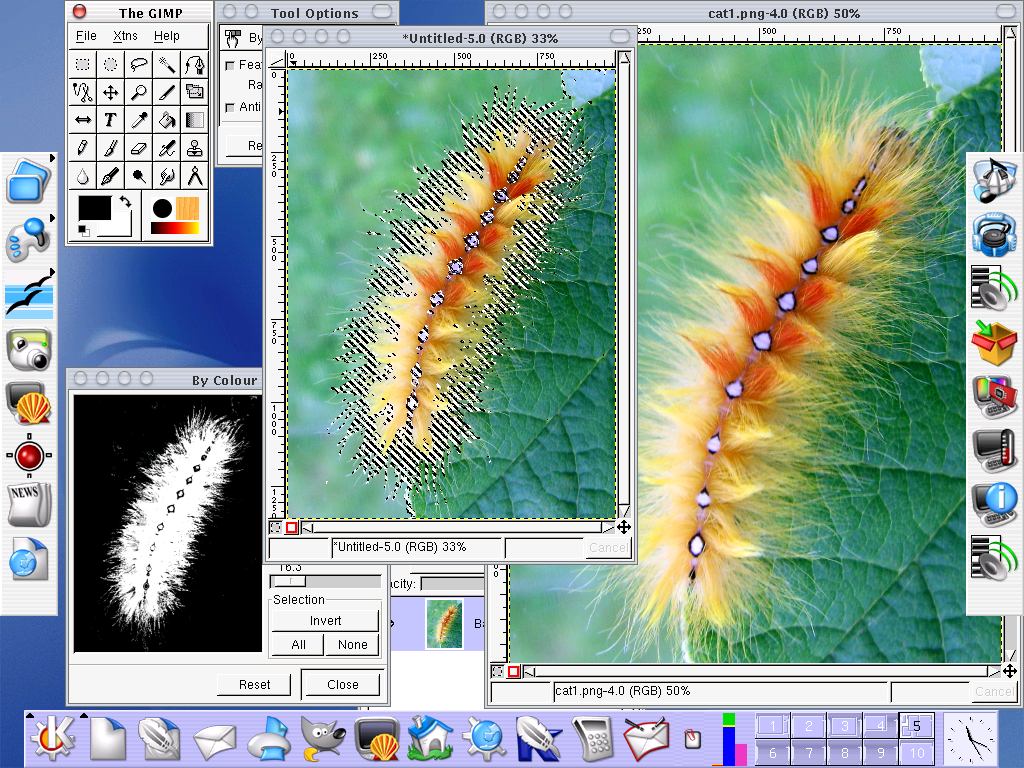
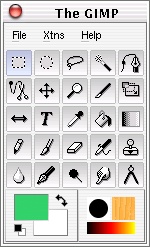
I have tried the menu across the top of the screen but found that it meant that if you had a window that was away from the top and you wanted to use the mouse to use the menu, you had to move it all of the way up there, away from what you were doing in the window itself. This caused too much disruption and so I got rid of it. One thing that I did find worked quite well is having commonly used applications on panels - Note that these panels can be a range of different sizes and do not have to be the same size as each other (These are set to large (48 pixels) but can be 32, 22, 16 or custom which can be dragged by the edge to whatever size you want). I hardly ever use the main menu (the one that is equivalent to the 'Start' menu in Windows) as I can get most of what I need from the panels. You can see that I use three as a normal user. On the bottom, starting at the left icon, there is the 'K' menu (equivalent to the start menu), then a 'Quick Browser' button that reproduces the ~/Documents directory as a tree-style menu so that I can open files stored in there or open an file manager window or a console in one of those directories. Next is 'Kate' - a text-editor that can open multiple files and has a built-in console that I use for programming, then a series of buttons for programs such as The GIMP, console, file browser, web browser, KWrite, calculator and email program. Next is the system monitor which tells me how much processor time is being used (hardly any at all), how much RAM is in use (green at the top is file buffers) and lastly how much swap space (the UNIX equivalent of Windows' 'Virtual Memory'). |
 Next,
you can see the 'Page Launcher' which happens to be
displaying 10 windows (5x2). On KDE (as with many other
UNIX desktops), you can have up to 16 desktops so that
you can order your work. This means that if you are in
the middle of doing something, you can just go to another
desktop and start doing something else which in turn,
means that you don't have to minimise everything. Next,
you can see the 'Page Launcher' which happens to be
displaying 10 windows (5x2). On KDE (as with many other
UNIX desktops), you can have up to 16 desktops so that
you can order your work. This means that if you are in
the middle of doing something, you can just go to another
desktop and start doing something else which in turn,
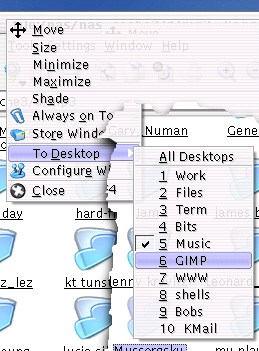
means that you don't have to minimise everything.Of course, it makes sense to organise yourself so I do my word processing on desktop 1, have my music playing on desktop 5, do my image processing on desktop 6 and my email client on desktop 10. If you want to move a window to another desktop, just right-click on the window decoration and select 'To Desktop'/ and then the desktop you want - if you give them meaningful names when you configure them, you will see something like the screenshot on the right. |
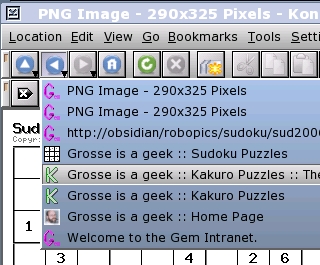
 With
having so many desktops, there is the possibility that
you might forget where you have left a particular window
so instead of working your way through them all (just
press [Ctrl][Fx] where 'x' is a number from 1 to 12 or
[Ctrl][Shift][Fx] to get any over the normal 12), on the
left panel at the top is the 'Window List Menu' which
gives a list of all windows on the the system for that
user. With
having so many desktops, there is the possibility that
you might forget where you have left a particular window
so instead of working your way through them all (just
press [Ctrl][Fx] where 'x' is a number from 1 to 12 or
[Ctrl][Shift][Fx] to get any over the normal 12), on the
left panel at the top is the 'Window List Menu' which
gives a list of all windows on the the system for that
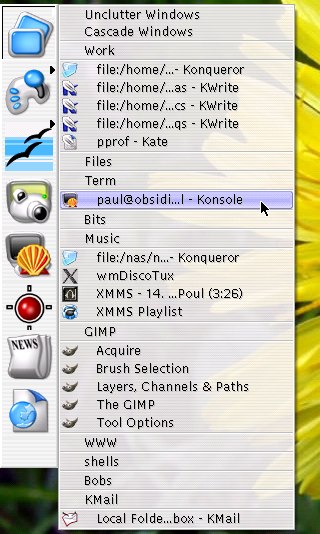
user. Just clicking on that menu item will bring down a list that is similar to the one you can see on the right. Each desktop is listed along with any windows that appear in it, thus allowing you to find something you think you might have lost. All of this makes clearing the desktop something of a redundant activity as you can always find a clear one to work on if you are interrupted. Other buttons you can see on there are: Games menu; OpenOffice.org menu; a program to take a snapshot of the screen; a root shell; a program called XKill; and, at the bottom, two programs I wrote myself. |
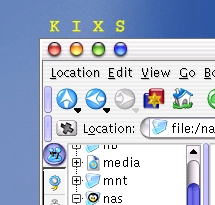 Here,
you can see the windows decorations I use for the normal
user. At the moment, I'm using the KDE version of IceWM
with an Aqua-based scheme. The red button (K) kills the
window, the amber one (I) minimises it, the green button
(X) maximises it and the blue button (S) makes it appear
on all desktops - this latter button does not feature in
the Mac OS X GUI because it is a single desktop only
system. Here,
you can see the windows decorations I use for the normal
user. At the moment, I'm using the KDE version of IceWM
with an Aqua-based scheme. The red button (K) kills the
window, the amber one (I) minimises it, the green button
(X) maximises it and the blue button (S) makes it appear
on all desktops - this latter button does not feature in
the Mac OS X GUI because it is a single desktop only
system.Occasionally, I change this around so that it looks completely different but that it how it is at the moment. |
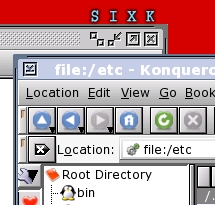 This
is the windows decorations that I use for root. The
appearance is such that it reminds me that I'm in a
special, privileged environment. This
is the windows decorations that I use for root. The
appearance is such that it reminds me that I'm in a
special, privileged environment.The buttons are as they are in the screenshot above. Also, note that the icons and fonts I've chosen are different. The result is that the whole feel is different and I am always aware that there are things that I should be extra careful about that could jeopardise the system if I were to do them (the sort of things that people on Windows systems do with admin rights all of the time such as surfing the web. |
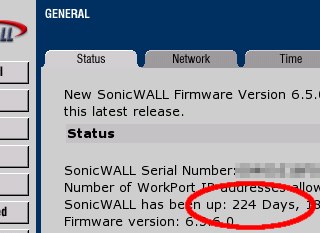
Hardware Firewalls
So, if you want more than one machine plugged into the Internet at any one time but you don't want to have one of them turned on continually, your best bet is to have an appliance firewall. These tend to have around four or so RJ45 sockets in the back so you can plug in a number of machines and as it is on all of the time (and using a lot less electricity than a computer), you can pretty much forget it once it has been set up. The screenshot on the right shows one appliance firewall that has been up for 224 days (over 7 months) and uptimes that run into years are not atypical. |
Search Engine Ranking ProgramIf you look at your Webalizer search string results, you can see what people have typed into a search engine in order to get to your site. If you are curious, you might like to know just how many other listings they had to negotiate before they got to your site. |
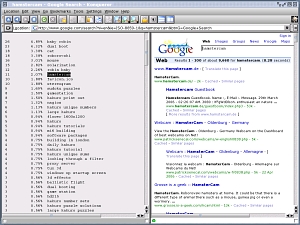 One way of doing this is to open up two
browser windows (or tabs, depending on your browser) and
drag the search string from the Webalizer list to the
search window, click on the button and then count your
way down the list to your entry. One way of doing this is to open up two
browser windows (or tabs, depending on your browser) and
drag the search string from the Webalizer list to the
search window, click on the button and then count your
way down the list to your entry.There is an easier way.
|
 Click
here to open the directory in another browser window.
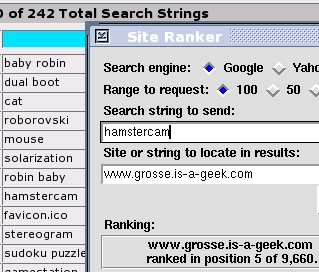
Using Site Ranker ('ranker' for UNIX-like systems and
'ranker.pl' for Windows), you can simply copy a search
string directly from your web browser into the 'search
string' box (deleting the old one) and click on 'Search. Click
here to open the directory in another browser window.
Using Site Ranker ('ranker' for UNIX-like systems and
'ranker.pl' for Windows), you can simply copy a search
string directly from your web browser into the 'search
string' box (deleting the old one) and click on 'Search.You need to have the modules Tk and LWP::UserAgent installed - it is probably easiest to just try to run the program if you don't know whether you have them installed or not. You can get any modules you have not yet installed from CPAN. |
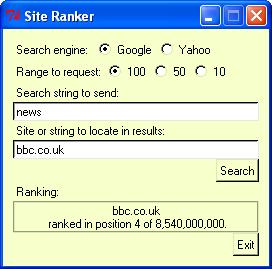 This is ranker.pl running on Windows XP. This is ranker.pl running on Windows XP.It works in exactly the same way - simply because it is the same program running on a cross-platform system. Note that in the ranking result, it also picks out the total number of page results that the search engine gives - here, Google stating that the search string 'news' gave 8,540,000,000 results, of which bbc.co.uk came fourth. |
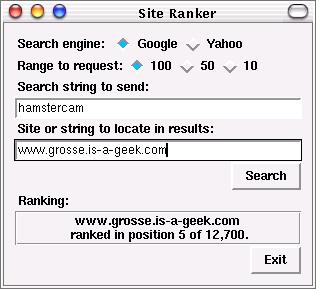 The Tk interface is a lot more flexible and
you can define the colours if you want. Here, I've used a
colour scheme that is in keeping with the one I have on
my user account (see 'KDE Screen Layout Choice' above). The Tk interface is a lot more flexible and
you can define the colours if you want. Here, I've used a
colour scheme that is in keeping with the one I have on
my user account (see 'KDE Screen Layout Choice' above). |
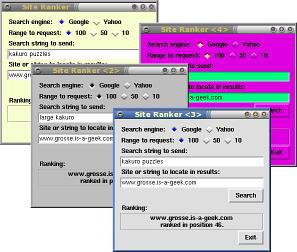 In short, you can get it to look any way you
want - at the same time. These are all from one
screenshot with four windows open simultaneously, using
four colour schemes. In short, you can get it to look any way you
want - at the same time. These are all from one
screenshot with four windows open simultaneously, using
four colour schemes. |
Running Down Laptop Batteries Safely
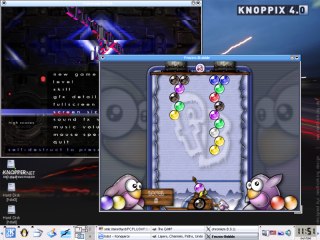
If you try to run your battery down on Windows, there comes a point where the system simply stops and this is equivalent to a dirty shutdown. Unfortunately, Windows writes to a disc, even when it is booting up, so you can only ever have a dirty shutdown with Windows. Ideally, you need something that will not write to any drive at any stage of running and this is where KNOPPIX comes to the rescue. With KNOPPIX (screenshot on the right), you just insert the CD and boot off that. You have full access to the system itself but because it is on a CD, it has been designed so that it does not write to any drive. As a result, you can use KNOPPIX until the battery goes flat without creating a dirty shutdown situation for your hard drives. In the mean time, you can play some of the games on KNOPPIX and look around the system. You never know, you might decide to take Windows off your machine and install Linux instead. |
 Your laptop battery
needs to be taken through a complete charge/discharge
cycle every now and then otherwise you start to lose some
of the charge range - it might end up that it will only
ever discharge to 80 per cent of full charge at which
point the voltage falls off to an unusable level, because
you never let it go below 80 per cent.
Your laptop battery
needs to be taken through a complete charge/discharge
cycle every now and then otherwise you start to lose some
of the charge range - it might end up that it will only
ever discharge to 80 per cent of full charge at which
point the voltage falls off to an unusable level, because
you never let it go below 80 per cent.Single Colours - Hex Values |
 If you are
trying to write a program that uses colour in its output
- say for a program that generates graphs as an output -
you can run into a problem with finding the right colour
values for your program. In Perl, when defining colours
as numbers, they are written in the same way as those in
HTML code - '#f4d90a' for example. Here is an easy way of
finding the right colour. If you are
trying to write a program that uses colour in its output
- say for a program that generates graphs as an output -
you can run into a problem with finding the right colour
values for your program. In Perl, when defining colours
as numbers, they are written in the same way as those in
HTML code - '#f4d90a' for example. Here is an easy way of
finding the right colour.In The GIMP, clicking on one of the colour blocks at the bottom left of the main window - here, green and white - will open up a dialogue box |
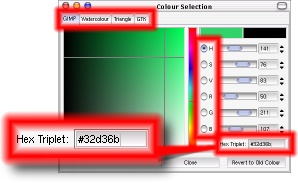 This is
the dialogue box. In addition to the Hex Triplet value
that you want, you can see that it has 4 tabs: GIMP;
Watercolour; Triangle; and, GTK which will allow you a
wide choice in how you select your colours. This is
the dialogue box. In addition to the Hex Triplet value
that you want, you can see that it has 4 tabs: GIMP;
Watercolour; Triangle; and, GTK which will allow you a
wide choice in how you select your colours. |
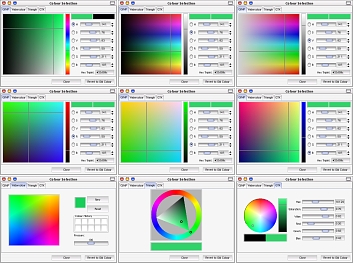
| In addition, under the GIMP tab, there are 6 options
on how you represent the choice: Hue; Saturation; Value;
Red; Green; and, Blue - and this is what they look like. From left to right, top to bottom they are: GIMP - Hue; Saturation; Value; Red; Green; Blue; then, Watercolour; Triangle; and, GTK. |
 |
| Now, you can pick whatever colour you like. |
Gradients - Hex ValuesIf you are trying to write a program that uses colour gradients in its output - say for a program that generates graphs with colour bars that change colour as they increment in value, you will need to know what those colours look like as well as what the values are. Here is an easy way of finding the right colours so that you can use RGB interpolation instead of HSV interpolation. |
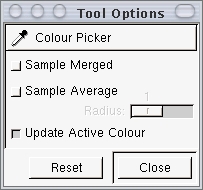 In The
GIMP - as with many image-editing programs - there is a
colour picker tool which is often shaped like a dropper.
With that selected, you can sample any colour you like. In The
GIMP - as with many image-editing programs - there is a
colour picker tool which is often shaped like a dropper.
With that selected, you can sample any colour you like.If you create an image and using the colours as described above and create a gradient, you can use the colour picker to get the intermediate colours. |
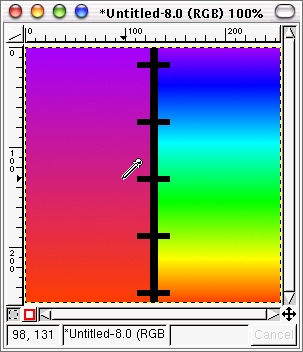 For a
linear RGB interpolation, you can get away with just
sampling a start and end colour and then just
interpolating the values for a given position. For a
linear RGB interpolation, you can get away with just
sampling a start and end colour and then just
interpolating the values for a given position.For an HSV interpolation - like the one you can see on the right in the screenshot - it is a little more complicated if you want to avoid using the HSV calculation itself. In the screenshot, the gradients have the same start and end values it is just that the one on the left is a plain RGB interpolation and the one on the right is a HSV interpolation. If you click the dropper somewhere on the image, it will sample the colour at that point (you can get it to choose an area if you want).
|
 Here, you
can see the tool's output, along with the hex value at
the bottom. Here, you
can see the tool's output, along with the hex value at
the bottom.So, for the HSV interpolation, you can draw a line with even intervals on it, take samples and then do plain RGB interpolations of those values. For a colour change like the one on the above right - going through the rainbow effectively - you would probably need around 8 points or so - depending on how accurately you wanted the colours to be represented. For smaller HSV changes, fewer would be needed. |
Super-Gradients
In addition, you can introduce transparency into the gradient which makes things very interesting if you want to. This tool is well worth playing around with because it is so powerful. |
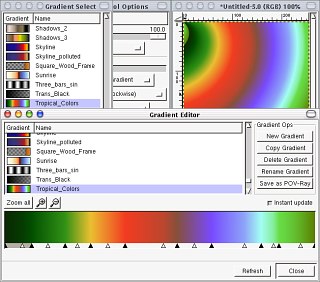 If a HSV gradient
isn't quite as complicated as you need, you can use the
gradient editor instead. Here, you have control over the
colours (picked from other areas if you like), what type
of gradients you want for them (you can mix HSV and RGB
gradients within the same scheme) where the centre point
of the gradient is so that you can skew the gradient.
If a HSV gradient
isn't quite as complicated as you need, you can use the
gradient editor instead. Here, you have control over the
colours (picked from other areas if you like), what type
of gradients you want for them (you can mix HSV and RGB
gradients within the same scheme) where the centre point
of the gradient is so that you can skew the gradient.KDE Keyboard Schemes
If you have a custom configuration for you way of working, you can get KDE to accommodate that as well. Do do all of this, open up 'Control Center', select 'Regional & Accessibility' and then 'Keyboard Shortcuts'. You can create a new shortcut or modify an existing one by selecting the action from the list box and click on one of the option buttons - 'Default' or 'Custom' - and you will be allowed to change that action's key sequence just by pressing the key with any modifiers that you want. |
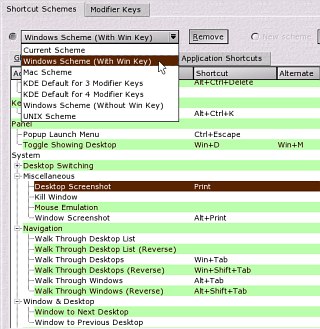 KDE is not just for
Linux on a PC so there are a number of other keyboard
layouts that if can cover. In addition to running with a
Windows keyboard (with or without the flag keys), if can
run on a Mac and so has the layout for that as well. In
addition, there are also various UNIX systems that KDE
runs on (including various BSDs, Solaris, AIX and so on)
so with a UNIX layout, you have all of your modifier
keys.
KDE is not just for
Linux on a PC so there are a number of other keyboard
layouts that if can cover. In addition to running with a
Windows keyboard (with or without the flag keys), if can
run on a Mac and so has the layout for that as well. In
addition, there are also various UNIX systems that KDE
runs on (including various BSDs, Solaris, AIX and so on)
so with a UNIX layout, you have all of your modifier
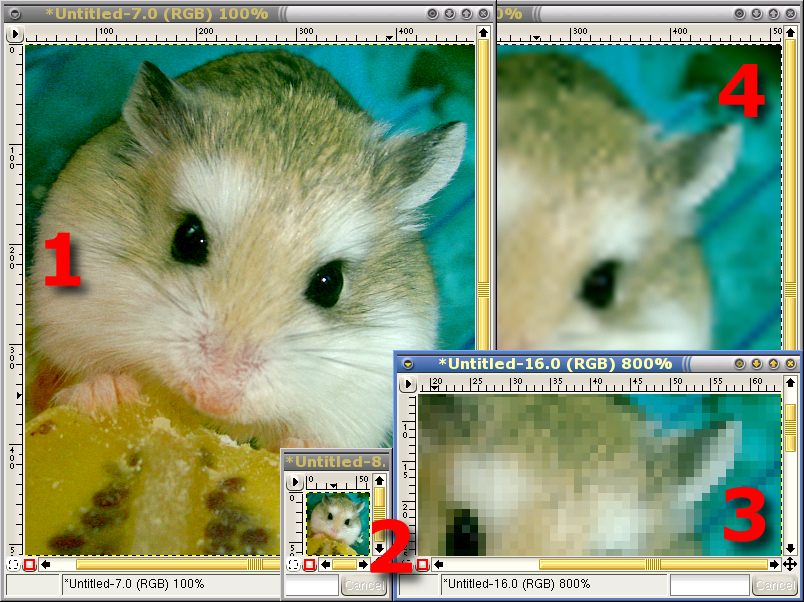
keys.(Not) Doing The ImpossibleIn programs like CSI, you often see people zooming in on some flaky image and then being able to sharpen up the screen, which is by now only a few pixels of the original image, to see someone's face and so the plot proceeds. So, is this possible?
One thing you might like to consider is that if you are going to use any tool, the action it performs makes assumptions on how the original image came into being. If something is blurred, what sort of blur was it? (Gaussian or some other distribution?). What about the optics of the device (I am not aware of any camera-phones that use lenses by Carl Zeiss or are made by Leica) - they will be full of aberrations that will befuddle any general software (that is to say any software that was not designed specifically for that configuration. So, what about configuration-specific software? That used to correct the images from the Hubble Space telescope was designed to correct known aberrations that existed in the image that changed over the image itself. These were all from light sources that were a particularly long way away and the imaging system (mirrors in this case) did not change - this meant that it could be optimised. Even so, when the new optics were put in place, the images were so much clearer than even the 'corrected' ones from before so even this is not perfect by any means. Note also that this is not interpolating pixels, it is just correcting image aberrations - there is no 'let's see what is between these two pixels' scenario. In the world where this type of light-path/aberration control simply doesn't exist, you cannot interpolate pixels and see what was there in the original. In the screenshot, the image was shrunk down to an eighth of its original size and then blown up again. Here, any optical aberrations are not included and still, it cannot be done. Why can't it be done? Simply, to do so would be a breach of the Second Law of Thermodynamics. That law says that in a closed system, the level of disorder (called 'entropy') only ever increases. In effect, the single photograph is a closed system and everything we do to it only increases the level of disorder. If we shrink it down to one eighth of its size, we have just thrown away over 98 per cent of the information that was there. Increasing its size will not bring that back again. If we sharpen it once it has been blown up, we cannot increase the level of information that was in the original above one part in 64 of the original because we discarded 63 parts of every 64 when we shrunk it down. Putting myself at risk of repeating myself, it cannot be done. Mind you, to state that the Second Law of Thermodynamics will never be broken would itself require the Second Law of Thermodynamics to be broken. Don't hold your breath though. |
Favicon.ico Images - A True Quantum Leap In The Browsing Experience
Favicons.ico files are small .ICO format files that can have a 16x16 image and/or a 32x32 image in them so that when they are displayed in the address bar of the browser, they replace the icon that was there (this does seem really to be a quantum leap in browsing technology simply because you could not make a smaller step). If you are curious to know what happens to them when they get on your machine, the answer is - like everything else Internet related - they are stored somewhere on your hard drive. On Linux, they are all stored as .PNG files, regardless of the original format. So, how do we, as website owners, put them onto our sites so that we can avoid being slagged off by people who really should be doing better things with their time? Read on... |
 Favicons
are arguably the least effective denial of service attack
ever. They simply serve no purpose other than to make
someone's browser look prettier. Are home Internet
end-user's really so impressed by something so puerile?
Apparently they are.
Favicons
are arguably the least effective denial of service attack
ever. They simply serve no purpose other than to make
someone's browser look prettier. Are home Internet
end-user's really so impressed by something so puerile?
Apparently they are.Creating Your Own 'favicon' File |
 Although
the original idea was to have a file called 'favicon.ico'
on the document root of your web server, there is a
problem getting hold of a program that will produce this
arcane format. If you have ever tried, you will have
found that they generally aren't very easy to use,
require you to sacrifice one of the only 16 colours
available to become the transparent colour and usually
have some sort of spoiler trick up their sleeve such as
only producing 3 files before refusing to work again, not
producing any files at all ... or something worse. Although
the original idea was to have a file called 'favicon.ico'
on the document root of your web server, there is a
problem getting hold of a program that will produce this
arcane format. If you have ever tried, you will have
found that they generally aren't very easy to use,
require you to sacrifice one of the only 16 colours
available to become the transparent colour and usually
have some sort of spoiler trick up their sleeve such as
only producing 3 files before refusing to work again, not
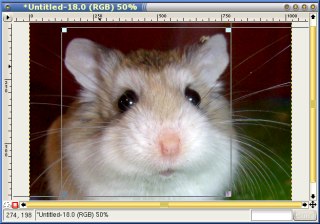
producing any files at all ... or something worse.So, to avoid this, you can actually use a normal network image format such as gif. png or jpg. png will allow you to preserve transparency as well as have as many colours as you like (although with a 16x16 grid to go at, you aren't going to get more than 256 any way). So, step one is to choose an image that you can fit into a square whilst preserving enough detail to make it reasonably recognisable. |
 With your
image now cut (note that I removed the black background
between the ears), cropped and corrected for density
distribution and so on, shrink it down to 16x16. With your
image now cut (note that I removed the black background
between the ears), cropped and corrected for density
distribution and so on, shrink it down to 16x16.Next, save it to the right directory within your server. You don't need to call it favicon.ico - you can call it mypic.png if you want. |
And this is how. In the web page, include in the
header the following line (assuming that the image you
have saved is called robo1.png and it is in a directory
called 'fico'...<link rel="icon" href="fico/robo1.png" type="image/png"> |
 ... and it
will now appear in the address bar of the browser just
like the image on the right. ... and it
will now appear in the address bar of the browser just
like the image on the right.Note that for the reasons that you can name them anything you want, and that they don't have to be in the same directory as the current web page or closer to the root, you can have them all organised nicely. Also, with them not having to be ICO files, you can use any program you want to create them. |
 One
advantage that the icon-centric end-user will find is
that they all appear in the navigation bar and if you use
[Alt][Tab], in there as well. One
advantage that the icon-centric end-user will find is
that they all appear in the navigation bar and if you use
[Alt][Tab], in there as well. |
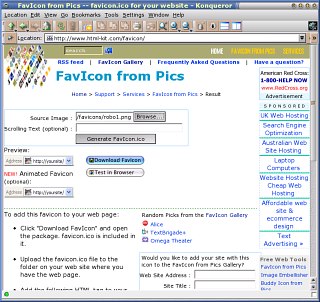
Online Generation of 'favicon.ico' Files
Next, open up a browser point it to http://www.html-kit.com/favicon/ (click on the previous link to open up the site in another browser window) and just upload your image and download the favicon.ico file. This works with more than the 16 colours that the original ICO format used for this used so it produced quite good results. When I tried it out, it worked nicely and quickly as well. |
 If you really do need
to use an .ico file, you can create them online. Just
prepare your image as you did before and save it to any
file name you want.
If you really do need
to use an .ico file, you can create them online. Just
prepare your image as you did before and save it to any
file name you want.