PC Plus HelpDesk - issue 225
This month, Paul Grosse gives you more insight into
some of the topics dealt with in HelpDesk and HelpDesk
Extra
|
 |
HelpDesk
W3C linksIf you have had a website up and running for any length of time, there is a possibility that some of the links from your site point at pages or even sites that don't even exist any more. Of course, sites can be down for maintenance or other reasons, only to pop up again a few hours later so it is not advisable to cut out every link that does not produce a page as soon as it fails. The best policy is to scan the links and then, a few days later, scan those that did not work. Any that are left can, at your discretion, be scanned again or thrown out. You might decide to have a file with the links in so that you can return to them and check them later.
|
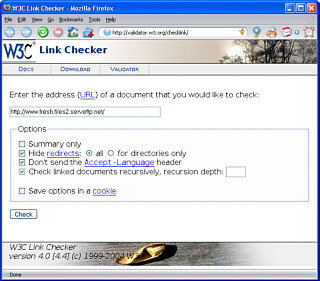 So,
what is the best way of searching through your
links? Whilst it is possible to write a program
that looks recursively through your site, it is
probably easier to use the link checker at
So,
what is the best way of searching through your
links? Whilst it is possible to write a program
that looks recursively through your site, it is
probably easier to use the link checker at 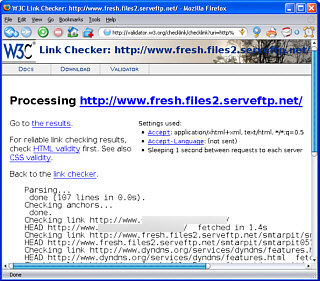 Once
it has looked at your site, it displays the
results so that you can identify the culprits and
check on them again later.
Once
it has looked at your site, it displays the
results so that you can identify the culprits and
check on them again later.Adding a working OpenBSD entry to the GRUB bootloaderIf you want to dual-boot with OpenBSD and Linux, you will have the problem that Linux will not recognise the 4.2BSD partition that OpenBSD uses as a viable operating system (primarily because it does not know how to read 4.2BSD partitions) To get around this, you need to add an entry manually to GRUB. This can be done fairly easily from SuSE Linux. All you need to do is to... Go into 'Control Panel'> 'YaST2'> 'System'> 'Boot Loader Configuration'. Select 'Available Sections' and click on 'Edit' - a list box appears. Click on 'Add' to add a new operating system and a message box appears asking; 'Clone the selected section ... instead of creating a new, empty section?' and answer 'No'. A new list appears with 'Section Name' highlighted. Click on 'Edit' and enter 'OpenBSD' (or whatever OS you have installed). In the 'Section Type', Select 'other' and the bottom half of the list should change. Edit 'root' to say '(hd0,0)' (noting that you do need the brackets and you are effectively saying the first partition (0) of the first hard drive (hd0)) and 'chainloader' should already be set to '+1'. Next, click on the 'Add' button and select 'makeactive' from the dropdown combo list. Click on 'OK' at the bottom right which takes you back to the options list and click on 'OK' again. Finally, saelect 'Replace Code in MBR', click on 'Edit', check the ckeckbox and click on 'OK'. Click on 'Finish' and you can now dual-boot into Linux and OpenBSD. |
Windows Dialler for Call barring.
However, modern telephones will display not only the last number dialled but several before that. In other words, if you use your code on your handset, it is only a matter of time before (s)he uses the recently dialled numbers facility on a phone that you used to un-block the calls and finds the PIN. In order to prevent this, you can avoid ever dialling the number from the telephone simply by using the Windows phone dialler. In this way, the telephone handsets never dial the number so that PIN cannot be seen from them. This will work as long as you keep your Windows machine protected by a password and don't allow your children to use it. |
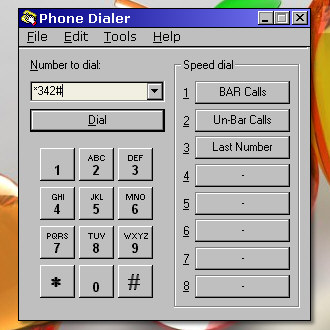 If you have
discovered that your teenage daughter/son has started
clocking up hundreds of pounds worth of telephone calls
to her/his boy/girlfriend's mobile, you will probably
have invested in call barring by now - this usually takes
the form of a code that you use to bar long distance and
mobile numbers and a code combined with a PIN to unbar
them.
If you have
discovered that your teenage daughter/son has started
clocking up hundreds of pounds worth of telephone calls
to her/his boy/girlfriend's mobile, you will probably
have invested in call barring by now - this usually takes
the form of a code that you use to bar long distance and
mobile numbers and a code combined with a PIN to unbar
them.HelpDesk Extra
About OpenBSDReleased roughly every six months (around the beginning of May and November) from http://www.openbsd.org/, OpenBSD is a UNIX-like operating system that places security above having the highest version number for any particular program. The default install (which includes everything you would want to run a webserver) has had only one externally accessible vulnerability in the last 8 years which is better than some operating systems that we can think of (all of them actually). If you look at the errata page ( http://www.openbsd.org/errata.html ), you will get an idea of some of the concerns and how many there are (or, perhaps how few there are when you consider that these versions run for 6 months). Compare that to other popular systems if you want. OpenBSD is not limited to running a server and is perfectly at home on a desktop or laptop even. The default install not only includes webserver software but also a GUI (XWindows) upon which you can run other GUIs if you want. |
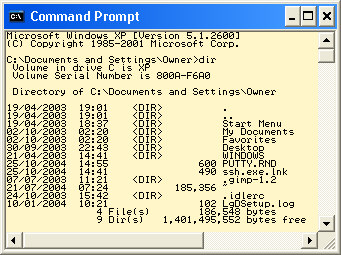
Training for the install on DOS
Click on start and then look somewhere like All Programs > Accessories > Command Prompt. It can vary according to how you have your system configured. Another way is to click on Start and then Run. In the combo box, type 'command' (no quotes) and the command prompt will open up. With the command prompt now running (you will realise that Windows XP is really just a very complicated and slow command shell) you can type in commands that will allow you to navigate the file system and manipulate files and directories. Your command prompt will probably be something along the lines of... C:\Documents and Settings\Owner > If you type dir you will get a listing like the one above. You can see the date and time that a file was list written to , whether it is a file or a directory, how big it is if it is a file and the long name of the file or directory. At the top of the listing, you can see the name of the volume (partition in this case - here called 'XP') along with its serial number and the path for the directory (C:\Documents and Settings\Owner). At the bottom of the listing are the total numbers of files and directories. If we want to make one of these directories current, we need to type CD ('change directory' or [make] 'current directory' depending upon whom you ask) and then the name of the directory we want to go to. For example, if we want to go to the 'Start Menu' directory, we type... cd Start Menu Note that in DOS, the case of the letters does not matter so CD, cD, Cd and cd are all equivalent as are similar variants of the directories you want to visit. Another way of going to the Start Menu directory is to type cd C:\Documents and Settings\Owner\Start Menu This way is using an absolute path (right from the beginning) whereas the first way was a relative path. You can see that there is a lot more typing involved however, this is the only way so far, that we have of getting back to the Owner subdirectory. You will notice in the screenshot above that there are two directories apparently with the names '.' and '..'. If you type cd .. you get back to C:\Documents and Settings\Owner - effectively we were CDing to the directory above (which is what '..' is). However, supposing you were in C:\Documents and Settings\Owner\Start Menu and wanted to go directly to the Windows directory. Now that we know how to go up a level and also down a level, we can combine the two so, if we are in C:\Documents and Settings\Owner\Start Menu, we can type... CD ..\Windows and we can get there in one step. If you now press the up arrow key, you will see that all of the commands that you have typed in so far (this goes on up to a limit) will appear - this can save you typing as you can edit these and just press enter. So much for moving around. We can also create, copy and delete files and create and delete directories. In C:\Documents and Settings\Owner, type md test If you type dir now, you will see that we have created a directory called 'test'. If we CD to it ('cd test') and then get a listing ('dir'), you will see that it already contains two files, '.' and '..'. Again, you can use cd .. to get to the next level up but don't do that just yet as we are going to create a file. Type... dir > dirlst.txt This is the same dir more dirlst.txt you will see the contents of the file (if this looks confusing, look at how large the drlst.txt file is). This command calls a program called 'more' and passes the string 'dirlst.txt' to it which it then interprets as a file name which it then opens and displays the contents of on the screen. You can see in the screenshot on the right these steps...
We can now copy the file to a new location (or file name) by typing... copy dirlst.txt dirlst2.txt If you dir the directory again, you will see that this new file has been created and if you more it, you will see that it is the same. There are many other ways of creating files so let us delete this one. Type... del dirlst.txt and if we now dir the directory, we see that it has disappeared, leaving just the new file and '.' and '..'. If we now cd up a level ('cd ..'), and type rmdir test we cannot delete the directory because there is still a file in it. So, let us type del test\dirlst2.txt If we type dir test we can see that the directory is empty now. Next type rmdir test and the directory is deleted. Check this by entering dir again. So, we have navigated around directories using relative and absolute paths. We have looked at the contents of directories when we have been in them and from elsewhere. We have created, looked at, copied and deleted a file and we have deleted the directory again. Whilst this might seem a little basic, what you will need to do for OpenBSD is not more complicated and the commands are similar. Instead of using a backslash ('\'), we use a normal slash ('/' which, unlike the BBC's curious preference, is simply called a 'slash'), to list a directory, you type 'ls' instead of 'dir', and instead of 'copy' we use 'cp'. You can learn more about the commands and get some valuable experience by installing SuSE Linux (not the Personal Edition as there are problems with root access restrictions and gaining enough experience as root) and playing around with that. I suggest SuSE Linux because it is one of the UNIX-like operating systems, the commands are pretty much the same and the installation is as easy (although a few times quicker) than Windows XP. Also, you will get a feel for the reliability and stability of the system. When you are in one of the Unices, you can find out a lot about the function you want to use (what it does and how to do it) by referring to the manual. Instead of using a several foot thickness of paper with all of the environmental impact that would imply, they are all online. You can literally type... man ls to find out more about the list command. If a command is mentioned in several sections of the manual, you will need to specify which manual to look in. In the OpenBSD documentation, the manual section is always included after the command so you will see ls mentioned as ls(1). You can do this as follows... man 1 ls In addition to this, you can find the man pages for ls online on the Internet at http://rootr.net/man/man/ls/1 and you can search for any other command as well. In fact, if you type 'openbsd man ls' (no quotes) into google, you will see that there are many such sites. |
 If you are not
particularly familiar with the command line, now is your
chance to have a go ... whilst still in Windows.
If you are not
particularly familiar with the command line, now is your
chance to have a go ... whilst still in Windows.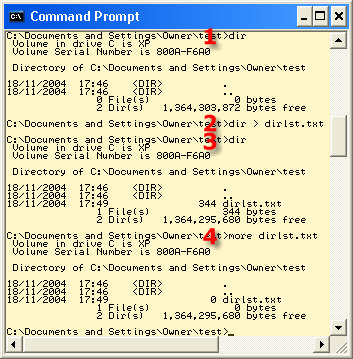 command as before but instead of seeing the
output listing on the screen (the standard output or
'STDOUT'), we are 'redirecting' it to a file that we are
creating called 'dirlst.txt' by using the greater-than
sign to indicate that the output of the dir command
should form the input of the file dirlst.txt. If we then
type
command as before but instead of seeing the
output listing on the screen (the standard output or
'STDOUT'), we are 'redirecting' it to a file that we are
creating called 'dirlst.txt' by using the greater-than
sign to indicate that the output of the dir command
should form the input of the file dirlst.txt. If we then
type Users, Groups and PermissionsThere is one other thing you need to know if you have only worked in a Windows environment and that is users, groups and permissions. Users - Everybody who uses a UNIX-like OS (including Linux) is a user and they will normally belong to at least one group of users. Each user can access files that they create as a user. They can also access files (if permitted) created by users that are in the same group as one of the groups that they belong to. Groups are handy because you can have the accounts department in a group of their own and the personnel department in a group of their own. If permitted, they will be allowed to have access to files that their own group produces but not the other. If somebody needs to have access to both group's files, the sys admin can make them a member of both groups. If there is one member of both groups, it does not necessarily mean that any member of one can access both. Each file or directory has a user, a group and permissions associated with it. These are divided into three sets of users:
Each of these three sets of users have three types of access:
If the file was supposed to be an executable, the execute bit would be set for the user. If user didn't want anybody else to run the program, he could reset the execute bit on the group and everybody else. If a user wanted to make sure that nobody else could read a file, he would reset the appropriate bits and if he wanted a script to be executable and readable by everybody but with only himself being able to write to the file, he could do that as well. In summary...
The above are only examples and you will see that as they are binary, there are 512 possible combinations. However, many of those combinations will be of little or no use (having a file that other people can get to but the owner cannot is not particularly useful in my opinion). You can, if you have a script that you don't want to run by accident, turn off the executable bit - only turning it on when you want to run it. Just in case you were wondering, directories do have similar sets of permissions. Just to make it more interesting, there is a special user called 'root'. Root has access to everything on the system and can change permissions. Effectively root has absolute power. For the reason that root can do anything, you should not run as root unless you really need to. For this reason, you can log in and then use the substitute user (SU) command which will ask for your root password. On OpenBSD however, you cannot SU to root unless your current user is in a group called wheel. In this way, normal users cannot become root even if they have the root password. So, when you create accounts on OpenBSD and you want that account owner to have root access, remember to put them into the group 'wheel' as well as their normal group. |
|||||||||||||||||||||||||||||||||||||||||||||||||||||||||||||||||||||
PreparationsNote that here, I use the plig site because it is in the UK. You should use a site that is close to where in the world you live.
You are now ready to start... |
PartitionsThe details of partitioning a typical installation are in the magazine but here is a bit about the way that it is laid out. The BSD file system all exists within one partition. This partition is divided up to produce a label that the OS looks at. Note that here, 'Partition' refers to the part of the whole OpenBSD partition.
You are now ready to install OpenBSD for real so follow the installation instructions. |
Solving loss-of-keyboard using SSLHopefully, this will never happen to you but if it does, this is a way out of it. If for some reason you lose your keyboard (this is most likely to happen at reboot with a keyboard that is non-standard such as on a laptop), ie, you type and nothing happens, you can log into your OpenBSD box from another machine using Secure Shell (SSH). It is just like telnet except that everything is encrypted, including your password. You will find that OpenBSD does not use telnet so having telnet on a windows machine is a waste of time n this instance. If you have a one of the Unices, you should already have SSH but if your other machine(s) is(are) Windows machines, you can download one for free. If you go to http://freshmeat.net/projects/putty/, you can download putty which is a free SSH client. Having logged onto your OpenBSD box, just CD to /usr/X11R6/bin then type xf86cfg which will launch XWindows on the host machine (not the SSH session) and you will have your mouse and keyboard back. |
Setting up the GUILog in as root then CD to /usr/X11R6/bin then type xf86cfg. This will start XWindows and you can now open up several terminals at a time and, perhaps more important than doing so using the different screens ([Ctrl][Alt][F2], [Ctrl][Alt][F3], [Ctrl][Alt][F4] and so on) is that you can see them all at the same time. However, fvwm (which is what XWindows is using at this stage) is rather limited - a reasonable browser would be a good start. So, you can download another windows manager and use that instead. See adding packages... |
Adding packagesTo add a package, use pkg_add. You will be adding them from an ftp/http site so the amount you have to type in could be considerable. There are two easy ways around this: 1) open another shell and 2) use and environment variable to save you typing it. I have found it easier to use the Korn Shell (ksh) which allows you to press the up arrow to get the previous command (something that the bourne shell does not) and then lets you change that line. To do this, at the command prompt just type... ksh and you will find that any command you have typed in ksh is reachable just by pressing the up arrow. When using pkg_add, you will find that the only bit you need to change is the end of the line and just by 'up'ing to the previous command, you don't even have to type pkg_add each time. One thing you will want to do is get a browser so that you can see the packages you want to install. You can get these names form the install.i386 file so look out for a .tar.gz file with the word 'links' in it. Install that (pkg_add looks for any dependencies and installs them as well - in this respect the installation .tar.gz files are not normal .tar.gz files) and when you run it, you will see just how fast browsing the Internet can be. To run links in graphical mode, just type links -q and you will wonder why you ever bothered with Windows. You can go to the OpenBSD mirror you chose and install any of the files you want to as you can see the file names in the browser and you can use pkg_add in another shell window on the same screen. If you want KDE, install everything KDE (limiting language versions of files only to those that you might need). I would recommend IceWM if you want a fast, light GUI or have memory limitations (96MB or less). To test out the GUI, you can either type the command name from within an fvwm window (in which case it will run in a window) or, you can restart a dummy from within fvwm (left-clicking on an unoccupied area of the desktop and then selecting dummy from the restart menu) and then, at the command prompt, start the windows manager which will open up a full-screen session. Note that you are already logged into the XWindows session so you don't need to run any session manager so, if you are running KDE, type kdestart instead of kdm. You can now configure files for any program or services you want to install or use such as Apache (which chroots therefore everything is in /var/www) which is in the default installation. |