PC Plus HelpDesk - issue 217
This month, Paul Grosse gives you more insight into
some of the topics dealt with in HelpDesk and HelpDesk
Extra
|
 |
HelpDesk
Web Statistics without cgi-scriptsIf you don't have access to webserver statistics for your website but do have a permanently-on connection to the Internet, you can collect your own statistics very simply. All you need to do is to run a webserver on your own machine - storing an insignificant image - and then have it displayed on some part of your web page. By doing this, the image will be downloaded by any browser that downloads images - ie most of them although you will not capture browsers such as links or those set up for blind people - and the details in your webserver log will hold their details. The details you will have are the ones that they want to send you and if their browser is configured to send false information, you will have to put up with that as anybody would. However, most people don't know how to modify the information on their browser so you will get a representative set of data from this. Ideally, you should have an insignificant image (might be just a line or block or even a completely transparent .gif file) that is part of the page you want to track. Put this in a directory of its own and you are part of the way there. Now, all you need to do is to get a webserver on your system and the easiest one is Apache which currently runs around 67 percent of the world's websites. Apache is:
Once Apache is installed, all you have to do is change the httpd.conf file so that it knows where your webroot is and what to listen for (most of the rest of it is already configured for you although it is worth reading through it just to make sure - again, the answers to any questions are most likely already on the Interent for you). One additional change is to the type of access log Apache stores. In httpd.conf, there is a line which you need to change to... CustomLog logs/access.log combined if your logs are to be stored in a subdirectory called [ServerRoot]\logs (on Windows systems or [ServerRoot]/logs on a Linux system). Once it is configured, start the server and then test it by running a browser and typing http://localhost/[name_of_ image.gif] in the address bar. If all is okay, (certainly as far as delivering the image is concerned), you should see it in the browser window. If you haven't got 'localhost' defined in your hosts file, you could just type http://127.0.0.1/[name_of_ image.gif] instead. On your web page, you need to have your IP address and the path from your webroot. Suppose your server root (in a Windows machine) is C:\Program Files\Apache Group\Apache2\, your web root (relative to that) is \htdocs, your image is called img.png and your IP address (as accessible from the Internet) is 11.22.33.44. In your webpage, you should have the following... <img src="http://11.22.33.44/img.png" hspace="2" vspace="2" width="16" height="16" Alt="Home Stats">
With your image in the page and your server up and running, all you have to do is to configure your firewall to allow port 80 (that is http) in from the Internet and you can start collecting that data. Note that you are doing nothing more than collecting the same data that everybody else does - you are not hacking into anybody's system. This data is sometimes used to provide browser-specific webpages on some servers so that if you have one of the more esoteric browsers, you cannot use their site unless you prefer text only content that is three months out of date. To test out your page as it is on the Internet, you might find that you cannot type in its URL and see your image. If this is the case, it is because your browser is pointing back at a machine on your Internet interface. To get around this, you can do one of several things:
Your browser will think that Google is looking at your website. However, you will not see any images so you will need a html file for it to download (we are just checking that your server works - we already know what your image looks like) so put a file called index.html on the directory root and you will be all right.
Your webalizer results will give you breakdowns of day of month, time of day, country, browser and so on. There is, of course, nothing to stop you from writing your own analysis program for your own purposes but the config file for Webalizer will allow you to tailor it to your needs faily well. |
Voting without cgi-scriptsThis is really just an extension of Web Statistics without cgi-scripts above. Again, not having access to cgi-scripts is not necessarily a bad thing as you can do it all on your home webserver (see Web Statistics without cgi-scripts above). On your voting page, you have your question and then links to small answer pages. At the end of the voting period, you get Webalizer to count the pages and you work out the results accordingly. If it was a simple yes/no there is no problem. If you had a rating with, say, points from 1 to 5, all you do is add up the pages for the 1 point page, the same for the 2 point page and so on. Multiply the totals by their scores, divide by the number of votes cast and you have the result. You can also take steps to stop people voting more than once by only allowing the first vote (or the last) from a particular IP address or discounting them altogether (something to be aware of is that you can have networks of genuine voters hidden behind a single IP address). Once you have your result, you can post it - do this on a weekly/daily basis. You can make your output graph as coarse or fine as you like or, you can cheat. The following is an example using a specific bar graphic. There is an easier way that uses only three graphics (if you have one for 0%, 3%, 5%, 7%, 10% and so on, you have 41 graphics). Using tables, you can modify the length of the bar very easily. eg.
This is done by having a table with four cells. The one on the right has the result in it, to the left of that, there is a transparent graphic which is set to the same image height as the bar images used (note that the height of this needs to be as large as the largest text you are going to use in the cell and also that it acts as a spacer). The two on the left have the images only as backgrounds but the width of the cells are set in pixels so that they two columns add up to 100 (the bar graph image is only 99 pixels wide and the other is even less but that is tiled - remember that images are tiled from the left). Of course, you don't have to make them 100 pixels wide in total, you can make them as wide or as narrow as you like. The code looks like this... <table border="0" cellpadding="0" cellspacing="0">
<tr>
<td width="23"
background="images/bar_g_bar100.jpg"> </td>
<td width="77"
background="images/bar_g_bg.jpg"> </td>
<td><img src="images/8x8.gif"
align="middle" width="2" height="21"></td>
<td>23%</td>
</tr>
</table>
One thing that you will notice if you have a look at the files/webpage directory on the superdisk is that the html file that you get has a longer name than you might immediately think necessary - vote001-4.html for example. By doing this, you can have many votes over a long period of time and know what each refers to in the server log. One thing you cannot do with this is have votes on multiple topics unless you either have them all on the same page with your users becomeing frustrated with always having to close browser windows; or, have a series of webpages that are linked to as they vote through a sequence of questions on new pages in the same browser - the html page name might reflect this like vt325.html preceded by vt32.html and before that vt3.html et cetera. |
HelpDesk Extra
Network Proxy Server HardwareIdeally, In additon to this, if you are going to have http accessible from the Internet, you should run this on a machine on a separate network (usually called a De-Militarized Zone or DMZ) so that if it is compromised, the intruder still has to break through another firewall before (s)he can get into your LAN. This last point means that if you are running processes that use cgi scripts (Common Gateway Interface), is should not be accessible from the outside because if that machine is taken over, things can be run on it that can compromise your network shares and so on. Here, however, we will be running an Apache server with cgi scripts that is accessible from the Internal network and if you want, you can make it accessible from the external network by configuring the firewall to allow incoming traffic through port 80 (http) as well. To do this reasonably safely, you will need to keep the version up-to-date so that vulnerabilities are addressed. In short, in an ideal situation, you would have three machines:
Here, we have 1 above (as an appliance with 2 NICs but you can run a software firewall on a dedicated machine) and 2 and 3 rolled into a single machine with 2 NICs (one facing the firewall and one facing the LAN). Note that the firewall on its own is not described here but setting it up is pretty much the same as the one described here except that you would not have any pull- or push-type connectivity with internal network resources (such as SMB - Samba) and so on (LAN hosts that use the proxy pull from the server). If you just want to try this out or you are on a low budget, you can roll out all three in one machine. Running lots of services on your external firewall is not the safest thing you can do though. So...The idea behind this project is that you can speed up the effective Internet speed of your network so that if you have already downloaded a file and it has not been updated since, all that happens is that it is transferred across your LAN at speeds approaching 100Mbps instead of 600kbps or whatever your broadband connection speed is. To do this, you will need to have a spare computer or buy one for the purpose. In addition to this, you can use it for many other network related jobs such as firewall, URL filtering, network time and so on. So, what do you need to have (or buy)? ComputerFor small business purposes (unless you are running a busy website) you need only a modest machine. I managed to obtain a Fujitsu Siemens Sceneic X which had
all for around £150 from a Derby electronics shop - there are plenty of these in University cities as students are on the lookout for such machines. You might want to take a copy of KNOPPIX on CD or CDR in order to check that Linux will recognise its components. To this, I added a second NIC (a PCI card) to make it dual-homed and another 128MB of RAM and a KVM switch which meant that I did not need to buy another keyboard, monitor or mouse or find extra room for them. The Scenic fits under the existing monitor as the monitor's original CPU is a midi tower. This setup is suitable for small businesses and homes so if you need really fast connection for some reason, you can buy more memory (the more the better), have a faster processor (or more than one - Linux supports this) or build your own. KVM switch
The idea is that you plug both computers into the KVM and then your single mouse, keyboard and monitor into it as well (as you can see above). With this model, all you need to do is press [Scroll Lock] twice in quick succession and you swap from one computer to another which is quite handy although can be confusing. The LED indicator lets you know which connection is currently on so I would advise plugging the leads in so that this makes sense, ie the LED on the right implies the computer on the right. |
 you should
have a firewall between your proxy server and the
Internet and it should be running on a separate machine
all on its own. However, it is a good idea to have
another firewall protecting the proxy server, running on
the proxy machine as well as this can protect the proxy
from the internal network in addition to anybody who
breaks through your external firewall.
you should
have a firewall between your proxy server and the
Internet and it should be running on a separate machine
all on its own. However, it is a good idea to have
another firewall protecting the proxy server, running on
the proxy machine as well as this can protect the proxy
from the internal network in addition to anybody who
breaks through your external firewall.  The KVM I found was an
ATEN 2 port KVM (£50) which has built-in leads. If you
are going to be unplugging the KVM a lot, it would
probably be better to have one with separate leads as you
can replace them when they break but for a static
installation, one if these is cheaper. When pricing up
these, remember that the leads are expensive if you have
to buy them separately and you should therefore take that
cost into account as they can cost more than some of the
KVM switches.
The KVM I found was an
ATEN 2 port KVM (£50) which has built-in leads. If you
are going to be unplugging the KVM a lot, it would
probably be better to have one with separate leads as you
can replace them when they break but for a static
installation, one if these is cheaper. When pricing up
these, remember that the leads are expensive if you have
to buy them separately and you should therefore take that
cost into account as they can cost more than some of the
KVM switches.
|
||||||||||||||||||||||||
 Disk
Partitions
Disk
Partitions| Device | Mountpoint | FS type | Size |
|---|---|---|---|
| /dev/hda1 | /boot | ReiserFS | 71MB |
| /dev/hda2 | swap | Swap | 439MB |
| /dev/hda3 | / | ReiserFS | 3,514MB |
| /dev/hda4 | /nas | ReiserFS | 4,032MB |
| Total | 8,056MB | ||
Notice that 8,056MB (7.87 GB) is slightly larger than the 6.1GB that Windows was getting out of the drive. You might be lucky and have this happen to you or you might not. This is, as far as I am aware, not a feature of ReiserFS.
Note that with earlier machines, there is a limit of 8.4GB on drive size. If you have one of these and it is down to the BIOS, you will not get more than the 8.4GB out of the drive regardless of the file system you use (ignoring compression).
Also note that ReiserFS has a very high efficiency for small files (it does not throw away the space at the end of a sector as FAT file systems do as it is designed to work differently to that) and if you are likely to have a lot of small files - such as if you are running a web server (all of those .gifs, .pngs and so on) - it makes sense to use ReiserFS. Also, ReiserFS is a journaling file system so if you have a dirty shutdown (such as power failure), it can get the file storage back together again in just a few seconds instead of several minutes - something that is important in an environment that is not tolerant of downtime.
Software Packages
These are the pieces of software that I loaded...
NOTE: Wherever possible, I have opted for the GUI way of doing things instead of the command line (although I have given both in some cases) because this is the type of environment that people will be familiar with from Windows. Apart from just being able to click on things, the GUI also offers a visual representation of the system layout such as in Konqueror running as the file browser - something that should help with getting to grips with the system quicker. Also, I have given the name and location of
configuration files. With the exception of Squid Log Analyser, I configured the network cards (see 'Network Cards' below) and ran the SuSE system update which automatically downloads any patches that are required. This ensures that your system is protected against recent attacks and vulnerabilities. As you have a broadband connection, this should not take too long although it has to be said that the first time you do it, it does take longer. |
 To edit such a file, open up the Konqueror
file browser (home) and locate your configuration file
using the pane on the left (for directory structure) and
click once on the file icon or name in the pane on the
right to open it in Kwrite which is like notepad in
Windows. You should of course, make a backup copy just to
be on the safe side before you edit it (but remember to
edit the current copy and not the backup).
To edit such a file, open up the Konqueror
file browser (home) and locate your configuration file
using the pane on the left (for directory structure) and
click once on the file icon or name in the pane on the
right to open it in Kwrite which is like notepad in
Windows. You should of course, make a backup copy just to
be on the safe side before you edit it (but remember to
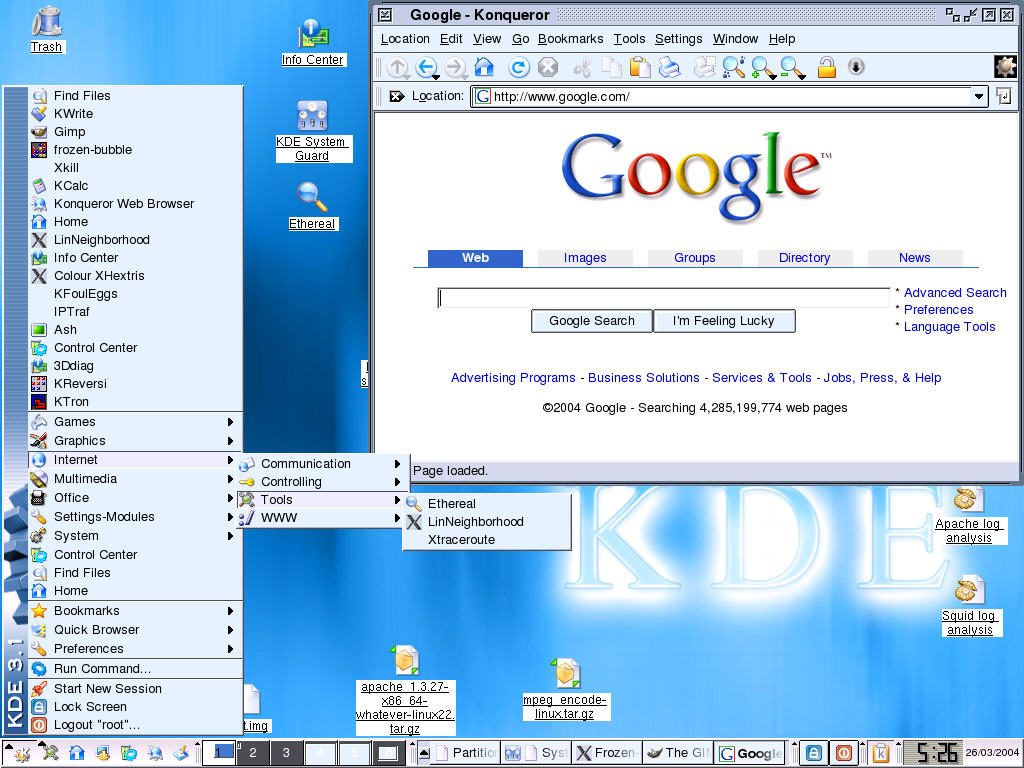
edit the current copy and not the backup).Operating SystemSuSE Linux is very easy to install and installs quicker than Windows XP (I have done both). It uses a GUI (KDE, although you can use Gnome or a number of others) and takes you through the steps, explaining what you need to do (choose a keyboard layout, partition your hard drive and so on) and only took me 20 minutes on this installation (no office software although I did install The GIMP as I need to take screenshots so on yours, you should have more space and an even quicker installation).
In the screenshot on the right, you can see the task
bar at the bottom, the menu up the left (like the start
menu in Windows) and a browser window open (Konqueror) There are a number of tools available to help you and some of them are already on the taskbar.
One thing you will notice is that there are multiple desktops. With these, you can set up a few standard desktops and leave them running. I use 'Info Center' and 'KDE System Guard' on two desktops, leaving them running. You can configure the desktop - including how many desktops you want - by right-clicking on the desktop and selecting Configure Desktop. You can also do this with the Taskbar or, if you prefer, do them all from within the Control Center. One thing you should consider is not having any screen saver other than 'blank' so that you are not occupying the processor unnecessarily. Also, you should set the time for screen saver activation to be only a few minutes. With a KVM switch, you are not saving a screen and also, you are not taking up space on your desk. |
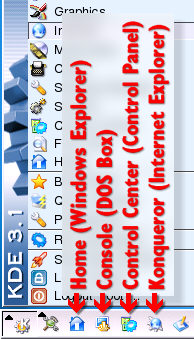 On the right, you can
see the icon with the Windows equivalent programs.
Clicking on the K with the gears gives you the (Start)
menu.
On the right, you can
see the icon with the Windows equivalent programs.
Clicking on the K with the gears gives you the (Start)
menu.Network Cards
In order to check that you have them the right way around, you can either connect the internal (LAN) card to a LAN machine and do something LAN with it or connect the external (Internet) card to the cable modem and launch a browser. If you have eth0 and eth1 identified correctly, this should work. If not, swap them over and try again. With the cards now correctly identified, mark them with sticky labels so that you don't forget. |
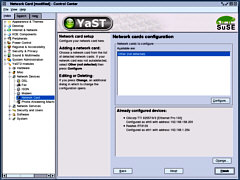 Before you can do
anything network, you need to configure your network
cards. Go into Control Center and then, YaST2 Modules/
Network Devices/ Network Card and configure the cards to
your internal network and your cable modem.
Before you can do
anything network, you need to configure your network
cards. Go into Control Center and then, YaST2 Modules/
Network Devices/ Network Card and configure the cards to
your internal network and your cable modem.FirewallThe SuSE Firewall2 comes with SuSE Linux and is a stateful inspection type within which you can activate Network Address Translation (NAT aka Masquerading). NAT does not a firewall make however, it is a useful addition as it makes it appear that every host behind it comes from just on IP address. The configuration file (SuSEfirewall2) is located in /etc/sysconfig In it, you need to define FW_DEV_EXT, FW_DEV_INT, the external and internal NICs (although you can define any interface) and, if you have a demilitarized zone, you can define the interface to this as well - FW_DEV_DMZ. There are a number of other options such as FW_MASQUERADE and FW_ROUTE and so on, allowing various degrees of functionality. The configuration file is heavily annotated and there is plenty of help about it on the Internet so your shouldn't have any problems setting it up by yourself.
Once you have finished setting up your firewall, you can take the Internet connection and plug it into a local machine and then use that local machine to port scan it and attack it, just to see if it works properly. |
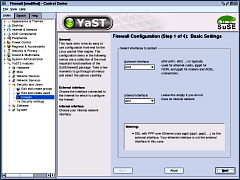 If you just want to
use NAT, you can set it up entirely from Control Center/
YaST2 modules/ Security and users/ Firewall. In fact, it
is a good idea to start off with this anyway.
If you just want to
use NAT, you can set it up entirely from Control Center/
YaST2 modules/ Security and users/ Firewall. In fact, it
is a good idea to start off with this anyway.DHCP(C)DIf you are going to use the machine as a dhcp server for your internal network, you need to configure and run dhcpd. dhcpd.conf (the dhcp daemon configuration file) is in /etc and there is support documentation in /usr/share/doc/packages.
|
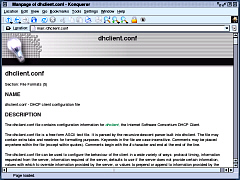 If you need to
request a dhcp lease from your ISP, you need to configure
and run the dhcp client daemon (dhcpcd). dhclient.conf is
in /etc and contains notes about its setup. More details
are to be found in man dhclient.conf which you can get in
the bash (Bourne Again SHell) console by typing "man
dhclient.conf" at the command prompt or by going
into the Konqueror web browser and typing
"man:/dhclient.conf" if you have the KIO Slave
installed.
If you need to
request a dhcp lease from your ISP, you need to configure
and run the dhcp client daemon (dhcpcd). dhclient.conf is
in /etc and contains notes about its setup. More details
are to be found in man dhclient.conf which you can get in
the bash (Bourne Again SHell) console by typing "man
dhclient.conf" at the command prompt or by going
into the Konqueror web browser and typing
"man:/dhclient.conf" if you have the KIO Slave
installed.Proxy ServerSquid is the name of the proxy server. It sits on port 3128, looking at requests for Internet http traffic from the LAN and when received, it checks to see if it already has an up-to-date copy of that file stored locally (ie, on your fast side of the modem bottleneck). If it has, it transfers that to the browser instread. Thus, if a website has been visited before and the files on the proxy server do not need to be updated, they can be downloaded at LAN speeds instead of the relatively funereally-paced broadband. To use it, you need to change a line in the SuSEfirewall configuration file so that it says: FW_SERVICE_SQUID="yes" Squid's configuration file (squid.conf) is in /etc/squid. It is fairly long but almost all of it is annotation. It is worth working your way through it but the main parts are defining the port it listens to (say your internal network is 192.168.1.0/24 and its gateway is 192.168.1.254 and you want to listen to port 3128, you need the line http_port 192.168.1.254:3128 and you also need to assign a space and location for the cache: cache_dir ufs /nas/squid_cache 1400 16 256 is what I use signifying that roughly 1.4GB of /dev/hda4 is used for the proxy cache, leaving the rest for the NAS. Also set debug_options ALL,1 for minimal logging.
The Runlevel editor allows you to select the run levels for any particular program. Run level 2 is a self-contained, standalone machine running just a command line. Runlevel 3 is the same but with network connectivity so network programs start to appear with this runlevel. Runlevel 5 is with the GUI. It also allows you to stop and start the programs and any that are dependent upon any others will be sorted out for you. Be careful with this editor as its consequences are very powerful. If you find yourself at a standalone command line on bootup log in as root and type init 3 to set the run level to 3. To get the GUI, type init 5 With squid running in runlevels 3 and 5, you should have your proxy service, albeit one that allows everything through without any filtering. |
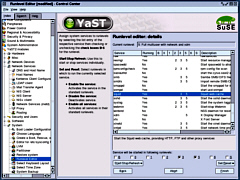 Again, just work your
way through it and when you have finished, start the
service using Control Center - you will have to restart
the firewall as well since you changed its configuration
file. The easiest way to do that is with the command line
but the most convenient if you want to avoid that is
through the Control Center using the Runlevel editor -
YaST2 modules/ System/ Runlevel editor.
Again, just work your
way through it and when you have finished, start the
service using Control Center - you will have to restart
the firewall as well since you changed its configuration
file. The easiest way to do that is with the command line
but the most convenient if you want to avoid that is
through the Control Center using the Runlevel editor -
YaST2 modules/ System/ Runlevel editor.URL FilteringURL filtering comes as SquidGuard. Its configuration file is squidguard.conf in /etc. This one is quite a bit simpler than the others although you will have to modify the squid.conf file so that it includes the line: redirect_program /usr/sbin/squidGuard -c /etc/squidguard.conf and to restart it, you need to restart squid.
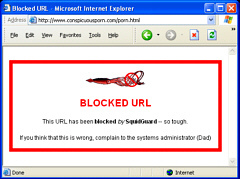
Next, you can specify a redirect page for blocked websites. You can do this on the local machine web server - hence running Apache. You can make this as simple or complicated as you like. Click on the image on the right to see one thing that you can do with this (in this case for a domestic installation).... You can of course, put anything you like there or follow the example in the original configuration file. One thing you will have to do is test it so you can go into Google and type "porn" (or whatever your restrictions suggest you should try). If all works properly, you should get the blocked page you have specified. It it does not, you will not be able to use that again without clearing out the local cache on the machine you are testing it on. If you don't want the bother of doing this each time, you will have to start clicking on the links and, as a result, downloading pages of porn. Remember that you can turn off the images in the browser but also, remember that if anybody asks, you are configuring SquidGuard (which of course you are - this is not an excuse, this is a reason). If you want to preclude any unnecessary interest from your ISP or anybody else, you might wish to start the configuration testing by typing "SquidGaurd" into the search string before hand - of course, this is not guaranteed but it might help. With SquidGuard, you can define access control lists by user, IP, time of day-week and so on so, if you want to allow your employees access to everything except porn sites, only during their lunch breaks whilst leaving the system administrator's machine unhindered by filtering at any time of any day, you can. Again, there is a lot of information on how to configure all of this. Another useful thing that SquidGuard does is allow you to add your own words, URLs and domains to the blocked list. Apart from the obvious ones that you can block, you can also use your squid access log to find out the names of things you don't want to appear on your browsers such as advertising. If you look at your squid log, you will be able to see the names of websites that have been accessed and you can add these - either as full URLs or even just partial domains to the lists. In the future - after restarting Squidguard - they will not appear. |
Network Addressable Storage
FW_SERVICE_SAMBA="yes" Samba is SMB which Windows uses and is configured by smb.conf in /etc/samba. You need to have the windows share you want defined and the level of sharing. Some lines have the same effect but the following should suffice: [nas] path = /nas/nas_cache public = yes guest ok = yes create mask = 0640 directory mask = 0770 read only = no writable = yes locking = no Restart samba in Control Center and it should appear in Windows Explorer under Network Neighborhood as above-right. Remember to change the permissions of the NAS directory that you have allocated to UID nobody and GID to nogroup so that anybody can read and write them otherwise you will have to configure permissions. |
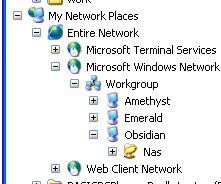 The idea behind this
is so that you have some commonly available storage on
the network. In this example, it is not protected but you
can protect it with userIDs and passwords if you want: it
depends on what user population you have. To get NAS
working, you need to have samba installed and you also
need to change a line in the SuSEfirewall configuration
file so that it says:
The idea behind this
is so that you have some commonly available storage on
the network. In this example, it is not protected but you
can protect it with userIDs and passwords if you want: it
depends on what user population you have. To get NAS
working, you need to have samba installed and you also
need to change a line in the SuSEfirewall configuration
file so that it says:Network Time ServerThere is a saying that goes along the lines of 'A man with one watch knows exactly what the time is whereas a man with two watches never knows'. So, with at least several PCs it is a really nice idea to have all of the clocks on your network say the same time. A Network Time server will take the time signal from a suitable local second stratum time sever and not only keep its host's time correct but will act as a time server to other machines on your LAN. With only one machine querying the external time server, this will keep their traffic down.
Just configure the time clients on your LAN machines to look at your server and they will all tell the time very accurately (ping times of <1ms are not uncommon). |
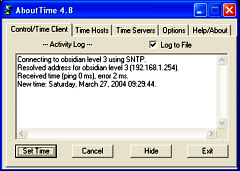 xntpd is the time
server and its configuration file (ntp.conf) is in /etc.
There are details and help on how to configure it but if
you put several external time servers in the list, it
will find one that it can use and unlike some others,
uses a drift file so that it can keep the machine's time
accurate to within a few microseconds (it wouldn't really
matter if it was just a few milliseconds really).
xntpd is the time
server and its configuration file (ntp.conf) is in /etc.
There are details and help on how to configure it but if
you put several external time servers in the list, it
will find one that it can use and unlike some others,
uses a drift file so that it can keep the machine's time
accurate to within a few microseconds (it wouldn't really
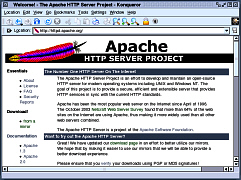
matter if it was just a few milliseconds really).WebserverThe Apache server (version 1.3.xx) is used by SquidGuard for its blocked pages and also by the network monitoring program Nagios (see below). We have discussed the configuration of Apache in the past (version 2.0.48 in PC Plus issue 213 - security cameras - hamstercam). Note that at the time of writing, the current version for version 2 is 2.0.49 and for version 1.3 is 1.3.29 Apache (httpd) is started and stopped from the Runlevel Editor and its configuration file (httpd.conf) is in /etc/httpd Here you need to set the server name, server root and webroot. Then set any password restrictions on directories thus... <Directory "/srv/www/htdocs/secrets"> AllowOverride AuthConfig Options Indexes FollowSymLinks Order allow,deny Deny from all AuthType Basic AuthName "Secret Server Files access:" AuthUserFile /etc/httpd/pswds AuthGroupFile /etc/httpd/gps Require group ssfg Satisfy Any </Directory> You also need to create any password and group files listed in the restrictions, using the password program (see the documentation on its use) and kwrite to create the group files you need.
There is plenty of information about running Apache,
both in the documentation that is installed with the
server and also on Apache's website which is at http://httpd.apache.org/
Integrating SAMBA with Apache under LinuxOne interesting thing about Linux is related to what you can do with disks and other resources.
With Linux (and other Unices) you mount a file system within the directory structure and it doesn't really matter what file system it is or even where it is. If you look at the partition mounting tree above, you will see that we have mounted one partition as /var/log. This partition could be hda# or even a partition on a physically separate drive hdb#, hdc# or even sda# (where # is a number - hde5 for example). In Windows, it is possible to represent network shares as drives and this is also true under Linux - except that it is not (in the same way that non- network drives are not) represented as a separate drive. So, it is possible to mount an SMB share (from another machine, running Windows, say,) within the Linux system as though it was on the same machine. In the example on the right, you can see that the partition mounted as /srv (yellow) has /srv/www/htdocs/hcam mounted in it. This is an SMB share from a drive on another machine on the network. There are pros and cons to doing this. With the Hamster Cam/ Security monitoring (webcam) in PC Plus issue 213, we used a piece of software on a Windows machine that could ftp an image file onto a server every so often. Here, it is just saving it locally and when the Apache webserver wants a copy of it, it sends across the LAN a request for it. If you are getting more hits per unit time on your server for this image than you are saving new images, the advantage lies with ftping (ie pushing) each new image to the server (remember that you would then have an ftp server running on it which has its own security considerations) whereas if you are getting fewer, the advantage is with using SMB to pull it across your network when required. This is based on the idea of keeping network traffic to a minimum. |
 In Windows, you are
stuck with drive C:, drive D: and so on. If you want to
refer to anything on another drive, you cannot do it
without having to be clever.
In Windows, you are
stuck with drive C:, drive D: and so on. If you want to
refer to anything on another drive, you cannot do it
without having to be clever. Log Analysis and System AdministrationIn order to keep an eye on what is going on and to allow you to investigate things should you need to, there are a number of tools that you can use. The following are the ones that I find useful:
Ethereal
This program is useful for finding out what is
happening if you are having problems setting up a
particular program - for example, it could tell you what
is going on if your dhcp negotiations are not working the
way you think they should or if you want to check if
something that should be encrypted is actually being sent
over the network in the clear. Squid Log Analyser
Click on the image on the right to see an example of
the analysis. If your cache can be fairly substantial, say 1.4GB as
on this machine, it can represent the casual browsing of
an average family (read into that what you like) of
several months worth of files. $month=$month + 1; # correct the month Webalizer
It gives graphical output of the system including where on the planet the people who looked at your website came from, what time of the month and what time of the day, as well as letting you know which pages people entered and left your site on. Each calendar month is broken down in this way so that
you have the last 12 months at hand. KDE system Guard
I keep a copy of this running at all times so that I can monitor what is going on. The default settings give you a 2x2 array of the top two rows of the screenshot. I have added another three rows with the LAN interface on the left and the Internet interface on the right (this is the way that it is arrange physically and it is always a good idea to do reflect the physical layout if you can as it makes more sense if you have to look at things in a hurry for some reason). Of the bottom three rows, the top one is packets from the Internet to the LAN, the second is packets from the LAN to the Internet and the bottom one is collisions for the two interfaces. You can see from the screenshot that there is a lot of traffic between the server and the LAN that is not going out to the Internet (I was hammering the LAN to test it by copying large files around it). On the bottom, you can see that the quantity of collisions decreases substantially as the interframe gap is increased by the NICs. The IEEE standard (802.3) says that it should be 9.6 microseconds but a lot of NICs have it set a lot lower than this because low demand networks such as home networks work faster as there are fewer machines on them to generate collisions. With more machines, you have more collisions so you should have a larger gap to help prevent this - note that you cannot prevent early collisions (ones that happen within the first 512 bits of data) as these will happen anyway. Info Center
If you look under Processor you can see how fast your
processor is - the machine I obtained for this project
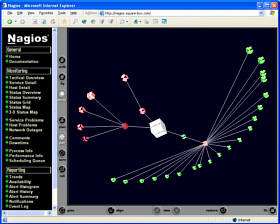
gave roughtly 1200 bogomips NagiosThis The program itself monitors system resources by testing them at specified time intervals. The time intervals can occur at any time of the day or week or you can define your own working week with different days, hours and so on so, if a machine was only turned on during office hours but not on Wednesday afternoons, that could be defined so that it would know not to look for it out of the specified hours. If something out of the ordinary happens such as a machine becomes unreachable for more than a specified amount of time, the program can email you or perform one or more of a variety of functions as specified by you in the configuration files - such an event could be triggered by a system crash, a hardware failure such as a NIC going down, workmen cutting through a fibre-optic cable or somebody stealing a server; and you would know either in real time or by looking at the logs when it happened. Like the testing, the notification time periods can be specified so that people who are not available at weekends are not emailed during them and so on. Nagios is capable not only of looking at the machines on your network, but also at other resources so if, for example, you have an outsourced website that you need to know is available 168/52, Nagios can check it for you and let you know if it was unavailable for eleven hours between Saturday night and Sunday morning although it cannot tell you why. When you install Nagios, and then look at the configuration and help files (/etc/nagios) you might find that the paths are slightly different to some of the various Nagios resources on the system. On mine, the webserver root (that is placed in Apache's server file system using aliases) is on /usr/lib/nagios; the documentation and other resources are on /usr/share/nagios; and; the ever-useful log files are on /var/log/nagios. When you are configuring Nagios, you will find the log files very useful as they will let you know where you have gone wrong (unless you are exceptionally brilliant at it and manage to configure it correctly the first time you use it). There are two main parts to configure:
ApacheLook in Apache's configuration file - httpd.conf in /etc/httpd and in the aliases section, you need to let Apache know that Nagios is to be a part of the system and what it is going to be called... Aliases section## start of nagios inclusion ScriptAlias /nagios/cgi-bin/ /usr/lib/nagios/cgi/ <Directory /usr/lib/nagios/cgi/> Options ExecCGI AllowOverride AuthConfig AuthType Basic AuthName "Nagios Access" AuthUserFile /etc/httpd/pswds AuthGroupFile /etc/httpd/gps Require group nagiosgp Satisfy Any order deny,allow deny from all </Directory> Alias /nagios/ /usr/share/nagios/ <Directory /usr/share/nagios/> Options None AllowOverride AuthConfig AuthType Basic AuthName "Nagios Access" AuthUserFile /etc/httpd/pswds AuthGroupFile /etc/httpd/gps Require group nagiosgp Satisfy Any order deny,allow deny from all </Directory> ## end of nagios inclusion You also need to make an addition to the directories so that Apache knows who is allowed to use it. Access permissions section## start of nagios inclusion <Directory /usr/lib/nagios/cgi> AllowOverride AuthConfig AuthType Basic AuthName "Nagios Access" AuthUserFile /etc/httpd/pswds AuthGroupFile /etc/httpd/gps Require group nagiosgp Satisfy Any order allow,deny allow from all Options ExecCGI </Directory> <Directory /usr/share/nagios> AllowOverride AuthConfig AuthType Basic AuthName "Nagios Access" AuthUserFile /etc/httpd/pswds AuthGroupFile /etc/httpd/gps Require group nagiosgp Satisfy Any order allow,deny allow from all </Directory> ## end of nagios inclusion This might seem a bit belt-and-braces but it doesn't leave anything to chance. With the conf file updated you can restart Apache using YaST2. NagiosThe other bit you have to configure is Nagios. This is broken down into a number of files in a sort of relational database thus... cgi.cfg checkcommands.cfg command.cfg contactgroups.cfg contacts.cfg dependencies.cfg escalations.cfg hostextinfo.cfg hostgroups.cfg hosts.cfg misccommands.cfg nagios.cfg nrpe.cfg nsca.cfg original_cfgs resource.cfg send_nsca.cfg services.cfg timeperiods.cfg The main configuration of Nagios is in nagios.cfg where the program is told where to look for the resources that it needs; each host has a place in the hosts.cfg and each host is part of a group (these can be which subnet they are on and so on) which are mentioned in hostgroups.cfg. Hosts are dependent upon the services of other hosts and so on - the whole lot linking together. The contacts (people such as systems administrators on various shifts and so no) are members of contact groups and can be (individually) contacted according to their work times. In addition to this, it is possible to specify scheduled downtime so that people are not getting warnings about things that are not really happening. The best way of getting to know Nagios is to set up a simple network with just a few hosts and a few services (say, just pings to start with and perhaps a http server). Configure it and then start Nagios in YaST2. If anything is wrong, the error log (config.err in /var/log/nagios) will tell you what it is (or at least the first ones it comes across until things get so confusing that it just gives up - things have to be fairly bad for this to happen though and it usually does a good job of letting you know what it wrong). Once it is up and running, you can access it via a web browser on any machine that you have so permitted. You will have to type your userID and password and then you are in. Click on Tac tical Overview and you will be able to see at a glance if there is anything wrong with hosts or services.
On the right of the diagram, the LAN is defined and
then the various routers and firewalls lead out of the
local system onto the ISP's system and then to hosts on
the Internet. You can configure Nagios to look at these
as well so, apart from your outsources website, you can
have your favourite search engines or anything you like.
As long as the owners will let you ping it or check the
http service (or whatever you want - as permitted),
Nagios can check it. With systems owned by other people,
it is a good idea to check them fairly infrequently as
these will have a fair amount of demand on them any way
and to have several hundred of their customers pinging it
once a minute just to see if it still there will probably
lead them to block you or at least complain. Once every
15 minutes, once per hour (or day even) would be more
appropriate depending on yours and their circumstances.
Click on any of the links on here and they will take
you to the appropriate page (services, hosts, trends and
so on).
You can also state types of states to graph. Selecting
hard and soft states will give you the most results.
Clicking on the "Update" button will give you
your new image.
If you click on a portion of the bar, it will zoom in. If you want to zoom out, change the zoom factor to a negative value and click on the update button. Again, you can change the time period and investigate
any part of the record you like. If you find that things
go pear-shaped with disk space and then clear themselves
up every day at the same time, it might be that you have
gone over a warning level with a log and at the same time
each day, the log is archived and the problem clears
itself up. If you want to try that out, you can set the
loglevel in Squid to 5 (remember to turn it back to 1
afterwards).
|
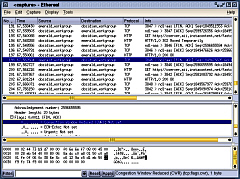 Ethereal is a packet
sniffer. You can set it to look at either (or any)
network interface (whether it is a NIC or a dial-up and
so on) and it will observe any traffic on that network
segment regardless of whether it was directed at the
machines NIC or not - in other words, it views the
network in promiscuous mode (although you can elect not
to capture in this mode if you wish)
Ethereal is a packet
sniffer. You can set it to look at either (or any)
network interface (whether it is a NIC or a dial-up and
so on) and it will observe any traffic on that network
segment regardless of whether it was directed at the
machines NIC or not - in other words, it views the
network in promiscuous mode (although you can elect not
to capture in this mode if you wish)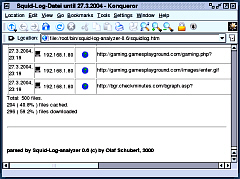
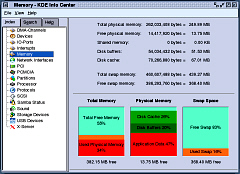 This is another one
that I keep running on a desktop all of its own. Whilst
it can tell you important information about your system
such as how many bogomips it produces, it is more
important to look at resources such as memory, storage
devices (how the disk space situation is developing) and
usb devices (if you are using any) as these are helpful
in finding out how the system is changing or if it is
nice and static.
This is another one
that I keep running on a desktop all of its own. Whilst
it can tell you important information about your system
such as how many bogomips it produces, it is more
important to look at resources such as memory, storage
devices (how the disk space situation is developing) and
usb devices (if you are using any) as these are helpful
in finding out how the system is changing or if it is
nice and static. program
runs on one of the machines on your network - some people
say that it would be better to have it running on a
machine on its own as it can take up a lot of processing
power if you have a large network (possibly thousands of
machines running many times more services) and frequent
checks but for a small network of half a dozen computers
to several dozen it should be okay to run it on a 500MHz
machine with a few hundred MB of RAM.
program
runs on one of the machines on your network - some people
say that it would be better to have it running on a
machine on its own as it can take up a lot of processing
power if you have a large network (possibly thousands of
machines running many times more services) and frequent
checks but for a small network of half a dozen computers
to several dozen it should be okay to run it on a 500MHz
machine with a few hundred MB of RAM. If you have specified
the 2D co-ordinates in the hosts.cfg file, click on the
Status Map in the menu (left frame) will give you a
picture like the one on the right.
If you have specified
the 2D co-ordinates in the hosts.cfg file, click on the
Status Map in the menu (left frame) will give you a
picture like the one on the right. Click on Service
Detail will get you a picture like the one on the right.
Each host has the services described and you can look at
the status information - so, say you wanted to know how
much disk space there was on a particular machine or how
fast the ping was, you could find out on this page.
Click on Service
Detail will get you a picture like the one on the right.
Each host has the services described and you can look at
the status information - so, say you wanted to know how
much disk space there was on a particular machine or how
fast the ping was, you could find out on this page. If, in the above
page, you click on a service and then "View Alert
Histogram for This Service", you get an image like
the one on the right. You can specify the report period
(last day, month, this year and so on) and the Breakdown
type (Day of the month, Day of the week, hour of the day
and so on) so that you can see if anything happens at a
specific time of the day, week, month and so on.
If, in the above
page, you click on a service and then "View Alert
Histogram for This Service", you get an image like
the one on the right. You can specify the report period
(last day, month, this year and so on) and the Breakdown
type (Day of the month, Day of the week, hour of the day
and so on) so that you can see if anything happens at a
specific time of the day, week, month and so on. If you click on
"Trends For This Service", you will get a
picture like this one. You can see where the service
fluctuates between OK, Warning, Unknown, Critical and
Indeterminate.
If you click on
"Trends For This Service", you will get a
picture like this one. You can see where the service
fluctuates between OK, Warning, Unknown, Critical and
Indeterminate.