PC Plus HelpDesk - issue 260
 |
 This month, Paul Grosse gives you more
insight into some of the topics dealt with in HelpDesk. This month, Paul Grosse gives you more
insight into some of the topics dealt with in HelpDesk.
|
 |
HelpDesk
Remove ugly orphans
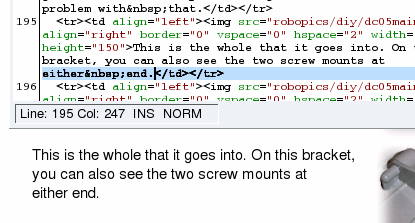
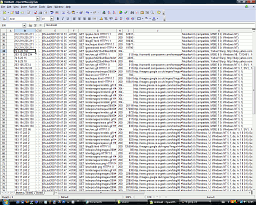
Orphans can make a paragraph look quite ugly. In effect, all you need is a way of tying together the last word and the penultimate word so that they never separate. Fortunately, this can be done quite easily. All you need to do is to open up the html page in your favourite text editor. Find the end of each paragraph by opening the search (usually [Ctrl][F]) and looking for '</p>', '</li>' or '</td>' (this will find most instances of end of paragraphs). In between the last two words, replace the space with ' ' which is an HTML escape character that represents a 'No-Break SPace'. (HTML escape characters start with an ampersand and finish off with a semicolon.) The ' ' character will force the last two words to appear together on the same line. You can see in the screenshot that in the web page (lower half) that there is enough space for the word 'either' but, because it is 'glued' to the word 'end', it is forced to appear on the next line. Once you have edited your file, save it as plain text with the same file name. |
 If, in
your HTML pages, you sometimes get single words at the
end of a paragraph and want to make sure that these
orphans never exist, here's how to do it.
If, in
your HTML pages, you sometimes get single words at the
end of a paragraph and want to make sure that these
orphans never exist, here's how to do it.
|
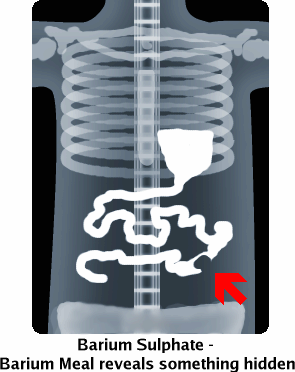
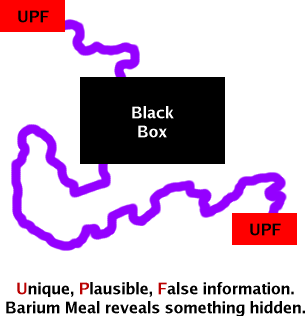 So, how do we reveal the existence of a path
between our suspected insecure source (our personal
account or details on our system) and something,
somewhere else? So, how do we reveal the existence of a path
between our suspected insecure source (our personal
account or details on our system) and something,
somewhere else?We need to know the rules so that we can plant something there that will reveal that they have been broken. For example, confidential information must be confidential. So, if we plant something there and it appears somewhere else, we know that somebody has broken the rules (possibly even the Law - Computer Misuse Act, Data Protection Act and so on) and with any luck, the trace back from where it appeared will reveal the perpetrator. So, we need a way of differentiating between our information and all of the other legitimate traffic.
Essentially, that is it - it has to be unique,
plausible but false and you can put it in one place such
as a file. If the information ever appears anywhere else,
you know that there is a connection between where you put
it and where it appeared. |
 If you make the carrot extra tasty, you are
more likely to get a result. If you make the carrot extra tasty, you are
more likely to get a result.
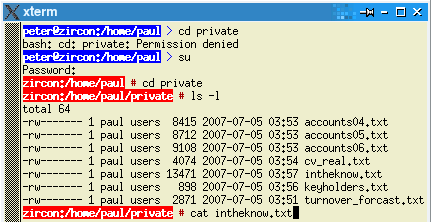
One thing you need to be, though, is patient. On the right, you can see that a directory is protected so that only the user has access. In this way, the only other person that has access is someone with root privileges. When they su to root, they can look at and open the files. In that way, if that information ever shows up anywhere you know that it was somebody with root privileges. One thing that you could do with this is to change the data every now and then so that it pin-points a time period. Wilf Hey and I had some fun with this in the 1990s. All good fun - for us. |
 Snooping IT staff
Controlling USB devices
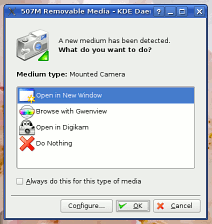
When you plug in a USB storage device - whether that is a camera or just an SD card or similar block storage device - a KDE daemon opens up a dialogue box that gives you a number of options. The default is 'Open in a New Window'. Pressing [Enter] opens this but removing it safely is a different matter. So what about the other end of the process -
unmounting it? |
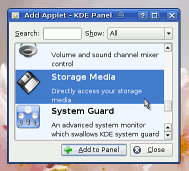 If you haven't got the little camera icons
in the panel as in the screenshot, right-click on the
panel and select 'Panel Menu', 'Add Applet to
Panel...'and then, in the dialogue box that appears,
scroll down to and click on 'Storage Media' and then
click on 'Add to Panel'. If you haven't got the little camera icons
in the panel as in the screenshot, right-click on the
panel and select 'Panel Menu', 'Add Applet to
Panel...'and then, in the dialogue box that appears,
scroll down to and click on 'Storage Media' and then
click on 'Add to Panel'. |
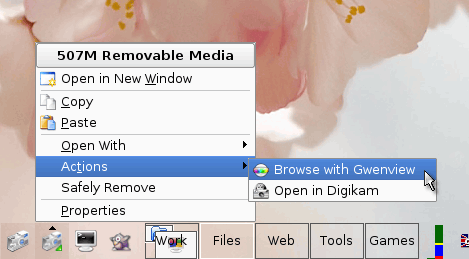 A camera icon will appear in the panel for
each USB block device and a floppy if you have one. A camera icon will appear in the panel for
each USB block device and a floppy if you have one.Now, to remove it properly, just left-click on the icon and then on 'Safely Remove'. |
 On a Linux
system, you can plug your camera into your Linux box and
it mounts all right under KDE. However, you might find
unmounting it a bit more of a problem and, if you have
written to that device, it is best to unmount it rather
than just unplug it. So, how do you make it flush its
cache before it loses contact?
On a Linux
system, you can plug your camera into your Linux box and
it mounts all right under KDE. However, you might find
unmounting it a bit more of a problem and, if you have
written to that device, it is best to unmount it rather
than just unplug it. So, how do you make it flush its
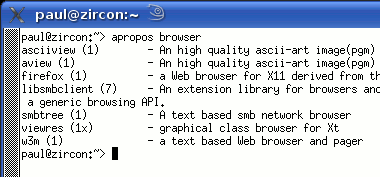
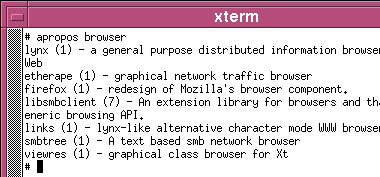
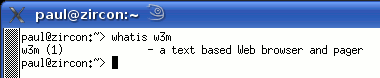
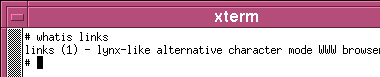
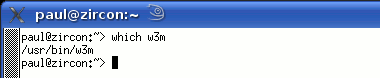
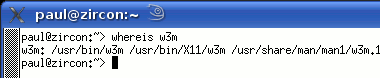
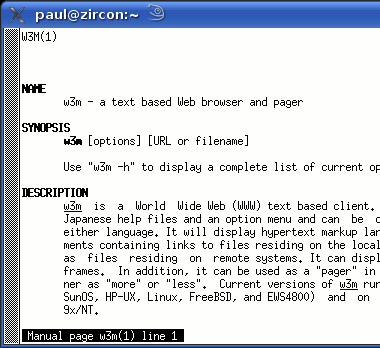
cache before it loses contact?Whereis, Whatis, AproposKnowing the name of a program and knowing what it does are always a problem, no matter which operating system you use and whether you use a GUI or a command line. So, here are some ways out of problems on two UNIX-like systems - Linux (SuSE 10.2) and OpenBSD.
|
||||||||||||||||||||||||||||||||||||||||||


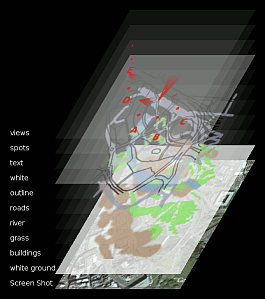
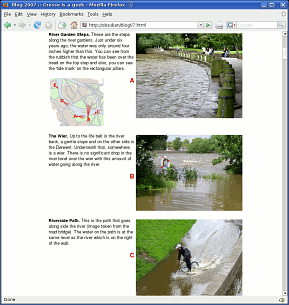
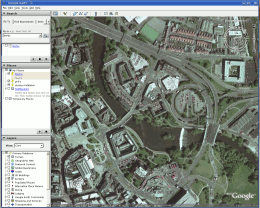
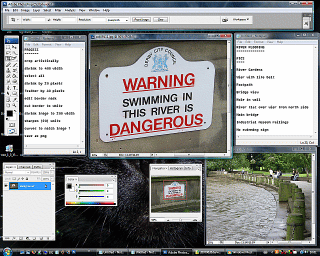
Make your own mapsMaps are always nice to have on your website but they are always owned by somebody. Strictly speaking, as far as ownership goes, the map is a work of art and comes under copyright. So, ideally, if you want the copyright of a map, you need to make your own. Usually, all you need on a website - or even This is how I made one earlier and it shows the positions and views of five photographs taken of the recent (June 2007) high river levels in Derby (UK). A good source of your area's topography is the photographic images from Google Earth - effectively, this is one of those so-called mash-ups that are so trendy to have at the moment. First of all, scale and orient the image to suit your needs and then take a screenshot. Next, open up your favourite, layer-friendly, image
editor - we are going to make good use of layers here. |
 Paste your screenshot as a new image and
crop it slightly larger than you need - this is so that
you can edit it down later on - you can't edit it up. Paste your screenshot as a new image and
crop it slightly larger than you need - this is so that
you can edit it down later on - you can't edit it up.Next, create a transparent raster layer and call it 'Roads'. Select the paintbrush, and draw the relevant roads onto that layer, taking out any unnecessary details - in my example, I had a layer of outline for the roads and filled the roads in on another layer as well. Next, you need to repeat the new-layer-draw cycle for railways, rivers, key buildings, green areas and anything else that you might need, using different colours. Note that a tablet is good for this, by the way, and adds more of an artistic feel to it. Note that you should feel free to stylise the map you are creating as much as you need to - remember that you are not copying the image, you are interpreting it. This is not just lawyer-speak either. At no point in any of this process are you using any automatic tracing tool. For example, if you were copying the image electronically (getting a program to use the information stored in the pixels to produce information in other layers without user interaction), you might be using tools like the magic outline mask tools; colour selection; and so on. Here, you are doing it all by hand. The only input that the bottom layer - the photograph - is having to the process is that it provides you with a visual guide - it might as well be in a different window as far as the image processor is concerned because it is not making use of it (If you were doing this on a system that used the Beryl or Compiz window managers, you could put Google Earth under your image and make your image transparent - equivalent to tracing paper). Being in a layer in the same image as your map does not contaminate your map with other people's copyright unless you get the image processor to draw your map for you. By keeping it in a separate layer and making sure that it cannot affect other layers directly when you flatten the image, you are making sure that everything that is in the end map is all your own work. Next, create a white layer ('white ground' in the image on the right) between the screenshot image and your handiwork - this is going to be your background. Also, add another one above everything you have drawn ('white'). This one is an easy way of toning down your map - all you need to do is just change its opacity. The reason for this is that the purpose of the map is to show people where something is in relation to everything else - a map that doesn't differentiate between various features is of little use here. By toning down the map (which is effectively the background), you are emphasising the bit(s) that you want the user to be interested in. Next, delete the screenshot layer so now, there cannot
be any of the original copyrighted photograph in your
image - it is all your own work. |
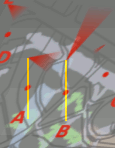 Now, add any text, your location (if
appropriate), using as many layers as you need above the
top layer. Now, add any text, your location (if
appropriate), using as many layers as you need above the
top layer.Here, I have added three layers:
These are on different layers so that I can change
their colours and opacity if I want to, or even tweak
their locations by a few pixels if I want. In the screen
detail, you can see how they locate (yellow lines) with
respect to each other. |
 Now, make any final adjustments to opacity,
colours and so on, save a copy of the image in your image
processor's native format and then flatten the image. Now, make any final adjustments to opacity,
colours and so on, save a copy of the image in your image
processor's native format and then flatten the image.Remember, your image does not contain any of the screenshot you took - it is all your own, stylised interpretation. You own the copyright. Finally, crop the image and save it. |
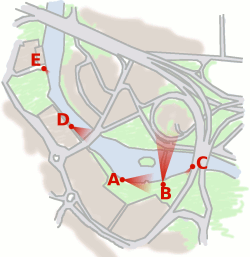
 This is the map in situ and, as you can see,
it makes it clearer where each of the photographs were
taken from and what they show. This is the map in situ and, as you can see,
it makes it clearer where each of the photographs were
taken from and what they show. |
 on a piece of
business literature - is a fairly basic piece of artwork
that shows people the rough, topologically important
features so that they will have a fairly good idea of
where something is. They don't need something that looks
like an aerial photograph. So, let's make our own.
on a piece of
business literature - is a fairly basic piece of artwork
that shows people the rough, topologically important
features so that they will have a fairly good idea of
where something is. They don't need something that looks
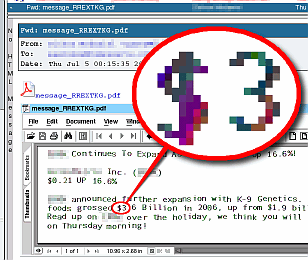
like an aerial photograph. So, let's make our own.PDF attached emailsYou might have been getting a lot of emails recently, that consist only of a PDF file attachment. Of course, you shouldn't open them but just what are they? If it is a virus, why aren't the virus filters filtering them out and if it is spam, why aren't the spam filters filtering them out?
Normally, the text in a PDF is written using vectors so that no matter how much you blow it up, you never see pixels as little squares. However, these new PDFs use dark-coloured, square blocks to form letters in the same way that pixels do, and on the same sort of scale. Blowing up these PDFs reveals them, as you can see. As a result, there are no letters in the file and spam filters fail to filter them out, just little blocks from a specially prepared pixmap. Even Optical Character Recognition has a difficult
task because the letters are all at different heights. |
 Of course, there is no reason to have the
instructions to produce these little squares in some sort
of order, they can be shuffled so that even studying a
group of them won't reveal the letters that are supposed
to be formed. The only way to filter these out by looking
at the PDF is to render it and then try to analyse that -
a time-consuming and processor intensive activity (which,
no doubt, the spammer intends it to be). Of course, there is no reason to have the
instructions to produce these little squares in some sort
of order, they can be shuffled so that even studying a
group of them won't reveal the letters that are supposed
to be formed. The only way to filter these out by looking
at the PDF is to render it and then try to analyse that -
a time-consuming and processor intensive activity (which,
no doubt, the spammer intends it to be).So, we just have to wait for the filter writers to come up with something that works better than the current solutions. Incidentally, while I have been writing the SuperDVD content (about a week in early July), the spammers have modified their program so that it now sends out attachments that have no file name. One can only presume that this is so that spam filters that look for a small (a few tens of KiB) PDF attachment with some sort of nonsensical name followed by .pdf will now have nothing to go on and therefore they will get through (until the filters are adjusted to quarantine emails that have a no-name file attached - that narrows it down a bit). |
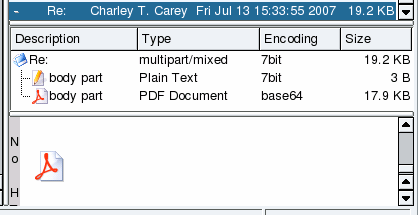
 Whilst
there are plenty of unexpected file attachments that are
clicked on - around 100,000 or so every day that turn
people's Windows PCs into zombie servers - the most
recent trend is that spammers in pump and dump campaigns
are now using PDFs.
Whilst
there are plenty of unexpected file attachments that are
clicked on - around 100,000 or so every day that turn
people's Windows PCs into zombie servers - the most
recent trend is that spammers in pump and dump campaigns
are now using PDFs.Viewing log files in Windows
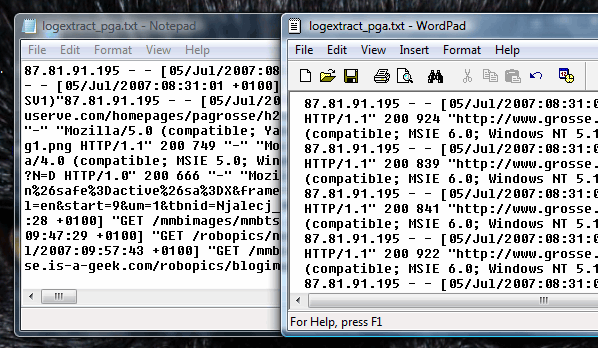
The output on the right shows the same log file extract displayed using two Windows text file programs: Notepad; and, WordPad. Notepad is text-only so you would think that it would be most appropriate to view a text-only file but you would be wrong in this case. Notepad just looks at the file as one large string. When you drop a file into WordPad, it is able to recognise where the end-of-line characters are and uses them to create new lines for the following pieces of text (although it does go on to make other new lines as well). At least it makes some sense when you look at it which is more than can be said for Notepad. So, why does this happen? |
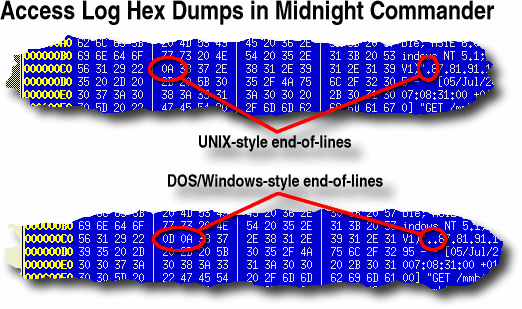 Most of the worlds web servers run on some
form of UNIX-like operating system. UNIX has a whole
different way of thinking about and solving problems. On
a UNIX-like system, such as Solaris, one of the BSDs or
Linux, the line ends have just a new line character
whereas NotePad expects a Carriage Return-Line Feed
(CRLF) pair - it hasn't seen them so it ignores the new
line characters. Most of the worlds web servers run on some
form of UNIX-like operating system. UNIX has a whole
different way of thinking about and solving problems. On
a UNIX-like system, such as Solaris, one of the BSDs or
Linux, the line ends have just a new line character
whereas NotePad expects a Carriage Return-Line Feed
(CRLF) pair - it hasn't seen them so it ignores the new
line characters.On the right are screen dumps from Midnight Commander (MC). The top file is from the original log extract and the bottom is the same file that has been copied and then DOSified so that it will read all right in Notepad. You can see that the DOS version has an extra
character (0x0D) and expecting this is the reason why
Notepad won't read the UNIX file correctly. |
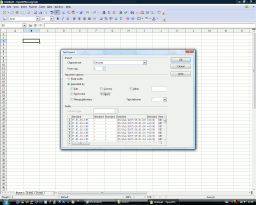 There are a number of solutions to this: There are a number of solutions to this:
To view this using OOo, open the file in Notepad,
press [Ctrl][A] to select all and then [Ctrl][C] to copy
it to the clipboard (you would do the same in Linux (KDE)
by using KWrite). |
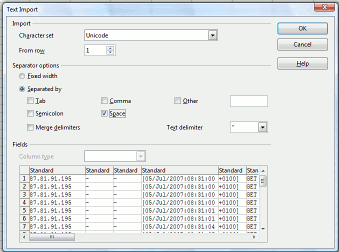 In OOo, press [Ctrl][V] to start the paste
process then make sure the 'Space' checkbox is checked
and the text delimiter is double quotes. In OOo, press [Ctrl][V] to start the paste
process then make sure the 'Space' checkbox is checked
and the text delimiter is double quotes.You can see how the field will be displayed at the bottom of the dialogue box. With the log file formats, the only space that is
included within a field is the space between the GMT/UPC
time and the offset (here +0100 for BST). Otherwise, the
GET field, referrer, user agent and so on all parse
correctly. |
 With it looking the way you want it, click
on 'OK' and it will load a row per line, broken down into
cells for each field. With it looking the way you want it, click
on 'OK' and it will load a row per line, broken down into
cells for each field. |
 Some
troublesome log files might end up as one line on some
text editors and, as it is supposed to be a log file,
this could represent a bit of a problem.
Some
troublesome log files might end up as one line on some
text editors and, as it is supposed to be a log file,
this could represent a bit of a problem.
|
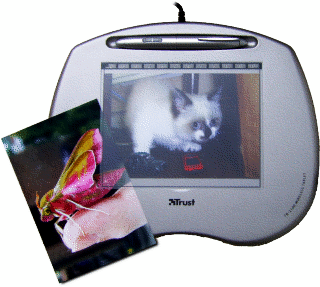
 The pen has a pressure sensitive tip that
sends effectively a grey-scale signal (it is actually 512
levels so that programs like The GIMP, PhotoShop,
PaintShop Pro and so on can use this extra information)
and this offers you a lot more than a simple on or off
pointer like the mouse. The pen has a pressure sensitive tip that
sends effectively a grey-scale signal (it is actually 512
levels so that programs like The GIMP, PhotoShop,
PaintShop Pro and so on can use this extra information)
and this offers you a lot more than a simple on or off
pointer like the mouse.Examples of the type of modification that you can use this signal for include brush colour, opacity, size and hardness. Colour variation is usually taken as a value from the currently selected gradient and in the image on the right, you can see how size and colour are implemented in The GIMP. Unless you are using a tablet for mapping large scale images, you will probably find that a cheap one will do everything you want it to. |
 Drawing with a tablet
Hashes in emailsBelieve it or not, it is possible to verify that the contents of a file has not changed, without having ever seen it, had it in your possession or had access to it. This can all be done by someone hashing their file and sending you the hash in an email - you can always telephone them to confirm the contents of the hash in order to compensate for email's intrinsic security weaknesses although the original file will not have been compromised. So, supposing you get a hash in an email, how does this work? MD5 (Message Digest algorithm 5) is what is known as a trapdoor algorithm. It works by taking a file that you feed it and packing its length so that it is a multiple of 512 bits long. It then takes it, 128 bits at a time, minces it up and then processes that with the next 128 bits until the file is used up. By then, you are left with a 128-bit value that can be represented as 32 hexadecimal values. It is called a trapdoor algorithm because there is no way that you can derive the contents of the file from which the MD5 function generated the hash. However, if you receive an MD5 hash in email, you can confirm that if a file generates the same hash, the file is extremely likely to have the same contents as the original file.
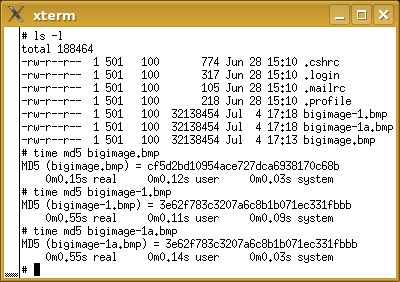
md5 filename
md5sum -b filename
fciv -md5 filename
...for *BSD, Linux and Windows respectively. (Note that you have to download and install fciv from http://support.microsoft.com/kb/841290/ for it to work because this is not part of the default installation.) You can see in the screenshot that the MD5 algorithm is fast - less than 150ms for a 32MB file. The images in 'bigimage.bmp' and 'bigimage-1.bmp' differ only by 1 pixel which has is only 1 bit different - this giving completely different hashes... cf5d2bd10954ace727dca6938170c68b and 3e62f783c3207a6c8b1b071ec331fbbb ... and just to show that the file name does not matter, images 'bigimage-1.bmp' and 'bigimage-1a.bmp' are the same and so are their hashes. MD5 produces a string of 128 bits but there are other algorithms. SHA-1 produces a 160-bit string and together, MD5 and SHA-1 provide the bulk of hashes although it is said that SHA-2 should be the norm by 2010. |
 You can
make your own MD5 hashes from a file using the following
commands (using 'filename' as the hash source file):
You can
make your own MD5 hashes from a file using the following
commands (using 'filename' as the hash source file):
|
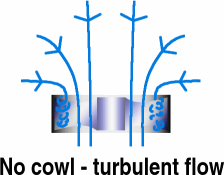 Without the cowl, the air at the edge of the
housing has to travel around a sharp bend and the
resulting flow over the ends of the blades is turbulent
and a lot less efficient - the flow over the inner part
of the blades is laminar and works the way it should.
Turbulent air does not just mean loss of efficiency - the
turbulence also creates noise. Without the cowl, the air at the edge of the
housing has to travel around a sharp bend and the
resulting flow over the ends of the blades is turbulent
and a lot less efficient - the flow over the inner part
of the blades is laminar and works the way it should.
Turbulent air does not just mean loss of efficiency - the
turbulence also creates noise.In addition to the fan
efficiency falling because only around 50 per cent of the
blade area is in effective use, there is also a higher
pressure drop over the intake. |
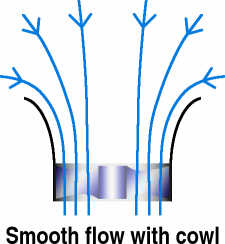 With a cowl - shaped like an elongated
inside of a doughnut - the horizontal vector for the air
flow at the edge of the intake is slower as the flow is
largely parallel to the direction of flow. This results
in the flow being laminar all of the way across the fan
blades, making the fan more efficient and producing less
noise. With a cowl - shaped like an elongated
inside of a doughnut - the horizontal vector for the air
flow at the edge of the intake is slower as the flow is
largely parallel to the direction of flow. This results
in the flow being laminar all of the way across the fan
blades, making the fan more efficient and producing less
noise.In addition, scaled, fluid dynamic tests have shown that the pressure loss across such an intake is significantly lower therefore the unit as a whole performs substantially better. Using water as a fluid and various shapes of inlet, the coefficient for pressure loss was around 20 times higher for a sharp-cornered intake (as in the no-cowl example shown above-right) than for one with a smooth intake such as the cowl. As a matter of interested, you can make your air intake consume an even higher proportion of the available pressure drop by having the sharp-cornered design protrude into the space from which air is being taken. With a reduction in air velocity at the intake, coupled with the virtual elimination of turbulence at the fan, such an assembly is much quieter. All you have to do is to get the manufacturers to make them. Remember, you read it here first. |
 More efficient fans
|
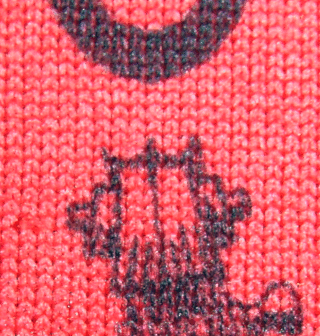 The words were printed out on a Roland
plotter and other parts were pasted in (literally), such
as the East Midlands Arts logo and my line tone
caricature of me playing the double bass. The words were printed out on a Roland
plotter and other parts were pasted in (literally), such
as the East Midlands Arts logo and my line tone
caricature of me playing the double bass.This was then put through the special photocopier and the process started. You can see that the definition was all right as well, even though this has been washed literally over a hundred times. In the heating process, the dye vaporises from the heated paper and this gas then moves to a cooler surface where it turns back into a solid. It doesn't melt at all, it goes straight from solid to gas and back again. You can see from the letter 'O' that the dye condenses onto the top of the material. This sweatshirt has lasted years of wear and if you
iron with a cool iron, the dye will outlive the shirt. |
 In the last 16 years though, things have
improved and now, half-tones are possible, using any
coloured image. In the last 16 years though, things have
improved and now, half-tones are possible, using any
coloured image.Whilst these machines are well out of the price range of the average PC Plus reader, you can take an image on a flash card along to a shop and get it printed onto a tee shirt. You don't have to use images taken with a camera
either - you can make up any image (as long as it is
legal) and get it printed out. |
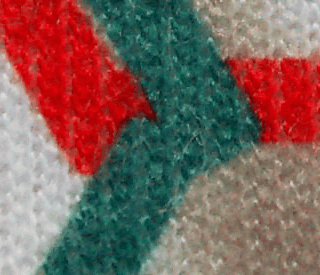 Colour definition is quite good - the
horizontal red line in the image on the right is just 2mm
wide making the colour mixing around 100 microns which
can effectively be ignored. Colour definition is quite good - the
horizontal red line in the image on the right is just 2mm
wide making the colour mixing around 100 microns which
can effectively be ignored.With your image, aim to get around 150dpi (or thereabouts) with an image size in the order of 12" (30cm) square. Also, remember that the process is aimed at the family snapper so whilst they claim to be able to take any image format, you are limited mainly to JPEG although PNG is worth a try as long as you have a JPEG image as a backup. If you want to try to find out which image types you can use, incorporate the file type in the name of the file as well as the extension so you might have 'mypicpng.png' and 'mypicjpg.jpg' because, being a Microsoft Machine, if you see the file name at all, you probably won't see its extension. Have fun. |
 Dye sublimation printing
Computers in filmsComputers in films are usually given a visual task that in reality is utter rubbish. No system designer would send m This type of network faux pas, along with many others, can be seen in many films. However, there is one film that springs to mind that does use a real program. In Jurassic Park, in a scene where the 10 year-old
girl and a few others are trapped by a dinosaur trying to
get in, she goes over to a console and utters those
famous words; 'This is UNIX! I know this' and starts
playing with a 3D file browser. |
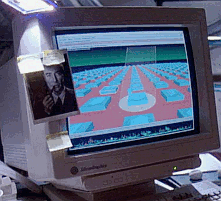
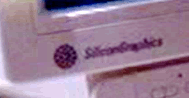 The browser in question is 'fsn' (File System
Navigator) and it ran on SGI IRIX which, if you look at
the border of the monitor, you will see. The browser in question is 'fsn' (File System
Navigator) and it ran on SGI IRIX which, if you look at
the border of the monitor, you will see. |
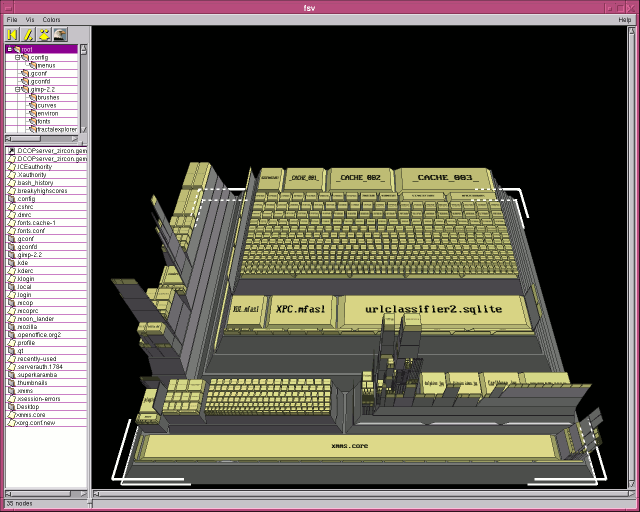
| SGI has now switched over to Linux but
you can install the LGPL port, fsv (File System
Visualiser), which works pretty much the same. In the
screenshot, you can see the same type of visual output
seen in Jurassic park with files as blocks inside
directories, all linked together by a tree structure. |
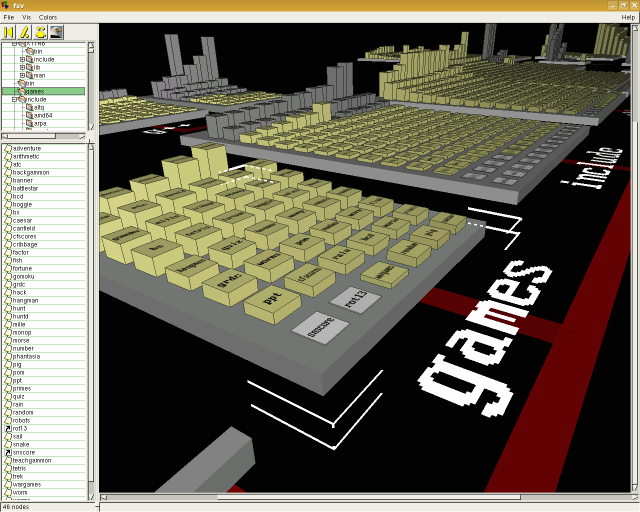 |
To navigate, you can click on various
files or directories. To change the view:
When you click on a node (file or directory), it puts it in the centre of the screen. If you selected a directory, you can expand it by right-clicking on it and selecting 'Expand' - this opens it up and places it in the tree. Right-clicking and selecting 'Properties' opens up a dialogue box showing the file/directory's metadata. FSV has another view, where everything is seen as a
progressively-subdivided, 3D block which you can
manipulate in the same ways as the tree view. |
 |
| As an alternative - one you are more likely to find on a Linux system - you can use 'fsview' which presents a progressively-subdivided, 2D block. |
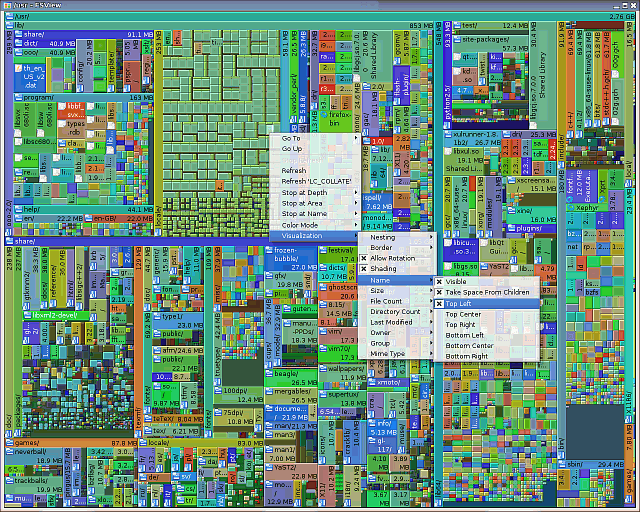 |
| In the same way as FSV, clicking on a directory will select and expand that in the same way as fsv and if you right-click on it, a menu drops down and you can change its appearance and navigate. |
 illions of images of
fingerprints over a network for a comparison similar to
those that we see in police and forensics dramas, for
example. In reality, the work is performed on the server
which, visually, is far less impressive.
illions of images of
fingerprints over a network for a comparison similar to
those that we see in police and forensics dramas, for
example. In reality, the work is performed on the server
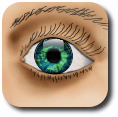
which, visually, is far less impressive.World map in iris
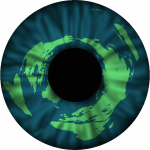
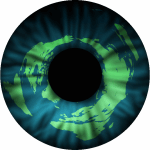
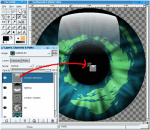
1
This is a part of a map that I found (go into Google Images and look for one there - you need one that is maybe five times bigger than your final image because we are going to mess around with it quite a bit. One thing to bear in mind is that if you are editing for the web (see the film-strip image above-left) then you are only going to be aiming for 70-100dpi whereas, if you are aiming for printed media, you should be aiming for around 300dpi or more. With this image, you can see that the Greenwich Meridian is not included in the land areas above and below it which makes it ideal (although if you have found one with the water all one colour, that would have been just as good). However, this has been saved as a JPEG so where there
are boundaries - such as the coast line - you have the
normal JPEG artefacts. |
|||||||||||||||||||||||||||
2With your image loaded, create two new layers so that we can mess around with masks and colours without destroying the original image before we need to.
Click on 'OK' ('Close') to finish. Now, select the top, empty layer. |
|||||||||||||||||||||||||||
3Select a colour for the land (we'll use green here). In Photoshop and The GIMP, just click on top-left box in the foreground/background tool in the toolbox and the 'Color Picker' ('Colour Selection') dialogue box will open. Select a hue by clicking on the spectrum and select its saturation and value from the large box. Click on 'OK' ('Close') to finish. 4Next, we want to fill the top layer, inside the mask, with our green.
Now, deselect the selected area [Ctrl][D]
([Ctrl][Shift][A]) |
|||||||||||||||||||||||||||
|
|||||||||||||||||||||||||||
7Next crop the image with the crop tool so that it only contains the part of the map we are interested in (for most of us, that goes from the southern tip of South America up to the top of Russia. Now, we have a longer and thinner map. 8Next, we want to introduce the area that will become our pupil. This black area needs to take up around 1/3rd of the image. Make black your background colour by clicking on the default colours (the little black and white icon in the colours tool) and then click on the reverse the colours icon to swap them over by clicking on the double headed curved arrow. Click on 'Image', 'Canvas Size...'. |
|||||||||||||||||||||||||||
|
|||||||||||||||||||||||||||
|
|||||||||||||||||||||||||||
10pIf you are using Photoshop, you need to make your image square (for some reason, it will make your circular image elliptical if you don't). Click on 'Image', 'Image Size...', making sure that 'Constrain Proportions' is not checked and adjusting the width so that it is the same as the height. Click on 'OK' and your image should be square. |
|||||||||||||||||||||||||||
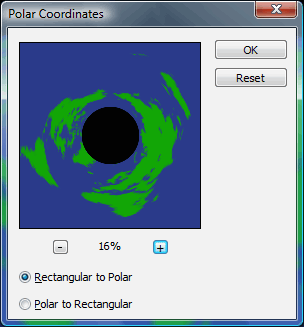 In Photoshop,
click on 'Filter',
'Distort',
'Polar Coordinates...'
and then click on the '-' button a few times so that you
can see some of your image. In Photoshop,
click on 'Filter',
'Distort',
'Polar Coordinates...'
and then click on the '-' button a few times so that you
can see some of your image.and then 'OK'. Unfortunately, if you want to rotate your image so
that something other than the middle of it appears at the
bottom, you will have to do this later on (rotate it
through an arbitrary angle). |
|||||||||||||||||||||||||||
|
|||||||||||||||||||||||||||
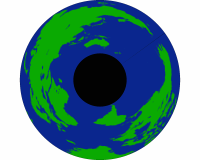 If you chose to have the iris at the bottom
and have Australia/New Zealand at the top, deselect, 'Map
Backwards' and 'Map from Top', changing the angle so that
your country of choice is at the top - Australia is
around 300 degrees. If you chose to have the iris at the bottom
and have Australia/New Zealand at the top, deselect, 'Map
Backwards' and 'Map from Top', changing the angle so that
your country of choice is at the top - Australia is
around 300 degrees.Note that this will vary according
to the Mercator projection map you started with. |
|||||||||||||||||||||||||||
11Now, you need to add an alpha channel (transparency)
to your layer. We did start off with a JPEG image - these
don't support transparency - so we need to get our image
into a transparent layer. There are a number of different
ways of doing this. |
|||||||||||||||||||||||||||
11pIn Photoshop,
use the circular mask ('Elliptical
Marquee Tool') to cover the image - this
will give us our highlighted circle. Now, we can copy the
image and paste it back into the same image which will
automatically end up as a new layer, with transparency.
Now all we need to do is to right-click on the 'Background' layer
in the layers dialogue box, then click on 'Delete Layer' and
confirm in the dialogue box that pops up. |
|||||||||||||||||||||||||||
|
|||||||||||||||||||||||||||
|
|||||||||||||||||||||||||||
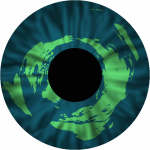
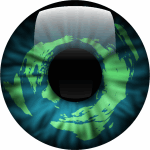
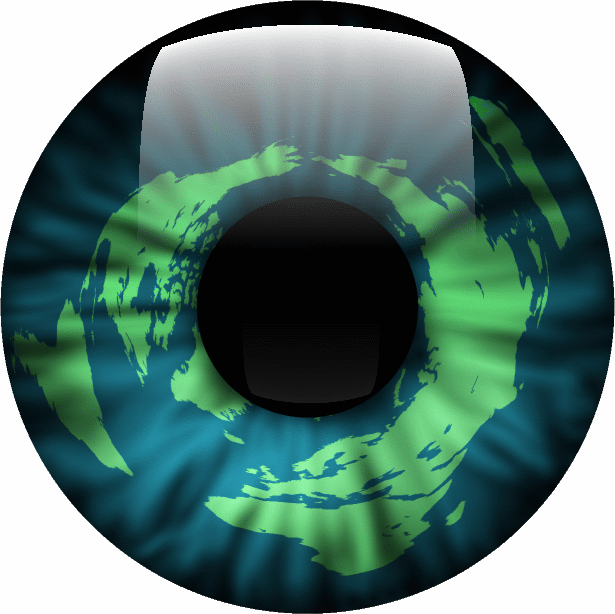
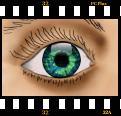 Here
is how to make an image of an eye - or at least the
iris part - that has a map of the world wrapped
around as the iris. I'm going to use the new Photoshop CS3 on Windows
and an old version of the The
GIMP (1.2.3) on Linux. Newer versions
have more capability but here we shall see how
flexible the software is. (Also, my son has
commandeered the server with The GIMP 2.2 on it)
Here
is how to make an image of an eye - or at least the
iris part - that has a map of the world wrapped
around as the iris. I'm going to use the new Photoshop CS3 on Windows
and an old version of the The
GIMP (1.2.3) on Linux. Newer versions
have more capability but here we shall see how
flexible the software is. (Also, my son has
commandeered the server with The GIMP 2.2 on it)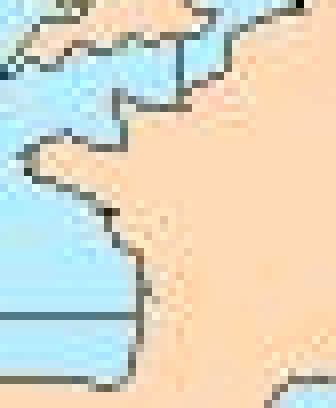 First of
all, you need to acquire a normal image of the earth. The
Mercator projection is fairly easy to find on the
Internet - you just need to find one without latitude and
longitude lines and with the land all of the same colour
(as an alternative, you can find one with the sea all of
the same colour - it is just so that you can select one
or the other).
First of
all, you need to acquire a normal image of the earth. The
Mercator projection is fairly easy to find on the
Internet - you just need to find one without latitude and
longitude lines and with the land all of the same colour
(as an alternative, you can find one with the sea all of
the same colour - it is just so that you can select one
or the other).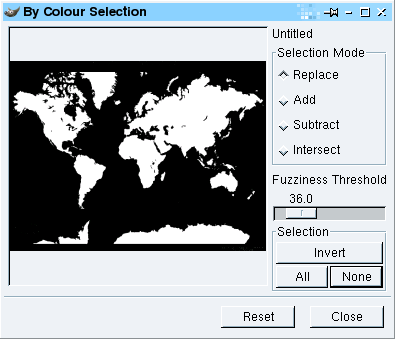 With the
map layer still having the focus (just click on it in the
layers dialogue box), click on 'Select',
'Color Range...' ('Select',
'By Colour...') and in the dialogue,
click on the land colour and, if necessary, adjust the
fuzziness so that you have all of your land.
With the
map layer still having the focus (just click on it in the
layers dialogue box), click on 'Select',
'Color Range...' ('Select',
'By Colour...') and in the dialogue,
click on the land colour and, if necessary, adjust the
fuzziness so that you have all of your land.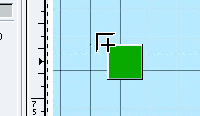 In
The GIMP, just click the mouse on the top-left
box in the foreground/background tool in the
toolbox and drag the colour onto the image. A
useful note is that this flood-fills the mask but
it doesn't change the identity of the current
tool.
In
The GIMP, just click the mouse on the top-left
box in the foreground/background tool in the
toolbox and drag the colour onto the image. A
useful note is that this flood-fills the mask but
it doesn't change the identity of the current
tool.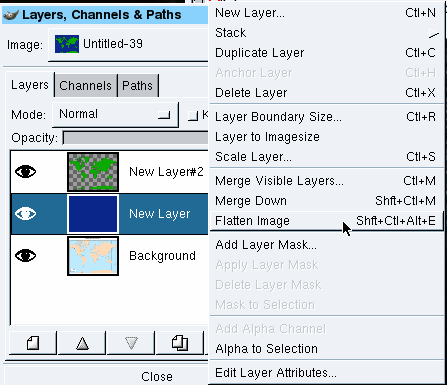 5
5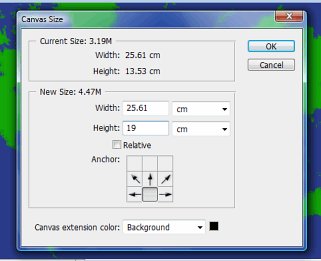 9p
9p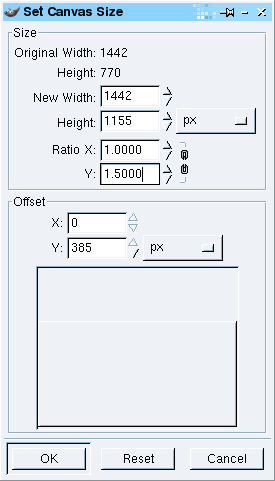 9g
9g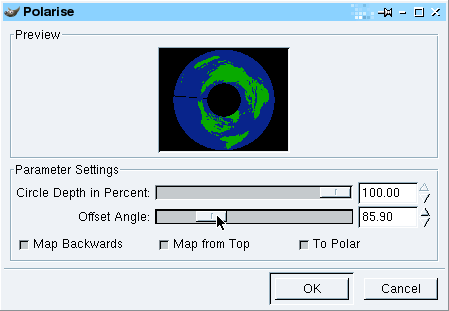 10g
10g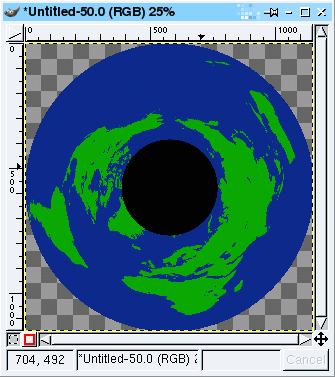 11g
11g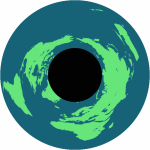

Multiple Document Interface (MDI) in Photoshop
On DOS or any GUI, the MDI kept everything in one window and made it easy to control that program's child windows. However, things have changed since then. Now, we have larger displays and run a number of programs at the same time so, whilst we are editing one image, we could be looking at some instructions or other notes - the nature of the MDI is to take up a whole load of your screen so that you cannot use it for anything else. Image editors like The GIMP have got around this by using multiple windows so that you can move them around from place to place, mingling with other programs or even sitting on a number of different desktops - something that you don't see on Windows or Mac OS X which are both single-desktop GUIs. So, how do we change this? In PhotoShop, make sure that you can see some of your desktop and then, grab hold of an image and drag it out of the MDI. At first, it will slip under the border but keep going and once you've dragged it past the border, it will appear outside the MDI. For the control windows such as 'Layers', 'Color', the tool box and so on, grab hold of the lighter-coloured area, just inside their borders and drag them - they break away just the same and soon, you can configure it the way you want - complete with other programs positioned so as to make your workspace more functional. PhotoShop won't let you get away with doing this to all of its windows but once it is the way you like it, click on 'Workspace', 'Save Workspace...' give it a name and click on 'Save'. Next time you open PhotoShop, your windows will either be there or you can click on 'Workspace' and select. The only disadvantage is that when you open a new image, you have to drag it out of the MDI and zoom in - a small price to pay. |
 Multiple
document interfaces (MDIs) have been around for many
years - on the PC, they existed in the early 1990s using
a 80x50 character DOS interface where they were extremely
quick on a processor running at even 16MHz.
Multiple
document interfaces (MDIs) have been around for many
years - on the PC, they existed in the early 1990s using
a 80x50 character DOS interface where they were extremely
quick on a processor running at even 16MHz.