PC Plus HelpDesk - issue 256
 |
This month, Paul Grosse gives you more
insight into some of the topics dealt with in HelpDesk
|
 |
HelpDesk
Adding quicklaunch icons to Vista's Taskbar
|
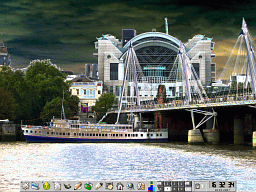 Having had access to a number of different
ways of doing things over the years - start-menu (Win)
style, top-menu (Mac) style, Desktop-icon (pretty much
all of them) style and panel menu (Mac/KDE/Gnome et al)
style, I have found that the easiest way to launch a
program is using a panel. On KDE and so on, you can try
them all out - at the same time if you want - and see
which is most useful. Having had access to a number of different
ways of doing things over the years - start-menu (Win)
style, top-menu (Mac) style, Desktop-icon (pretty much
all of them) style and panel menu (Mac/KDE/Gnome et al)
style, I have found that the easiest way to launch a
program is using a panel. On KDE and so on, you can try
them all out - at the same time if you want - and see
which is most useful.On the right, you can see the way
I have my working desktop. |
 This is part of it close-up. This is part of it close-up.It is very
easy to access the programs you use most often using this
- move the mouse to the bottom of the screen to bring the
panel up and then just click on the one you want. |
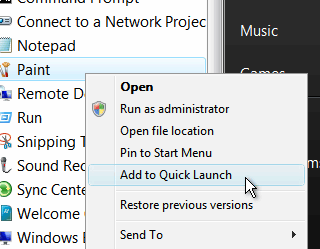 You can make Windows like this as well. You can make Windows like this as well.First,
find your item in the menu then right-click on the menu
item you want to install on your Taskbar and then, click
on 'Add to Quick Launch'. Quick Launch is a toolbar that
you can add to the taskbar - it should be there with one
or two programs on it already. Right-clicking on any
program icon in the menu or explorer should give you this
option. |
 Your new icon is now visible in the Quick
Launch toolbar. Hovering the mouse over an icon will make
a tool-tip pop up with the identity of the program, just
in case the icon isn't what you thought it was going to
be - some can be quite difficult. Now, you can access
your favourite programs in just one click, just like on
other operating systems.. Your new icon is now visible in the Quick
Launch toolbar. Hovering the mouse over an icon will make
a tool-tip pop up with the identity of the program, just
in case the icon isn't what you thought it was going to
be - some can be quite difficult. Now, you can access
your favourite programs in just one click, just like on
other operating systems.. |
Interrupt accuracy
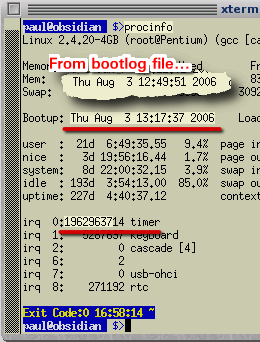
However, you need to do this over a period of time (unless it is really inaccurate). You need to make a make a note of the output of the 'procinfo' command - specifically, the line that starts with 'Bootup:' which has the start-up date and time. Make sure you have ntpd (the Network Time Protocol Daemon) running then, when you boot the machine, copy this line to a file and save it. Here, it is saved in a text file on Root's desktop each time the computer is run. A few weeks or so later, open up a console and run 'procinfo' again. When you compare the bootup date and time with the one in the file, you might well see a difference. In addition to the bootup date, you will also see a value for 'irq0' - the timer interrupt. If your machine's interrupt frequency is nominally 100Hz, just take off the last two digits to get the number of seconds it has been up. As an example, from the bootup log file, this machine (600MHz Katmai, 1199.30 bogomips) was booted at 12:49:51 on 3rd August 2006. Running procinfo again produces the same date but with 13:17:37 giving a difference of 1,666 seconds. The number of seconds on irq0 is 19,629,637 which works out at just under 85ppm or 51 seconds per week. |
Making text look photocopiedTo get text in an image to look like text that has been photocopied many times, you need to look at and try to mimic the photocopying process. In old-style photocopiers, the page is placed face-down on a piece of glass and then bright light illuminates it and the resulting reflected light is focused onto a drum. The drum has a cadmium sulphide (CdS) layer on its surface. CdS is an insulator but when you shine light on it, it becomes a conductor - some light sensors as CdS. The CdS coated drum is given a charge of static electricity and then the image is focussed onto it. The light makes the CdS conduct and lose its charge. Where there was not enough light to make it conduct, the surface keeps its charge. Next, the surface of the drum passes close to the pigmented powder and any charge picks up the powder. Note that the powder ends up where the dark parts of the original image were so that no negative is formed. Next, the powder is deposited onto the paper and this then goes near a heater where it is heated up until it melts and then this is rolled flat. In modern photocopiers, the image is scanned in - still using an optical system - and then a laser is used to place the image on the drum and the rest is the same. Essentially, there are a number of places where errors in the outline (the black/white boundary) can creep in: |
||||||||||||||||||||||||
|
||||||||||||||||||||||||
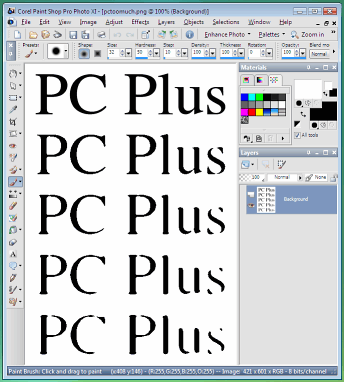 My personal favourite image processor is the
GIMP which is what I used to make the images above.
However, you can use any image processor that is equipped
with blur, threshold and gamma correction. So, as an
example, we'll use Paint Shop Pro... My personal favourite image processor is the
GIMP which is what I used to make the images above.
However, you can use any image processor that is equipped
with blur, threshold and gamma correction. So, as an
example, we'll use Paint Shop Pro...First of all, take your text and then blur it as it would be through a slightly out of focus lens. In Paint Shop Pro, select 'Adjust', 'Blur' 'Gaussian Blur...' and pick a suitable radius. Next, click on 'Adjust', 'Brightness and Contrast', 'Threshold' and pick a number. Repeat this a number of times until you have the desired effect. Play around with this by: changing the blur to represent errors in the lens; and, changing the threshold cut-off level. Positioning the threshold towards the dark end is equivalent to continual over exposure as shown in the screenshot. |
||||||||||||||||||||||||
When your web page was cachedYou might like to know when search engines (that is to say 'any' search engine) cached you web page. If you have access to the server log, you will find lines in it that might look like this (it is wrapped so you can see it - normally, it would be just one line)... 66.249.72.177 - - [12/Mar/2007:00:09:41 +0000]
"GET / HTTP/1.1" 200 20342 "-"
"Mozilla/5.0 (compatible; Googlebot/2.1;
+http://www.google.com/bot.html)
However, you might well not have such access which could represent a problem. One thought you might have is that you could write a little piece of JavaScript that somehow made it tell the time but one thing to remember is that web search engines use robots to spider your pages and there is no guarantee that they will run scripts (in fact, you shouldn't even think that they might, simply because of security reasons). So, how can you find out if you don't have access to the server logs?
|
 ...and at the top of the page, you can see
when it was cached. ...and at the top of the page, you can see
when it was cached.However, you cannot guarantee that the search engine that you are interested in will display this information. So, if you can't get the information from the server
or the cached file's search-engine-metadata, how can you
get it? |
If you can run CGIs (Common Gateway
Interface scripts) and SSIs (Server-Side Includes), it is
actually quite easy. All you need to do is include a line
in your index page that goes something like...<!--#exec cgi="/cgi-bin/ctr.cgi"--> ...and when you upload it, change its permissions to make it executable if your server uses the 'x-bit hack' or change its extension from '.html' to '.shtml' so that it will be recognised as needing processing. The above line will be executed and substituted in its entirety with output from the server - in this case, a cgi script called ctr.cgi that is stored in the server's /cgi-bin directory. In your cgi-bin, you will need a short Perl script that, clearly, can do anything you like, but should contain something along the lines of ... #!/usr/bin/perl -w
# let apache know what we are doing
print "Content-type: text/plain", "\n\n";
# get the DMY and turn them into a human-readable form
($day, $month, $year) = (gmtime)[3, 4, 5];
$year += 1900;
@months = qw/ January February March April
May June July August
September October November December/;
$month = $months[$month];
$sup = "th";
if (($day == 1) or ($day == 21) or ($day == 31)) {
$sup = "st";
} elsif (($day == 2) or ($day == 22)) {
$sup = "nd";
} elsif (($day == 3) or ($day == 23)) {
$sup = "rd";
}
$day .= "<sup>" . $sup . "</sup>";
# find out how long the server has been up for
# (if it is not your server, you might not be able
# to do this and you will get an error but it is
# worth a try :-)
open (FH, "/proc/interrupts");
@data = <FH>;
close FH;
$ints = $data[1];
$ints =~ m/(\d{3,15})/;
$ints = $1;
$ints = int($ints / 360000 / 24);
if ($ints >= 50) {
print "This server has been up for <b>$ints days</b>";
}
printf "<br>at %02d:%02d:%02d GMT on ",
(gmtime)[2],(gmtime)[1],(gmtime)[0];
print "$day $month $year.\n";
|
Now, when a robot spiders your web pages, the date and time will be included as part of the page itself and as it is text-only, it will be saved just like all of the rest of the text in your page. |
Ergonomics - rules of thumbYou might be wondering whether to invest in a laptop or a desktop as a replacement for that old desktop or, even as a completely new installation. However, you need to consider just how much space it will take up (compared to what is available to it); what proportion of the working day it will be in use; where it will be used (will it end up being used just on the desktop or will it be used in other places as well?). If it is to be used in a variety of places or only occasionally, you might well be better off with a laptop. However, for that permanent installation, you need to consider the well-being of the people who are going to use it. |
 This is what many people end up doing when
they use a laptop. Note the following: This is what many people end up doing when
they use a laptop. Note the following:
So, how we do this better? What are the rules of thumb for this? |
| Monitor distance: First
of all, position your monitor to avoid reflections of
lights or windows in the screen and make sure that it is
no closer to your eyes than you would hold a newspaper
(maybe a little further away than that when you consider
the resolution on a piece of newsprint is around 150dpi
and your screen is less than 100). Monitor brightness: Set the brightness/contrast of the screen so that it is comparable to a piece of newspaper that you would read in a well-lit room. If it is too bright, your eyes will have a relatively small area in your field of vision that is a lot brighter than the rest of it. Also, if it is too low, the opposite will happen. Either are a source of strain and to be avoided. Clearly, during the day, the amount and colour of the light that goes into the room will change (especially on a sunny day with clouds and a bit of wind so that clouds are passing in front of the sun) but you can get it roughly right.
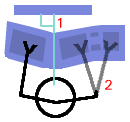
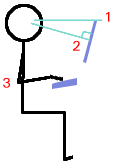
Monitor Angle (V): You should look at the monitor fairly square-on so that perspective distortions are at a minimum. Do this by adjusting its angle so that the centre of the screen is close to a right-angle relative to your eyes (2). Keyboard Height: The keyboard should be either the same height as your elbows or just a little lower. If the keyboard can be tilted upwards at the back then there is a bit more flexibility (3) and you can have it a little higher. Keeping your forearms level makes for more comfortable typing. If you have an adjustable chair, you can do this by:
|
 Next: Next:
Use an ergonomic keyboard if possible - Microsoft's 'Natural' keyboard is particularly good and comfortable to use but there are others. Finally, fine movements are done with the forearm when using a mouse which is just asking for trouble so use a good tracker-ball instead. An optical design using your thumb to move the ball is best. This way, your thumb does the fine motor movements as you would when writing. With an optical design, grease and dirt won't make such an impact on its function. This is easy with a desktop where these components are separate but with a laptop, users tend to lean forward over the machine, with their hands just under their chins, peering at the screen which is too close. |
|
Website internals exposedWhen you are developing a website that involves some backend work, it is, of course, nice to know what has happened, should things go wrong. You can, of course: use your own debugging code which you can then disable before you put the pages into a production environment; or, you can make do with the server's (or the back-end program's) own. Whichever you use, you must remember to turn it off before you put the site into a production environment (without wanting to labour the point too much). The sort of output you might find useful could be like the following...
...with information removed at the '##REMOVED##' parts to protect the victims of those who should know better and at '##SNIP##' for the sake of space. Notice that the source file line contains the full path of the document. This lets you know where on the system this file was and at the end, it tells you what version of what program it was using. If this error went un-noticed, the URL that generated it could be used to check for hacks into vulnerable versions of it. Of course, it is one thing to know about this but another to let the admin know about it. Sites should have admin/webmaster addresses on them but with plenty of spam around, not many of them do. However, even with no admin address, there should still be a way of communicating with the admin - assuming that he monitors his logs. Every server should produce an error log as well as an access log. The error log contains, amongst other things, lines with 'Invalid URI in request' and the actual URI sent to the server. To send a message to the systems administrator who looks at his error logs, just type an address like 'http://www.somedomain.com/your_server_is_leaking_data.hml' and you should get an error 404 (page not found) - the URI ending up in the log. There is nothing to stop you from doing this over several lines to let him/her know more details. |
|
Privileged account reminderIf you use a privileged account as well as a normal user account - we're talking about Vista as well as any other OS with a GUI - it is easy to get carried away and forget that you have absolute power over the system as an admin. Whilst it is true that you can always click on the start menu to see who you are (or click on start another session in KDE or, if you are on the command line, you can type 'w' to see who you are), you don't always do this. If you happen to have a browser running (say, so that you could update something on the system) and someone asks you to look up the cinema times or something else (such as the weather, train times or whatever), you might just forget where you are an what someone who breaks into the account can therefore do. You need some way of reminding yourself.
Another useful thing to help differentiate between the two types of account is to use a different GUI style for the account. Whilst this is not as flexible in Vista as it is in UNIX-based GUIs, if you select the Classic style in Vista, you will know that it is different to your normal user account, even when you have your wallpaper covered completely by programs. In addition to this, you can make your GUI display colours different, reinforcing the idea that there are things that you shouldn't do as a privileged user. Try to make the admin account as unwelcoming as possible, as a stark contrast to the comfortable home that you have made from your unprivileged account. There are plenty of other aspects of the GUI that you can play around with such as font style (if you use a 'sans' font on your normal account then use a serif font for your admin GUI or vice versa as an example), border widths and so on. |
User Agent stringsUser Agent strings aren't just used to spy on us - they do have their uses. For instance, web servers use them to work out which pages to send to the browser that sent the request and this can depend upon a number of different things - whether it is for platform, browser type or language. This is usually sent in the 'User Agent' string. Some
of the more advanced browsers will let you decide just
how much of this you send off - one example being
Konqueror in KDE. Under the Browser identification in the
configuration dialogue box, you have the options on what
to send... |
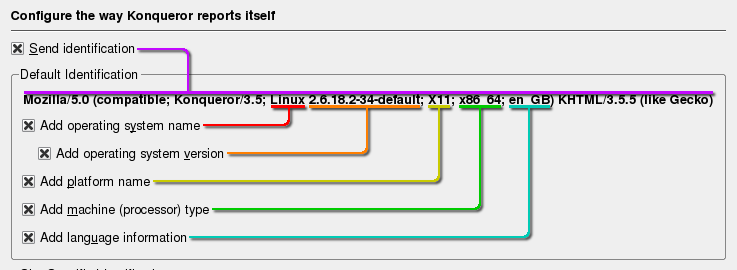 |
Mozilla/5.0 (compatible; Konqueror/3.5; Linux 2.6.18.1-34-default; X11; x86_64; en_GB) KHTML/3.5.5 (like Gecko) breaks down as follows:
From this information, if the server needs to send you different pages according to, say, language, then it is equipped to do so. In addition to deciding what is sent, you can also
pretend to be using a different browser, OS, machine and
so on. |
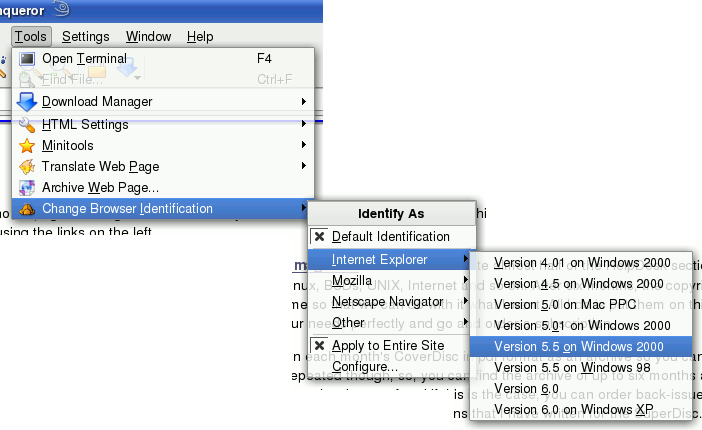 |
Various combinations exist and in some cases, you can get quite different results - normally due to non-standard and inconsistent extensions to HTML or JavaScript. Click on 'Tools', 'Change Browser Identification', '[whatever browser you want]', ']whatever version/OS you want]'. |
Automatic system reportIt would be nice to have an automatic system report waiting in your in-box when you got to work so that you can make sure that the web server and some other things are working as they should. In addition, you can also know when the system has been under some load and any thing else that you want. The first program that might spring to mind is Nagios which will monitor your system continually and email you should it find anything that is outside the limits you might have set. However, the default configuration won't send you a concise report when you want it, you have to log into it with a web browser and this can be considered overkill in some respects. Here is an answer - a small, annotated Perl program that runs from a crontab (Perl will already be on your machine so you shouldn't have to install anything unless you have selected options that give your machine very limited resources to use). You should be able to configure it for your own special requirements. The example program is a pretty straightforward top-to-bottom program that identifies certain values (number of processes; PID; the sizes of two logs; a number of processes with the same name; and, the total number of bytes transmitted and received by one of the Ethernet cards) although you can modify it to suit your needs. Every hour, on the hour (according to the crontab), the program runs and logs the results. It also looks at a number of other things if you want. If there are any that are outside the limits you set, it sends you a warning email - this can also be done if you want it to make sure that, say, httpd is running and it finds that it is not. As well as looking at log file lengths (use a
directory listing with the file sizes in it) or the
number of lines in a log file (use 'wc -l' to find this)
for excessive additions, you can set lower limits on log
file growth. This can be used as a tool to look for a
server being down or a network blockage and so on. |
The program (parts of it any way - see
the annotated 'sysreport' file in the 'files/sysreport'
directory by clicking here) looks like this...#!/usr/bin/perl
use warnings;
# get the time - if this is the first thing we do,
# we don't have a race condition for it.
# use localtime and select a substring of it
$dttm = substr(localtime, 8, 2)."/".substr(localtime, 4,
3)."/".substr(localtime, 22, )." ".substr(localtime, 11, 5);
# create another copy of the hour - this is just lazy
$ctime = substr(localtime, 11, 2); # this is the current hour.
# Check it later on to see
# if the report needs outputting
## current PID; $$ is Perl's PID for this program
$cpid = $$;
#Note that there are no limits with this -
# it is just a number that cycles
## No of processes; Get this by using 'ps ax'
# and piping it to 'wc -l' so that we just get a number
$cl = "ps ax | wc -l";
# execute the string and store the output in a
# scalar (it is just one number on one line)
$cnp = (readpipe ($cl))[0];
# extract the number using a regular expression
# - the brackets put the recognised digit(s)
# into a special variable
$cnp =~ /(\d+)/;
# reuse the scalar so that now, it contains (guaranteed
# to contain) just the number
$cnp = $1;
#limit - set the limit for the number of processes we
# think is acceptable for this machine
$cnpl = 250;
# Now, repeat the process with other properties of the system
# You can copy the $cl (command line) to a console and execute
# it to see what the output looks like with any of these
## length of httpdeflt log;
$cl = "ls -al /var/log/httpd | grep httpdeflt_log";
@ls = readpipe ($cl);
$ls[0] =~ m/root\s+(\d+)\s/;
$pgac = $1;
#limit
$pgacl = 10*1024*1024;
##eth0 rx and tx bytes
$cl = "ifconfig eth0";
@ls = readpipe ($cl);
# with this one, both of the results are on the same line so we can take them
# using just one regular expression - the two portions in brackets are the results
$ls[7] =~ m/RX bytes:(\d+)\s.+TX bytes:(\d+)\s/;
# and the first one is stored in $1 and the second in $2
$et0r = $1;
$et0t = $2;
#Note that there are no limits with this - it is just a number
You can see that we get the numbers into the variables but you need to know how. I The line we are interested in is line 7 (remember that it starts at zero) and we are after the two numbers in the darker blue. We can isolate the numbers in one go by using the regular expression $ls[7] =~ m/RX bytes:(\d+)\s.+TX bytes:(\d+)\s/; where $ls[7] is the seventh line which is assigned to a match. Within the match (m//) we look for 'RX bytes:' followed by a number which is at least one digit long and is followed by a space (this is one of a number of mechanisms that ensure that we have the whole number - the default is to take as much as it can and still match the required pattern so this is a belt and braces approach that is capable of withstanding changes in the code/program output and so on) and then '.+' means that there are a number of other characters before we get to and match; 'TX bytes:' in the same way. Note that the numbers ('\d+') are in brackets which means that they will be placed in a number of variables. The first one is $1, the second is $2 and so on. Now that they have been matched, we can put them in a variable of their own... $et0r = $1; $et0t = $2; ...or, if you wanted, you could say... ($et0r, $et0t) = ($1, $2); The next section of the program compares the values we get with the limits we set for each value. if ($cnp > $cnpl) {
$warng = "Total Processes ($cnp) Exceeds limit";
$warngm = "$dttm
Total number of processes exceeds the limit of $cnpl.
Current number of processes = $cnp.";
# At the end, we call the process that sends the mails.
&send_warning;
};
If it finds that one is out of range, it stores some string values and then calls the 'send_warning' subroutine which looks like this... sub send_warning {
# This subroutine creates a message and replaces
# two substrings with the warning and
# warning message that are created just before it is called.
$msg = "From: SysReport <yourname\@yourdomain.com>
To: Systems Administrator <yourname\@yourdomain.com>
Subject: ** WARNING: ASASA
WARNING ASASB \n";
$msg =~ s/ASASA/$warng/;
$msg =~ s/ASASB/$warngm/;
open (SM, "|/usr/lib/sendmail -t -i");
print SM $msg;
close (SM) or warn "Sendmail did not close nicely";
}
When you are testing this program out, you can call it from the command line and before the line that starts with 'open', you can insert/unremark the following two lines which will print the email message to the command line instead of sending it to the email server, and then, stop the program. That way, you can see that it is all working all right. print $msg; Next, we log the numbers like so... open(SRL, ">>/root/bin/perl/sysrep/sysreport/sysrep_log"); print SRL "$dttm $ctime $cpid $cnp $cntp $mailtar $pgac $et0r $et0t\n"; close(SRL); Having done that, we now look to see if we need to send a report. #if time set to 8am, send daily summary. note that you can set this to any time you like.
# Alternatively, you can make it do it twice a day by checking for two times like so
# if (($ctime eq '08') or ($ctime eq '15')) {
# To use the above line, remove the hash mark '#' but also make sure that you remark
# out the line below by starting it with a hash mark - this way will make sure that
# there is only one opening brace '{'
if ($ctime eq '08') {
#send daily summary
#open log file
open(SRL, "</root/bin/perl/sysrep/sysreport/sysrep_log");
# slurp it into an array
@lg = <SRL>;
close(SRL);
#keep last 25 entries
foreach $x(0..25) {
$lines[$x] = $lg[$x-26];
}
#clean up entries
foreach (@lines) {
chomp;
};
# Now to formulate the report - we'll build a string containing the message so that
# we only need to pipe it to the sendmail program.
$msg = "From: SysReport <yourname\@yourdomain.com>
To: Systems Administrator <yourname\@yourdomain.com>
Subject: ** Daily Report: $dttm - previous 24 hours **
+-------------------------------------+
| SYSTEM REPORT for $dttm |
+-------------------------------------+
CURRENT STATUS:-\n";
Now, we can start designing our printout for the report #find uptime and include that as well...
$cl = "uptime";
$utp = (readpipe ($cl))[0];
$utp =~ m/up (\d+) days\s+(\d+):(\d\d),/;
($utpd, $utph, $utpm) = ($1, $2, $3);
# make sure that we have a singular if the machine has only been up for one day
if ($utpd == 1) {$utpdd = "day"} else {$utpdd = "days"};
$msg .= ' ' x 23 ."System up for: $utpd $utpdd, ".$utph."h ".$utpm."m
Current -Number of- -Log Size KiBytes-- ----eth0 kBytes----
Date Time PID Procs Trpts mailtrpt httpdeflt RX TX\n";
# That's the headers printed out for the current status line.
$fcpid = substr(' '.$cpid, -5);
$fcnp = substr(' '.$cnp, -4);
$fcntp = substr(' '.$cntp, -3);
# Now to use commas to make it easy to read long numbers. To do this, we use the
# comma-ise function - see at the bottom
# Again, disc space uses 1024 ...
$fmailtar = substr(' ' x 7 .commaise(int($mailtar/1024)), -7);
$fpgac = substr(' ' x 7 .commaise(int($pgac/1024)), -7);
# ... and non-disc space quantities use SI (k = 1000)
$ket0r = int($et0r/1000);
$fket0r = substr(' ' x 9 .commaise($ket0r), -9);
$ket0t = int($et0t/1000);
$fket0t = substr(' ' x 9 .commaise($ket0t), -9);
# Now that we have these values, we'll add them to our string.
$msg .= "$dttm $fcpid $fcnp $fcntp $fmailtar $fpgac $fket0r $fket0t
SUMMARY of Last 24 hours:-
Delta Number of Log Deltas/K eth0 deltas/k
Hourly PID procs tarpits mailtrpt httpdeflt RX TX\n";
# These are going to print out the max, avg, min and, where applicable, total
# values for each of these.
# There are several ways of doing this and both of them are messy.
# You can either:
# go through each record, making notes of the max, min and total for
# each one you are interested in one at a time, then build up the string
# line by line; or,
# you can create a variable for each line and then go through each heading,
# simultaneously collecting data for each column's max, min and total.
# Also, you could create a 3D array and do it that way. However, we'll do it
# column by column for each line.
#
# Here are the base strings for each value we are intersted in...
$mx = " Max ";
$av = " Avg ";
$mn = " Min ";
$tot = "Totals ";
# We are only intersted in columns 3, 4, 5, 6, 7, 8 and 9 so we'll use the quote-white
# to create a list to use. Note that we could have used (3..9) to get the same result
# but if we wanted to use 3, 4, 5, 7, 8, 9, this would have created a problem. Using
# qw// gives us this flexibility and visibility on lists this size.
foreach $x (qw/ 3 4 5 6 7 8 9 /) {
#Set total to zero
$totv = 0;
#Next, we have the number of values in the total (this is used because if we have a
# log that is archived, that would create a negative number which would upset
# everything else.
$valsv = 0;
# create an old version of the line's array.
@lgl1 = split " ", $lines[1];
#Now, we have to go through 24 lines and in some cases, compare them with the previous
foreach $y (2..$#lines) {
#copy the old one - this is why we prepared it before we started the foreach loop
@lgl0 = @lgl1;
@lgl1 = split " ", $lines[$y];
unless (($x == 4) or ($x == 5)) {
# not pid or tarpits (ie, a delta)
# compare with previous result in the log
$v = $lgl1[$x] - $lgl0[$x];
if ($v < 0) {
#rollover
if ($x == 3) {
#pid -- needs a rollover adding to it
$v += 0x8000;
} elsif (($x == 8) or ($x == 9)) {
$v += 0x80000000;
$v += 0x80000000;
}
#if it is still negative, it is a log that is reset so we'll look out for that
}
} else {
#not deltas
$v = $lgl1[$x];
}
#we have $v so now, let us put it into its max/min et cetera
if ($y == 2) {
#we are at the beginning so initialise max and min
$mxv = $mnv = $v;
}
# if the max value is less than the current value, update it
if ($v > $mxv) {$mxv = $v};
# if the current value is greater than zero [ie, not negative] and (less
# than the minimum [being positive, it qualifies as being the new minimum]
# or the minimum is less than zero [it hasn't been update by a positive
# number yet] ), then make it the new minimum.
if ($v > 0) {
if (($mnv < 0) or ($mnv > $v)) {
$mnv = $v;
}
}
# if the number is greater than zero then
if ($v >= 0) {
#add it to the total
$totv += $v;
# and add one to the number of values we have added to the total value
$valsv++;
}
# Now, loop back to do the next line for this record
}
#we've got a total, max and min so, let's calculate the average using
# the total and the number of values in it.
$avv = int($totv / $valsv);
# Now, we need to format the output for each value
if ($x == 3) {
#delta pid
$mxv = substr(' ' x 7 .commaise($mxv), -7);
$mnv = substr(' ' x 7 .commaise($mnv), -7);
$avv = substr(' ' x 7 .commaise($avv), -7);
$totv = substr(' ' x 7 .commaise($totv), -7);
} elsif (($x == 4) or ($x == 5)) {
#procs and tarpits
$mxv = substr(' ' x 7 .commaise($mxv), -8);
$mnv = substr(' ' x 7 .commaise($mnv), -8);
$avv = substr(' ' x 7 .commaise($avv), -8);
$totv = ' ' x 7 . '-';
} elsif (($x == 6) or ($x == 7)) {
#mailtar and httpdeflt logs
$mxv = int($mxv/1024);
$mxv = substr(' ' x 10 .commaise($mxv), -10);
$mnv = int($mnv/1024);
$mnv = substr(' ' x 10 .commaise($mnv), -10);
$avv = int($avv/1024);
$avv = substr(' ' x 10 .commaise($avv), -10);
$totv = int($totv/1024);
$totv = substr(' ' x 10 .commaise($totv), -10);
} else {
#eth0 RX and TX
$mxv = int($mxv/1000);
$mxv = substr(' ' x 9 .commaise($mxv), -9);
$mnv = int($mnv/1000);
$mnv = substr(' ' x 9 .commaise($mnv), -9);
$avv = int($avv/1000);
$avv = substr(' ' x 9 .commaise($avv), -9);
$totv = int($totv/1000);
$totv = substr(' ' x 9 .commaise($totv), -9);
}
# Now, concatenate those strings with the four substrings we are accumulating
$mx .= $mxv;
$av .= $avv;
$mn .= $mnv;
$tot .= $totv;
# Now, cycle back to the next field
}
# Now, we have all of the values we want, formatted the way we want so add them
# to our string.
$msg .= "$mx
$av
$mn
Day's
$tot
LOG for Last 25 hours:-
Tot Delta mailtrpt log Tar httpdeflt log eth0 deltas/k
Date Time Prc PID size/K Delta pit Size/K Delta RX TX\n";
# Now, we have the headers for the previous 25 values. This is a bit easier. We still do it for
# each line of the log but we only have to do it once.
#Prepare the previous log line as before...
@lgl1 = split " ", $lines[0];
#Now, start cycling through them
foreach $x (1..$#lines) {
#copy the lgl line and split the new one
@lgl0 = @lgl1;
@lgl1 = split " ", $lines[$x];
#add the date to the line
#first, check its length
if (length ($lgl1[0]) == 8) {$lgl1[0] = " " . $lgl1[0]};
$msg .= "$lgl1[0] $lgl1[1] ";
#add the procs
$msg .= substr(' ' x 3 . $lgl1[4], -3);
#add the delta pid
# Note that we can get around it being negative by adding 0x8000 to it and then modding by the same
$delpid = substr(' ' x 6 .commaise(($lgl1[3] - $lgl0[3] + 0x8000) % 0x8000), -6);
$msg .= "$delpid ";
#add the mailtar size
$fmailtar = substr(' ' x 7 . commaise(int($lgl1[6]/1024)), -7);
$msg .= "$fmailtar ";
#add the mailtar delta, noting that if we have a negative number, it is a reset
if ($lgl1[6] < $lgl0[6]) {
#log file has been reset
$dfmailtar = " reset ";
} else {
# use 1024 because this is disc related. However, we want it to go to a 1/10th of a KiB
$dfmailtar = substr(' ' x 7 .commaise(int(($lgl1[6]-$lgl0[6])/102.4)/10), -7);
# also, note that if the end is whole (ie, no '.0') then add it to it and strip the front off the string.
unless ($dfmailtar =~ m/\./) {$dfmailtar = substr($dfmailtar . ".0",-7)}
};
$msg .= "$dfmailtar ";
#add the tarpits
$msg .= substr(' ' x 3 . $lgl1[5], -3);
#add the httpdeflt size
$fpal = substr(' ' x 7 .commaise(int($lgl1[7]/1024)), -7);
$msg .= "$fpal ";
#add the pal delta
if ($lgl1[7] < $lgl0[7]) {
#log file has been reset
$dfpal = " reset ";
} else {
$dfpal = substr(' ' x 7 .commaise(int(($lgl1[7]-$lgl0[7])/102.4)/10), -7);
unless ($dfpal =~ m/\./) {$dfpal = substr($dfpal . ".0",-7)}
};
$msg .= "$dfpal ";
# Now, add the eth0 RX delta
if ($lgl1[8] > $lgl0[8]) {
$drx = substr(' ' x 6 .commaise(int(($lgl1[8] - $lgl0[8])/ 1000)), -6);
} else {
$drx = $lgl1[8] - $lgl0[8];
# we can't add 0x100000000 in one go because it is too large on some machines so
# let's add half of it twice
$drx += 0x80000000;
$drx += 0x80000000;
$drx = substr(' ' x 6 .commaise(int(($drx)/ 1000)), -6);
}
$msg .= "$drx ";
#add the eth0 TX delta
if ($lgl1[9] > $lgl0[9]) {
$dtx = substr(' ' x 7 .commaise(int(($lgl1[9] - $lgl0[9])/ 1000)), -7);
} else {
$dtx = $lgl1[9] - $lgl0[9];
$dtx += 0x80000000;
$dtx += 0x80000000;
$dtx = substr(' ' x 7 .commaise(int(($dtx)/ 1000)), -7);
}
$msg .= "$dtx";
# That's the end of that line so let's add a next line character.
$msg .= "\n";
# Cycle around for the next.
}
# That is a long table for an email so let's add a footer to it to reiterate the columns
$msg .= " Date Time Tot Delta mailtrpt log Tar httpdeflt log Eth0 deltas/k
Prc PID size/K Delta pit Size/K Delta RX TX\n";
# These are debug lines that you can use to debug the program when you edit it for your own system.
# Just unremark the print line and remark the file lines. If you want to stop the program there,
# unremark the exit as well (the 2 is the exit code - you can use these to see how your program ends)
# Remember to unremark the file commands and re-remark the print and exit lines.
#print $msg;######################################### DEBUG ################################
#exit (2); ######################################### DEBUG ################################
open (SM, "|/usr/lib/sendmail -t -i");
print SM $msg;
close (SM) or warn "Sendmail did not close nicely";
}
#And, that is it.
sub commaise {
# This sub takes the contents of $_ and adds commas every third number from the right.
my $a = shift;
1 while ($a =~ s/(\d+)(\d\d\d)/$1,$2/);
return $a;
}
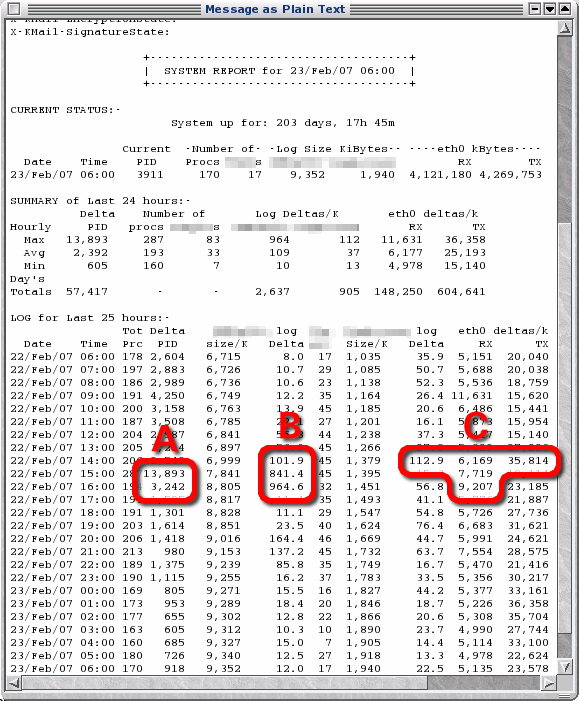
On such an hour, it reads the log and produces a page that shows the current status, a summary of the last 24 hours with figures for maximum, average, minimum and, where appropriate, totals. Then it shows the log details with a number of delta values as well. From these, you can see (in the screenshot):
From this, you can look at the appropriate logs, trace IP addresses and fine-tune your reporting program limits. |
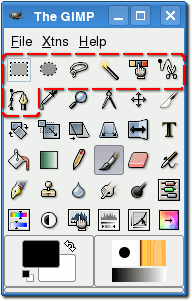
Layer Masks in the GIMPSelecting areas and cutting them ([Ctrl][X]) works fine - you can even select the ruby mask. However, once you commit to cutting, the only way back is to undo all of the editing you have done since - and that assumes that the original cut operation is still recent enough to be in the cache.
Also, if you have used a tool that uses transparency such as fuzzy-edged painting tools, the edges will lose their fuzzy edge (you can also see this in (3)). The solution is to create a layer mask. |
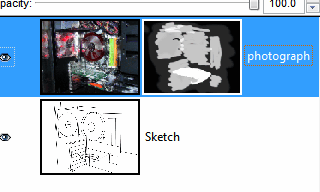 On the 'Layers' dialogue box, right-click on
the layer you want to create the mask for and choose 'Add
Layer Mask...'. In the dialogue, you have a number of
selections and the most obvious one to choose is
'Initialise Layer Mask to: White (full opacity)' as this
will keep your transparent layer looking the way it
already does. On the 'Layers' dialogue box, right-click on
the layer you want to create the mask for and choose 'Add
Layer Mask...'. In the dialogue, you have a number of
selections and the most obvious one to choose is
'Initialise Layer Mask to: White (full opacity)' as this
will keep your transparent layer looking the way it
already does.To 'cut out' parts of the layer it is
attached to, make sure that it is selected in the Layers
dialogue, then select your paint tool and draw over the
parts you want to remove using black. You can, of course,
use any method you like to draw on it so you can still
use the select tools to highlight areas and then fill
them with black. |
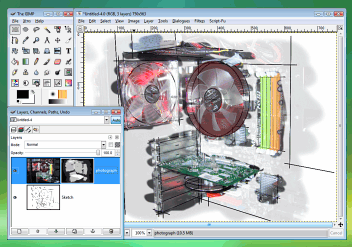 Later on, if you decide you want to 'undo'
some of the masking, you can just use white to draw on
the mask -- the original transparency is preserved simply
because you have not changed it. Later on, if you decide you want to 'undo'
some of the masking, you can just use white to draw on
the mask -- the original transparency is preserved simply
because you have not changed it.In the example on the right, you can see how a sketch has been made by drawing on a layer with the opacity turned down and then the original photograph has been 'painted on' by using the layer mask. I tried it several times before I achieved something that I was reasonably happy with and, because I wasn't messing around with the alpha channel, I could undo areas out of order, just by painting over them again on the mask. |
|
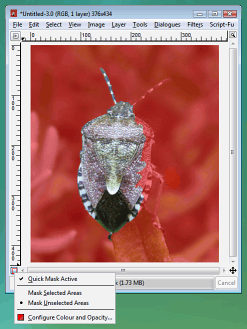 In the GIMP, you press the 'Toggle Quick
Mask' button (in the bottom-left of the image window), in
Picture Publisher, you click on the 'Ruby Overlay' button
and so on. In the GIMP, you press the 'Toggle Quick
Mask' button (in the bottom-left of the image window), in
Picture Publisher, you click on the 'Ruby Overlay' button
and so on.With the mask visible, you can draw on it using any tool that you would normally use. Any colour you use will be converted to its grey value but the grey values will convey intermediate levels of transparency. This is particularly useful if you want to cut out a part of an image so that you can transfer it into another. You can enlarge the image as much as you like and use any tools that you feel are appropriate to do the job. Once you have finished, click on the toggle button again and you can cut, paste or whatever you want. Note that you are not stuck with total transparency or
total opacity - you can use any intermediate levels you
wish. |
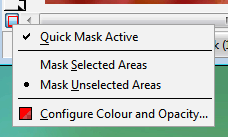 If the 50 per cent red isn't distinct enough
for the particular job at you are doing, you can
right-click on the button, select 'Configure Colour and
Opacity...' to change this. If the 50 per cent red isn't distinct enough
for the particular job at you are doing, you can
right-click on the button, select 'Configure Colour and
Opacity...' to change this. |
Crontab file timesThe crontab file ('/etc/crontab') contains a list of programs and when the system should run them. Each minute, the system reads /etc/crontab and looks for any times that match the current time. Any that it finds, it runs. In the file, each job has a line to itself. On that line, you will find a series of numbers or asterisks followed by a userID and then the program with any arguments (the format might vary on some systems). The numbers and asterisks tell it when to run and they are ordered as follows: minute (0..59); Hour (0..23); Day of month (1..31); Month (1..12 or names); and, Day of week (0..7 or name) with 0 or 7 being Sunday. If you want a program to run on weekdays, every other hour from 7am to 5pm, you can use... 0 "7-17/2" * * 1-6 me some/program/or/other ...so it is quite flexible. Each user can have their own crontabs which they can edit themselves with the crontab command. |
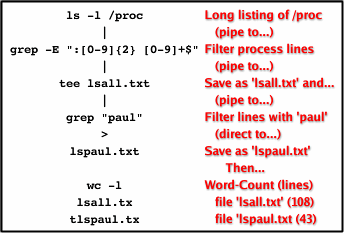
Tee for twoWe all know you can pipe commands and redirect output but did you know you can save it as a file anywhere along the command line? Supposing you want to know at a particular point in time, which processes are running - what there PIDs and start times are - and of them, how many are running as 'paul', saving the results in two files. First of all, we pipe ('|') the long format listing of '/proc' through grep and getting all lines that have a colon, two digits and a space and then end with a number. If we included 'paul' in the regular expression, we wouldn't get all of the processes so instead, we can create two files and 'wc' them like so... ls -l /proc | grep -E ":[0-9]{2} [0-9]+$" | tee lsall.txt | grep "paul" > lspaul.txt
wc -l lsall.txt lspaul.txt
This saves its input as any number of files you list and then also to STDOUT which, of course, you can pipe to any other program that will take it such as wc and grep. With tee, the default is to overwrite them but you can append them using the '-a' switch. |
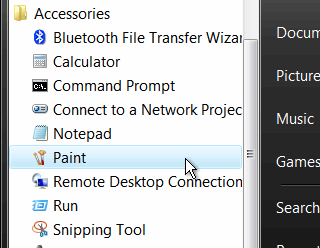 Sifting
through Windows Vista's menus, looking for programs that
you use a lot can be frustrating. However, you can make
it work a lot better for you by placing your icons
carefully.
 It doesn't
really matter whether your computer's interrupt frequency
100Hz or 110Hz, it would be interesting to see just how
far out it can be.









 On Google,
you can simply click on the cached link...
 Note that
you can test this script and you should get something
like this as output.
 Monitor
Height: It is fairly comfortable when you look
slightly down at the monitor so one rule of thumb is to
make sure that the top of the monitor is roughly level
with your eyes (1).
 Retrieving Vista menus
 Release GUI resources
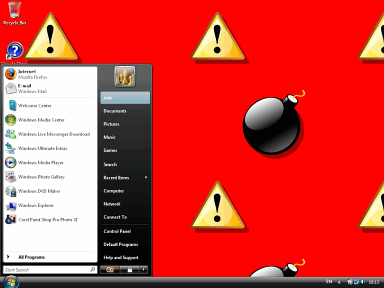 All you
have to do is to use a distinctive wallpaper such as the
SUSE Linux root user's wallpaper in the screenshot - here
used on Windows Vista.
 f we take
the example immediately above and look at the output of
'ifconfig eth0', we get the following...
 You can
configure the program to send you a report of the
previous day (together with the same hour for comparison)
- this is at a particular time so you can have your
report first thing if you want. In addition to emailing
it to you, you can use lpr to send it to a printer so
that you have a printed copy waiting for you instead.
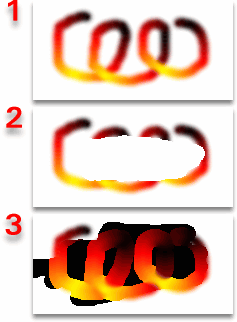 The erase
tool sets the alpha value to zero, making it transparent
thus allowing you to cut away any parts you want.
However, using the unerase option (double-click on the
toolbox erase button to get the options) turns it back to
255 and you might encounter some problems if the image
you are unerasing was drawn on a transparent layer (1).
When it is erased, the opacity is turned right down (2).
The colour of an added transparent layer is usually black
- which you will see once you have unerased it (3).
 Configurable ruby mask
 ...by
using the 'tee' command.