PC Plus HelpDesk - issue 234
This month, Paul Grosse gives you more insight into
some of the topics dealt with in HelpDesk and HelpDesk
Extra
|
 |
HelpDesk
Dynamic passwordsSome times, you need to make passwords change a little more frequently than one every three weeks or whatever. Here is a program that will change the passwords for a given set of users, using a given realm on a server, one every hour. The passwords are generated automatically from a set of characters that can be as wide or narrow as you like. This solution is suited best to people who use a server infrequently but intensely for a few tens of minutes when they do - such as looking up recent data such as price lists or calendar items. If users are going to use them in a reasonably controlled environment, they can be printed out or they can be encrypted using public key cryptography and the resulting file sent by email. For the configuration here, each user has a password for each hour of the day. Browsers that use them will be able to access that realm until the password changes on the hour (or whenever, according to how you set the crontab or scheduler if you are running Windows - see below for setting up the scheduler (27 steps). Apache configuration - httpd.confIn our etc/httpd/httpd.conf file, we can have a section that defines the access rights to a particular directory. This is fairly easy to do and can be done like this... <Directory "/srv/www/htdocs/secrets">
AllowOverride AuthConfig
Options Indexes FollowSymLinks
Order allow,deny
Deny from all
AuthType Basic
AuthName "secrets test"
AuthUserFile /etc/httpd/daccess/dpass
AuthGroupFile /etc/httpd/daccess/dgroup
Require group dg1
Satisfy Any
</Directory>
...which will protect the 'secrets' directory. Note that the AuthUserFile and AuthGroupFile are not the usual ones as these are the ones that we are going to create directly and indirectly. First of all, we need a group file in the usual format. Create a directory called /etc/htppd/daccess/ and create a file in it called 'dgroup' which has content similar to that below dg1: borris john mike dg2: borris phil mark peter This consists of a group name followed by a colon and then, space-separated user names - one group on each line. The next thing we need to do is to generate the passwords that we are going to use. Password generatorThe first thing we do is tell the program where it is and open up the group file like so... $pth = "/etc/httpd/daccess/"; open GRP, "<".$pth."dgroup"; @group = <GRP>; close GRP; Next, we split each line of the @group array and put each user into another array so that any duplicate appearences are eliminated - one user needs one password. Following this, we select a set of characters to use. If you are going to have users with password files on a computer that they can cut and paste from (this eliminates keyloggers) then you can have any characters that are acceptable to the program that reads the passwords but if you are going to have people with pieces of paper, they need to use a character set that has few ambiguities in it so, Il1 should not be used along with qg and so on. Fairly complete @chars = qw(A B C D E F G H I J K L M
N O P Q R S T U V W X Y Z
a b c d e f g h i j k l m
n o p q r s t u v w x y z
0 1 2 3 4 5 6 7 8 9 );
Fairly restricted @chars = qw(a b c d e f h j k m n p r s t
u v w x y z 2 3 4 5 6 7 8 9 );
Finally, we generate the passwords and store the list of each user's passwords in each file - these can be distributed securely to each user (so that each user does not know the other user's passwords) foreach $x (@users) {
open(UDP, ">".$pth."dp$x");
foreach $c (0..23) {
# build random string
$pw = "";
foreach (1..8) {
$pw .= $chars [rand @chars];
};
print UDP "$c $pw\n";
};
close(UDP);
};
You can see the full listing with comments by clicking here. Regular updatingTo generate the password file with each group member's current password in it, all you need to do is put an entry in the crontab file that runs the program you'll find on the SuperDisc called 'dynaudpass'. Again, it's operation is quite simple. All it does is look at the group file to see who needs a password in the password file, looks up the current passwords for those users, generates them using the web server's trapdoor program and then saves them all at the same time in a new password file. This is a partial, commented listing... Tell the program where it is going to find its files and where to store the program output. $pth = "/etc/httpd/daccess/"; Next, it reads in the group file and process it to get a list of unique users in the same way that the other program has already covered above. Following that, we look at the local time and, as this version of the program only looks for the hour of the day, we can use a regular expression in the string returned from the localtime function thus... {
my $t = localtime time;
$t =~ m/(\d+):\d+:\d+/;
$curhour = $1 * 1;
};
Next, for each of the users in our list, we open their file, find the appropriate password and push it, along with the user name into an array. foreach $u (@users) {
open USR, "<".$pth."dp$u";
@dausr = <USR>;
close USR;
foreach $ln (@dausr) {
if ($ln =~ m/$curhour\s+(\w+)/) {
$pw = $1;
last;
};
};
# trapdoor the password
$cl = "htpasswd -nbms $u $pw";
@rt = readpipe ($cl);
$pwl = $rt[0];
chomp $pwl;
# store it in the dpass array
push (@dpasslist, $pwl);
};
Finally, we save the contents of the array as the password file. In the etc/crontab file, you just need a line that reads 0 * * * * root /etc/httpd/daccess/dynaudpass We've already told it where to find the necessary files so it runs all right. |
Internet Explorer - Content Ratings
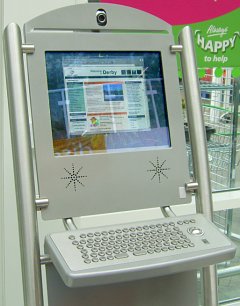
Any reasonable person will accept that these terminals should not be used for viewing unsuitable material but if your website has no contentious content, you need to know how to stop being blocked by old (and even new) copies of IE. The content ratings used by default on IE are the RSAC ratings so, as most admins don't have time to configure anything else (or aren't aware that they exist even), you need to get those tags. Except that you can't. So, here is what to do. Register with ICRA and rate your content honestly. If you are supplied with a tag like the one below (the important things are the numbers which need to be the same as in this example, ie all '1's) <meta http-equiv="pics-label" content='(pics-1.1 "http://www.icra.org/ratingsv02.html" l gen true for "http://www.your.own.domain.com" r (nz 1 vz 1 lz 1 oz 1 cz 1))'> So, you need to adjust the content so that it is like the following example. <meta http-equiv="pics-label" content='(pics-1.1 "http://www.rsac.org/ratingsv01.html" l gen true for "http://www.your.own.domain.com" r (n 0 s 0 v 0 l 0) "http://www.icra.org/ratingsv02.html" l gen true for "http://www.your.own.domain.com" r (nz 1 vz 1 lz 1 oz 1 cz 1))'> With that in the head part of your web pages, you should be able to get your site on the browser. |
 Internet Explorer has
not quite kept up with the rest of the world when it
comes to content ratings, in fact, most people are
probably not aware of content ratings. However, if you
have a web site and you want to be able to view it at
your local supermarket or pub or anywhere that there is
one of the new local government terminals, you will
probably encounter content ratings.
Internet Explorer has
not quite kept up with the rest of the world when it
comes to content ratings, in fact, most people are
probably not aware of content ratings. However, if you
have a web site and you want to be able to view it at
your local supermarket or pub or anywhere that there is
one of the new local government terminals, you will
probably encounter content ratings.IrDA TipIrDA needs you to know where the sensors are. On some devices, it is pretty obvious but on others, it could be anywhere.
|
 If
you use a digital camera, you can locate the
flashing IR emitter on the IrDA device fairly
quickly as digital cameras usually see infra-red.
The picture on the right is of an IrDA dongle.
If
you use a digital camera, you can locate the
flashing IR emitter on the IrDA device fairly
quickly as digital cameras usually see infra-red.
The picture on the right is of an IrDA dongle.  On
some phones, it is obvious where the IrDA is but
on others, it is not.
On
some phones, it is obvious where the IrDA is but
on others, it is not. If
you want to find out if your digital camera does
pick up infra-red, try it out with a known IR
source such as a television remote control.
If
you want to find out if your digital camera does
pick up infra-red, try it out with a known IR
source such as a television remote control.IrDA security
Bluetooth has a range of only a 20th of that but, as has been demonstrated, can be picked up at a range of between 0.5 and 1 miles. Both Bluetooth and Wireless LAN are radio but even with higher frequency carries such as infra-red (where line of site [or reflection] and proximity both apply) you are not in total control. If you have an IrDA device as a dongle, you should unplug it when you are not using it and if you have an IrDA device built into your computer, you should really switch it off when not using it. |
 IrDA is a wireless
method of communication between computers whether it is a
mobile phone or another computer you want to talk to. The
problem with wireless communications is that they leak.
We all know that Wireless LAN is a serious risk because
it can be picked up by the normal devices at range up to
100m.
IrDA is a wireless
method of communication between computers whether it is a
mobile phone or another computer you want to talk to. The
problem with wireless communications is that they leak.
We all know that Wireless LAN is a serious risk because
it can be picked up by the normal devices at range up to
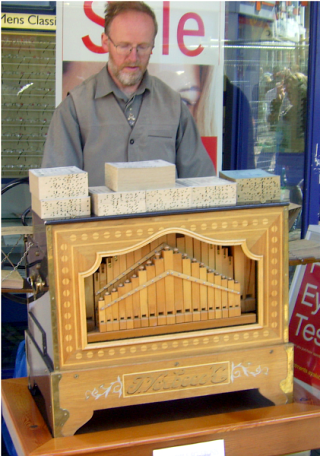
100m.MIDI (Musical instrument Digital Interface)
|
 Midi
information is simply any digitisable data that
describes a piece of music.
Midi
information is simply any digitisable data that
describes a piece of music.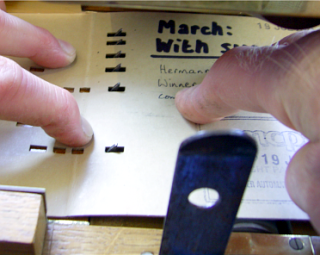 Here,
you can see the pins that read the notes. They
are fed from left to right. The pins have a
sloping left side so that as the card is pulled
through, the pin pushes through the hole and then
as the note ends, it is pushed back gently.
Here,
you can see the pins that read the notes. They
are fed from left to right. The pins have a
sloping left side so that as the card is pulled
through, the pin pushes through the hole and then
as the note ends, it is pushed back gently.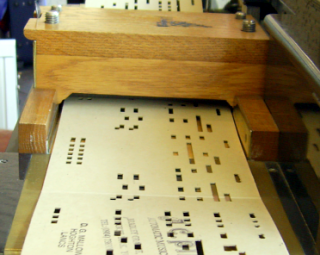 Here,
you can see the holes as they are pulled towards
us with high pitched notes on the left. You can
see that as each pin represents a note to be
played, it has a series of holes that play it -
in this case, the card has a span of 36 holes
across its width.
Here,
you can see the holes as they are pulled towards
us with high pitched notes on the left. You can
see that as each pin represents a note to be
played, it has a series of holes that play it -
in this case, the card has a span of 36 holes
across its width. This
image is from a MIDI file editor (CakeWalk) and
you can see how each note has a particular
position.
This
image is from a MIDI file editor (CakeWalk) and
you can see how each note has a particular
position.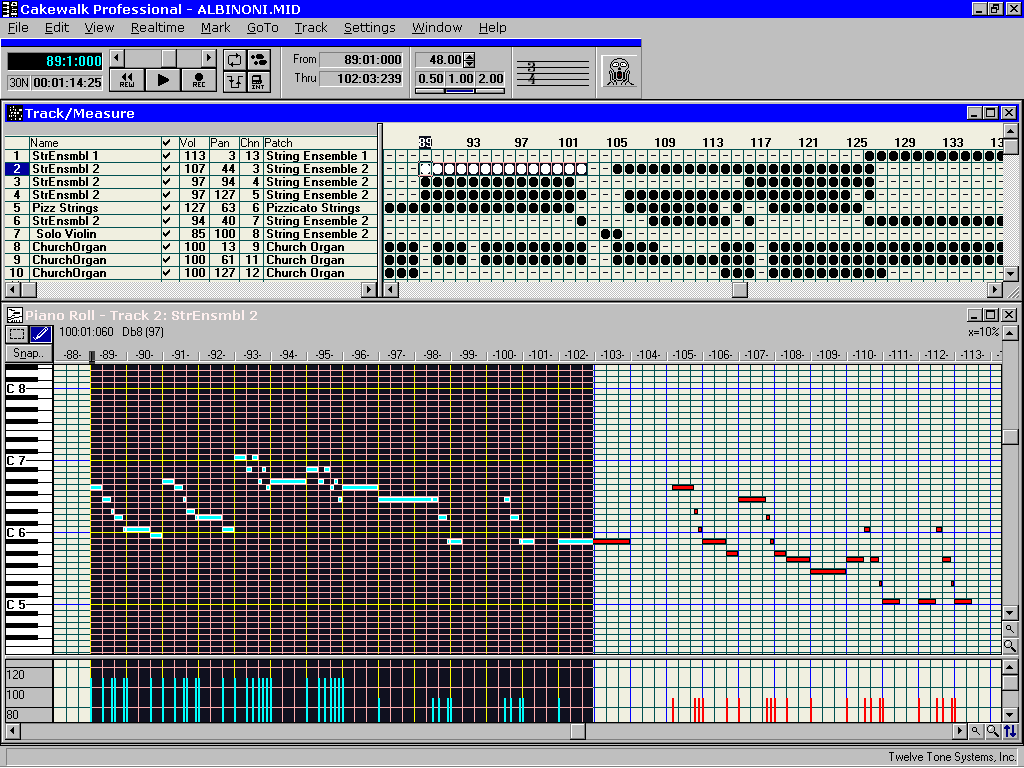
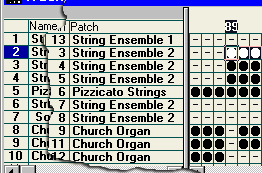 Each
MIDI file can have 16 channels and they can be
patched through to any instrument the MIDI card
is capable of producing. In this case, channel 1
is patched through (mapped) to the 'String
Ensemble 1' voice. On that channel, the piano
role produces the notes that that voice produces.
Channel 2 is mapped to a different sound and so
on, so, it is like having up to 16 organs of
which 1 (normally channel 10 although sometimes
channel 16) plays the drums. Clearly, a snare
drum is not capable of having dozens of
distinctly different notes (to the untrained ear)
played on it so with the drum channel, each note
plays a different instrument or one in a
different way such as a hi-hat being tapped
closed, open, closing and so on.
Each
MIDI file can have 16 channels and they can be
patched through to any instrument the MIDI card
is capable of producing. In this case, channel 1
is patched through (mapped) to the 'String
Ensemble 1' voice. On that channel, the piano
role produces the notes that that voice produces.
Channel 2 is mapped to a different sound and so
on, so, it is like having up to 16 organs of
which 1 (normally channel 10 although sometimes
channel 16) plays the drums. Clearly, a snare
drum is not capable of having dozens of
distinctly different notes (to the untrained ear)
played on it so with the drum channel, each note
plays a different instrument or one in a
different way such as a hi-hat being tapped
closed, open, closing and so on.HelpDesk Extra
Keeping it simpleThis is actually quite easy as you are effectively creating two programs:
In addition to that, we are not covering anything that has not been discussed either in HelpDesk Extra (HTML programming) or in my Learning Programming with Perl Masterclass. This is an application of those principles, demonstrating how powerful even just a basic knowledge of programming is. |
Configuration fileAll the configuration file needs to do is tell the programs that need it what we want them to do. The important bits are the IP addresses that we want to ping so having an IP address on each line is a good start. However, there is more that we can do with it than that. One reason for this is how we will read in the configuration file. If we slurp the whole file into an array and then go through the file, one element at a time, we can check for IP addresses using a regular expression to see if there is a match. $configline =~ m/^(\d+\.\d+\.\d+\.\d+)/; $ipaddress = $1; will find any line starting with an IP address and put that address in the following variable via $1 - note that it is up to you to make sure that IP addresses are real as the validity of these is not checked for. It would also be nice to have some sort of user friendly information on the line so that we know what the IP address is. This can be included after a space (or some white-space) following the IP address, on the same line. So, we have a file consisting of lines that start with IP addresses. However, the fact that we look for lines that start with an IP address and then only use those lines, means that we can have lines that start with other characters, meaning different things and make the config file not only easier for humans to read but also format the eventual output in a more intelligent way. The IP addresses are just a mass of numbers but they can fall into categories and you can divide them up any way you like. If we pinch the idea of using html-like tags, we can bracket groups of IP addresses and give these groups names. Also, we can have comment lines (and blank lines) that will be ignored by the programs that read the config file. It is worthy of note that the comment lines do not actually need to start with a '#' as these lines do not start with 'www.xxx.yyy.zzz', a '<', or a '</' but it does give the user a way of easily identifying what is ignored by the programs. Incidentally, as only the '</' part of the line is read by any of the programs, it doesn't actually have to have the same text in it as the opening tag. So, we can end up with a config file that looks like this... # # Pingu (ping ip monitor) configuration file. # # (make sure that the last configuration line has a carriage return) # # anything you put between the '<' and '>' is used as a label by the # cgi program we use to make our web pages. You don't have to bother # but if you have a lot of areas of interest, you can make it all # easier to read. You can have everything under one or have five # if you want. <internet> 1.2.3.4 www.some.domain.com 2.3.4.5 www.some.otherdomain.com 3.4.5.6 www.yet.anotherdomain.com </internet> <web access> # put your ISP's gateway in here because that might well affect the results # from other external IPs and if you can see what is going on, the better an # understanding you will have. 10.10.10.254 isp gateway 192.168.255.254 appliance firewall </web access> <lan> # you can put any machines you are interested in here 192.168.0.1 Paul's desktop 192.168.0.2 mail server 192.168.0.3 dns 192.168.0.4 intranet web server 192.168.0.254 lan gateway </lan> You don't have to use these categories, you can make it as simple or as complicated as you need to - dividing up the Internet as you like. |
Logging programFor our basic ping program, we need to be able to communicate with the ping command in the operating system, pick up the results and save them in a file that is dedicated to that IP address. We've already seen how the configuration file is designed so all we need to do is design our program to work with the data it needs. First of all, we need to find the time (RED = UNIX/Linux, BLUE = Windows, GREEN = any)... $t = time; ...and then we need to let the program know where it is - this is because it is, in all probability, going to be run from somewhere other than its own directory. We do this like so ... $path = "/srv/www/cgi-bin/pingu/"; $path = "D:\\Program Files\\Apache Group\\Apache2\\cgi-bin\\pingu\\"; Note that because the backslash is used in Perl as an escape character, it has to be escaped to represent itself and also, Windows paths can include spaces. By defining it in only one place, there is less opportunity to make mistakes (or it is easier to locate and correct them). Next, we can open the configuration file and slurp the whole thing into an array. open CFG, "<".$path."pingu.conf"; @conf = <CFG>; close CFG; This array now contains a number of different types of line and we are only interested in those that have IP addresses - in fact we are only interested in the IP addresses themselves. So, let us start a loop that looks at each line and selects the IP addresses - only taking action when we find one. Like so... foreach $w (@conf) {
chomp $w;
if ($w =~ m/^(\d+.\d+.\d+.\d+)/) {
$adrfn = $adr = $1;
So far, we have chopped off any return characters (with chomp) and found our line with an IP address in it. In addition, we have also put it into two variables: $adrfn and $adr. One is the IP address that ping will use and the other is one that we will convert into a Windows-friendly file name format by replacing the dots in the dotted quad with dashes like so... $adrfn =~ s/\./-/g; Now, we can use this to open the log file (either for the first time or to append it in the way that you would do with any log file). open LOG, ">>".$path."pingu".$adrfn.".log"; Next, we need to ping the destination. This is different for each operating system because we are using an external command. $x = "ping -n 3 $adr";
$x = "ping -c 3 $adr";
...then use readpipe to get the result and put it in an array and use just the last line... @y = readpipe ($x);
$r = $y[$#y];
Now that we have our last line in $r, we can examine it and save the result and close the log file. Again, the operating systems are different so we have to use a different regular expression. Also worthy of note is that whilst both operating systems give their return times in ms, the Windows times are in whole milliseconds whereas the UNIX/Linux ones are given to three decimal places (ie, in micro seconds). if ($r =~ /\d+\.\d+\/(\d+\.\d+)\/\d+\.\d+\/\d+\.\d+/) {
# got the average time now
print LOG "$t $1\n";
} else {
# no numbers there so this is a 100 percent fail
print LOG "$t -1\n";
};
close LOG;
... where the average time is the second one in the result line; or... if ($r =~ /Average = (\d+)ms/i) {
# got the average time now - note that in the case of Windows, we use
# a different regular expression
print LOG "$t $1\n";
# debug, checking that the right one was picked up
} else {
# no numbers there so this is a 100 percent fail
print LOG "$t -1\n";
};
close LOG;
... where the average result has the word 'Average' in front of it; and finally, loop around for the next line in the config file. You can create a directory in your cgi-bin called 'pingu'. Then, if you are running Windows, copy into it the contents of 'pingucoll/cgiwindows' and the contents of 'restofcgi-bin'. If you are running UNIX/Linux, copy into it the contents of 'pingucoll/cgiunix' and the contents of 'restofcgi-bin'. You can get to those directories by clicking here. The next thing we need to do is let it run at regular intervals - here, once every fifteen minutes. |
Scheduling
|
 1.
Click on 'Start',
1.
Click on 'Start', 2.
'Settings',
2.
'Settings',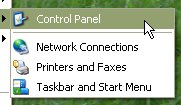 '3.
Control Panel' and a dialogue of sorts (the
control panel) will open up.
'3.
Control Panel' and a dialogue of sorts (the
control panel) will open up.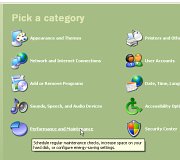 4.
Then, click on 'Performance and Maintenance',
4.
Then, click on 'Performance and Maintenance',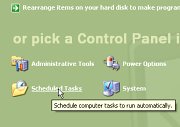 5.
then click on 'Scheduled Tasks'. Now, a new
browser will open up called 'Scheduled Tasks'.
5.
then click on 'Scheduled Tasks'. Now, a new
browser will open up called 'Scheduled Tasks'.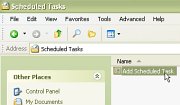 6.
Double-click on 'Add Scheduled Task'
6.
Double-click on 'Add Scheduled Task'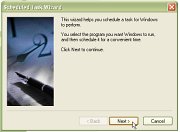 7.
which starts up the 'Scheduled Task Wizard'.
Click on 'Next'
7.
which starts up the 'Scheduled Task Wizard'.
Click on 'Next' 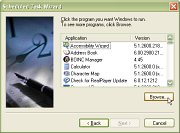 8.
and after a short wait, you will be presented
with a list of applications that Windows knows
about. As we have just created the one we want to
run, we need to click on the 'Browse...' button.
8.
and after a short wait, you will be presented
with a list of applications that Windows knows
about. As we have just created the one we want to
run, we need to click on the 'Browse...' button.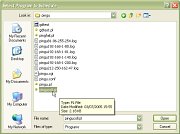 9.
In the 'Select Program to Schedule' dialogue box,
locate your program
9.
In the 'Select Program to Schedule' dialogue box,
locate your program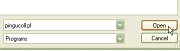 10.
and double-click on it (or single-click on it and
click on the 'Open' button).
10.
and double-click on it (or single-click on it and
click on the 'Open' button).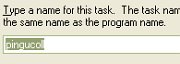 11.
Next, you will be invited to type a name for the
task (or leave it alone)
11.
Next, you will be invited to type a name for the
task (or leave it alone) 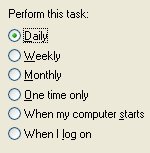 12.
and select from a list of intervals, the shortest
of which is 'Daily'. Whilst all of these sound
useless, click on 'Daily'
12.
and select from a list of intervals, the shortest
of which is 'Daily'. Whilst all of these sound
useless, click on 'Daily' 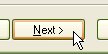 13.
and then on 'Next'.
13.
and then on 'Next'. 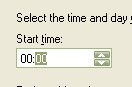 14.
On the following form, set the time to '00:00'
14.
On the following form, set the time to '00:00' 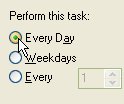 15.
and under 'Perform this task:', select 'Every
Day'
15.
and under 'Perform this task:', select 'Every
Day'  16.
and then, click on 'Next'.
16.
and then, click on 'Next'.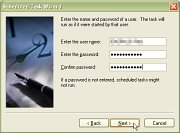 17.
On the next form, enter the user name and
password and click on 'Next'.
17.
On the next form, enter the user name and
password and click on 'Next'. 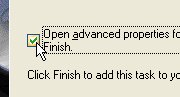 18.
In the last screen, make sure that the 'Open
advanced properties ...' checkbox is ticked.
18.
In the last screen, make sure that the 'Open
advanced properties ...' checkbox is ticked. 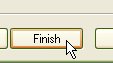 19.
Click on 'Finish'.
19.
Click on 'Finish'.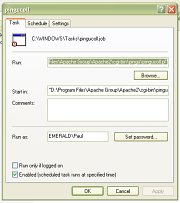 and
the task's advanced properties dialogue box will
appear.
and
the task's advanced properties dialogue box will
appear.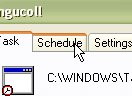 20.
Click on the 'Schedule' tab
20.
Click on the 'Schedule' tab 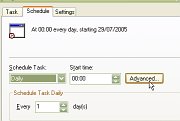 21.
and click on the 'Advanced...' button.
21.
and click on the 'Advanced...' button. 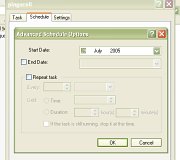 and
the 'Advanced Schedule Options' dialogue box will
open
and
the 'Advanced Schedule Options' dialogue box will
open 25.
Click on 'OK'.
25.
Click on 'OK'. 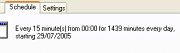 and
the details should appear in the schedule tab
and
the details should appear in the schedule tab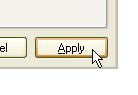 26.
Next, click on 'Apply'
26.
Next, click on 'Apply'  27.
and 'OK'.
27.
and 'OK'.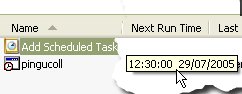 In
the 'Scheduled Tasks' window, the 'Next Run Time'
should be the next 15 minute slot.
In
the 'Scheduled Tasks' window, the 'Next Run Time'
should be the next 15 minute slot. Then,
every 15 minutes, a little box called
'C:\WINDOWS\System32\svchost.exe' pops up in
front of whatever you are doing at the time,
whether you are doing nothing in particular or
are in the middle of doing some word processing.
Then,
every 15 minutes, a little box called
'C:\WINDOWS\System32\svchost.exe' pops up in
front of whatever you are doing at the time,
whether you are doing nothing in particular or
are in the middle of doing some word processing.Reporting ProgramIn your server's document root, you should put a directory called 'pingu' and into that, you need to copy the files on the SuperDisc in the htdocs directory. You can get to those directories by clicking here. The file called index.html consists of the following <html>
<head>
<title>Pingu .:..:.: Ping Monitor</title>
</head>
<body topmargin=0 leftmargin=0 rightmargin=0>
<!--#exec cgi="../cgi-bin/pingu/pingu.cgi"-->
</body>
</html>
and that is all that is needed. The cgi script is called each time the page is loaded. The links that are generated by the cgi script all refer to this page (the cgi script is capable of handling all of the requests it is given) so there is only any need for one page and one cgi. Note that if you are running a UNIX-like system and you use the XBit hack, you need to make this file executable so that Apache parses it. Or, if you are running Apache on Windows (where executable files are not understood properly) or on a UNIX-like operating system without using the XBit hack, you need to call it index.'shtml' and make sure that this is included in the httpd.conf file (just search for 'shtml' in the file and you will find the reference to it there). You will also have to go through pingu.cgi and change 'index.html' to 'index.shtml' (or let the computer do it for you) if you use '.shtml' instead of '.html'. Next, we need to have a look at the cgi-bin/pingu script. This script is called by Apache which passes on anything in the query string as well in an environment variable that you can access from within Perl by using the environment hash. Thus... $e = $ENV{QUERY_STRING};
The first time we request this web page, it will have no query string at all so we need to have a default page that can deal with that, offering appropriate choices.
In each case, we will have a header to the page that just says what it is; and, a footer that gives the options that are available. In the middle, we will have the part of the page that is generated by the cgi's interpretation of the query string. In this way, the program can be quite short, like so... &printheader;
# find out what is wanted
$e = $ENV{QUERY_STRING};
#chomp ($e);
if (length($e) == 0) {
&init;
} elsif ($e =~ /^r/) {
&report;
} else {
&cnr("CGI command not recognised");
};
&printfooter;
exit;
If you look at the script cgi by clicking here, you can see how it is laid out and how these simple parts are elements of the larger solution - it is annotated reasonably well. Note that because of security on this server, the cgi file has an additional extention of -removeme. Remove this extention before you use it. Once you have a cgi like this up and working, you can change it to suit your own needs. The easiest way is to alter the pingu.conf file but if you need it to do something else, being open source, you can do it yourself. |