PC Plus HelpDesk - issue 227
This month, Paul Grosse gives you more insight into
some of the topics dealt with in HelpDesk and HelpDesk
Extra
|
 |
HelpDesk
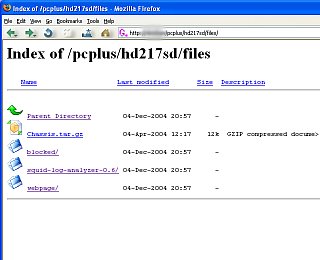
Apache Fancy IndexingUsually, if a file called index.html exists in a directory, that file will be sent to the client by the server when it gets a request for the default file in a directory so, when asking for http://www.foo.com/, the file http://www.foo.com/index.html will be sent. The default file does not have to be index.html, this can be changed if you want using the DirectoryIndex directive. In httpd.conf, you should find the line DirectoryIndex index.html so, if you want to use home.htm as your default file, just change this to... DirectoryIndex home.htm If, however the default file is not there and Fancy Indexing is turned on, you will get a page that Apache has created dynamically for you. To turn it on, you need a module loaded, so you need a like that looks like... LoadModule autoindex_module /usr/lib/apache/mod_autoindex.so and also a line like AddModule mod_autoindex.c These should be in your default Apache htpd.conf file and you just need to make sure that they are there if you cannot get it working. With the module loaded and added, that page looks like the one below...
|
Arbitrary angle motion blur
If your graphics package cannot do arbitrary blur angles, you can blow up the image, then rotate it, blur it at 0 degrees, rotate it back again and then shrink it back down again. Again, the reason for blowing it up is so that any cross-pixel steps are obscured. You might notice in the blown up images above, that there are a number of distinct steps in the density of the blurred dots.. If you want this to be smoother, you can blow it up by a larger factor but remember that in your strive for perfection, you might be chasing detail that nobody is going to look for. |
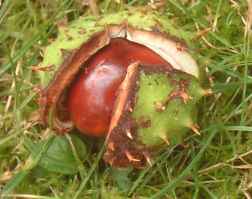
 If
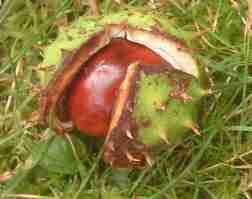
you blur a normal photograph, such as the one of
the Roborovski hamster on the right, you can blur
it at any angle you want. and it will look all
right (assuming that blur is the effect you
want).
If
you blur a normal photograph, such as the one of
the Roborovski hamster on the right, you can blur
it at any angle you want. and it will look all
right (assuming that blur is the effect you
want). Like,
so. This is because there are different sized
areas of different densities and the viewer
concentrates on details (s)he recognises.
Like,
so. This is because there are different sized
areas of different densities and the viewer
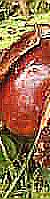
concentrates on details (s)he recognises. However, if you want to blur
something that only has small details and you
want to use an angle that is close to a multiple
of 45 degrees, you have something of a problem.
Take the image on the right...
However, if you want to blur
something that only has small details and you
want to use an angle that is close to a multiple
of 45 degrees, you have something of a problem.
Take the image on the right... If we give this a blur of 16 pixels,
on an angle of 4 degrees and then bring the
density range up so that we can see what we are
looking at (as I will do with all of these as the
dots will get lost if I don't), we see that there
are distinct steps in the blur trace.
If we give this a blur of 16 pixels,
on an angle of 4 degrees and then bring the
density range up so that we can see what we are
looking at (as I will do with all of these as the
dots will get lost if I don't), we see that there
are distinct steps in the blur trace. We can get around this by scaling up
the image by, say, a factor of four and using no
interpolation method so that the pixels end up as
squares like so...
We can get around this by scaling up
the image by, say, a factor of four and using no
interpolation method so that the pixels end up as
squares like so... Next, we apply the blur (remembering
to multiply the distance by the same factor that
we blew up the image by), like so...
Next, we apply the blur (remembering
to multiply the distance by the same factor that
we blew up the image by), like so...


JPEG compressionMany cameras come with jpeg compressed files (.jpg) being the only option for the image files they produce. Whilst it is commendable that they conserve memory use by using a compressed image file format, jpeg does leave a number of artefacts in the reproduced image. One of the predominant artefacts is the way that the compression puts everything into blocks. This is noticed if you are doing anything that cuts down on the number of colours (such as posterisation) or enhances any edges (edge detect ends up with loads of edges that run in a square fashion in addition to the edge lines that you are actually interested in. One advantage about jpeg is that you can control the level of compression so that you can balance image file size against image quality.
All of these images were produced on the GIMP
version 2.0. The enhanced versions were created using |


HelpDesk Extra
Server-Side IncludesServer-Side Includes (SSIs) allow you to have dynamic content in your web pages without having to go to the length of producing pages that are made up entirely of program-generated html code. Whilst CGI (Common Gateway Interface) scripts are an effective way of processing forms and other user input, they are something of a sledgehammer of a way of doing things. For SSIs, a walnut sized problem, you do not need such a sledgehammer. In effect, SSIs allow you to have a normal html file but include within it, a reference that the server will see and then process. In the final output, the reference is replaced completely so the user will not be aware of the existence of SSI code in the original html file. To get the server to read through the file (parse it), we need to let it know that it needs parsing. There are two ways of doing this:
Apache supports both of these. It is better to use the normal file extensions because:
To get Apache to use normal (.html) file extensions, you need to set the executable bit on the file so that the file is executable. Unfortunately, Windows doesn't recognise files by their content, only by their extension so you cannot do this on Windows. Linux, *BSD et alHowever, on Linux (et al), you can modify the x-bit simply by
WindowsOn Windows, you can only change the file extension to .shtml Configuration fileGeneralIn order to make SSIs work, you need to have directives in the httpd.conf file that reads... LoadModule includes_module /usr/lib/apache/mod_include.so .. and also a line like ... AddModule mod_include.c .shtml (Windows, Linux, *BSD, UNIX...)To get Apache to read .shtml files, you need to have a couple of lines in httpd.conf as follows... AddType text/html .shtml ... which adds .shtml to the list of file extensions that are to be considered fair game for the server, and... AddHandler server-parsed .shtml ... which tells Apache that .shtml files need to be scanned through for SSI code instead of just being copied to the client's browser. x-bit (Linux, *BSD, UNIX...)To get Apache to search through normal .html files that have the exec bit turned on, you need a line in the httpd.conf file that looks like... <IfModule mod_include.c> XBitHack on </IfModule> Apache will now parse .html files with the x-bit on. Just before we leave the httpd.conf file, there are still one or two things we can do with it that are related to SSIs. We can add a line that look at the browser and, dependent upon the type of browser, set various variables. This is done by having a line that looks like... BrowserMatchNoCase MSIE IE ...which looks for the string 'MSIE' in the browser information that the browser sends Apache. As the name suggests, it is case-independent. If it finds the string, it sets the variable 'IE'. You can, of course, look for other sub-strings such as Gecko, Firefox, Links and so on and have any number of variables. We can use these variables in the SSI code as follows... |
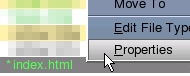 right-clicking
on the file and selecting properties...
right-clicking
on the file and selecting properties...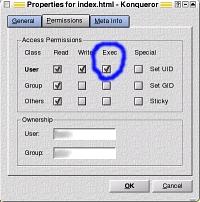 ...
then, making sure that the exec bit is checked.
...
then, making sure that the exec bit is checked.Code in html filesNow that we can get Apache to read our .html files for code, we need to put some code in there. With SSIs we can do many things:
All of this is achieved without having anything special on the URI (the browser address line) other than the page name that is being requested. Dynamic Text - Local VariablesSo, as an example, to add the date, we need to use the DATE_LOCAL variable within our html file. This is done like so... <!--#echo var="DATE_LOCAL" --> The <--#command other necessary bits --> part is replaced so remember to include spaces where necessary. Select Static Text From Within PageTo select text from within a page, you need to have some way of knowing what is gong on (otherwise you may as well just use static text). So, if in your httpd.conf file, you have set a variable for MSIE (which you have called 'IE') and one for NetScape (which you have called NETSC), you can now use them for selecting code within your page. Thus... <p>
<!--#if expr="${IE}" -->
You are using Internet Explorer.
The United States Computer Emergency
Readiness Team (US-CERT) suggests that
you use a different browser.<br><br>
Also, there are some issues with
standards compliance with this browser
so you might have a degraded experience
of these pages as a result of this
non-compliance.
<!--#elif expr="${NETSC}" -->
You are using Netscape.
Some of the functionality of these
pages will be lost as a result of
standards non-compliance.
<!--#else -->
Have a nice Day
<!--#endif -->
</p>
You can, of course, include anything you want including html tags that refer to images and so on. Add Static Text From Other FilesTo add the contents of another file, you just need to make sure that the context of that file is correct (if you are adding something to the middle of a table, such as a menu, you need to have your html tags sorted out). If we have a partial file called specialmenu.txt and we wanted to include it, we would need the line... <!--#include virtual="specialmenu.txt" --> which simply replaces the text between the <> (as well as the < and the >) with the contents of the file specialmenu.txt. The contents of the menu file would be along the lines of... <center> <a href="index.html">Home</a><br> <a href="blog.html">WebLog</a><br> <a href="dls.html">Downloads</a><br> <a href="links.html">Links</a><br> </center> .. which, whilst making it easy to update the menu for all of the pages, would have the disadvantage of giving a live link to the page that the user was already looking at. Add Dynamic Text From A ScriptTo add dynamic text from a script (instead of having a file with the text already in it, we run a program that generates the text according to a set of conditions) such as if we wanted to have a program that generates a menu that has a current-page-link that is not live, we need to use a line like the following in our parsed html page... <!--#exec cgi="cgi-bin/menus/ms1.cgi" --> ... where cgi-bin/menus/ is where ms1.cgi is stored. As for the contents of such as script... |
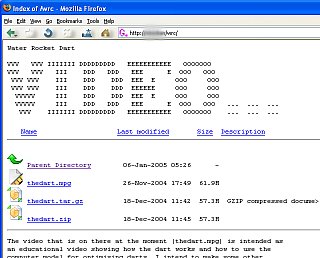
Code to runOnce we have our page looking for a script to run, we need to justify the requirement. So, let's look at two scripts, one for a counter and the other for a dynamic version of the menu in the previous section. You can find these files in Windows readable format (ie, crlf) in the files directory or by clicking here. Counter#!/usr/bin/perl -w print "Content-type: text/plain", "\n\n"; $counter_file = "counter1.txt"; open(FILE, ">>$counter_file"); close(FILE); chmod(0777,"counter1.txt"); open (FILE, "<" . $counter_file) || die "Can not read from the counter file.\n"; flock (FILE, 2); $number_accesses = <FILE>; flock (FILE, 8); close (FILE); open (FILE, ">" . $counter_file) || die "Can not write to the counter file.\n"; flock (FILE, 2); $number_accesses++; print FILE $number_accesses; flock (FILE, 8); close (FILE); 1 while $number_accesses =~ s/^(\d+)(\d\d\d)/$1,$2/; print $number_accesses; exit (0); Basically, it lets Apache know what it is up to with the content type and then two blank lines, then it finds out that the file is there, locks it, reads it, increments it, saves it, unlocks it and then the last few lines format the value into comma-separated thousands and then prints it. Dynamic MenuThis is similar although we look at an environment variable passed to it by Apache - DOCUMENT_NAME I've highlighted the first part in Blue so that it is more visible #!/usr/bin/perl -w
print "Content-type: text\/plain", "\n\n";
my $thispage = $ENV{DOCUMENT_NAME};
print "<center>\n";
if ($thispage eq "index.html") {
print <b>Home</b>";
} else {
print "<a href=\"index.html\"
><b>Home</b></a>";
};
print " <br>\n";
if ($thispage eq "blog.html") {
print <b>WebLog</b>";
} else {
print "<a href=\"blog.html\"
><b>WebLog</b></a>";
};
print " <br>\n";
if ($thispage eq "dls.html") {
print <b>Downloads</b>";
} else {
print "<a href=\"dls.html\"
><b>Downloads</b></a>";
};
print " <br\n";
if ($thispage eq "links.html") {
print <b>Links</b>";
} else {
print "<a href=\"links.html\"
><b>Links</b></a>";
};
print "</center>\n"
You can see that it compares the name of the page that the output of this program will become and if it is the same, just outputs a plain piece of text (albeit bold). If it is not, then it uses an anchor href to generate a link to that page. |