PC Plus HelpDesk - issue 257
 |
This month, Paul Grosse gives you more
insight into some of the topics dealt with in HelpDesk.
|
 |
HelpDesk
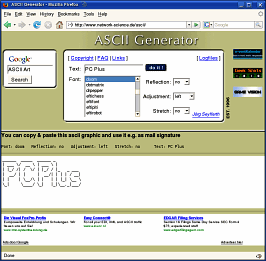
Easy ASCII textWe've all seen text a the bottom of emails where normal printing characters are used to produce larger letters like so... _____ _____ _____ _ | __ \ / ____| __ \| | | |__) | | | |__) | |_ _ ___ | ___/| | | ___/| | | | / __| | | | |____| | | | |_| \__ \ |_| \_____|_| |_|\__,_|___/ ...and this can take some time - especially as you fiddle around with it, getting it right. Of course, you are limited to 80 characters (or less - once indenting quotes have been done, you are often left with 78, then 76 [although the signature should be taken out with the email program when it encounters a double-dash at the beginning of a line followed by a space and then a new line like so '-- ']) width so if you want to do something with a lot of letters, you need to be careful if you are going to get it all on. (The one above uses the font 'big') So instead of doing it by hand, you can install and use one of the programs that will do this for you but if it is just one or two designs you need, it is a waste of time installing one. You are far better going for a web-based service.
Just type your text, select a font and click on the 'do it!' button. If you want to see what your text looks like using all of the fonts, choose '_all fonts with your text_'. You can just highlight and copy the text, pasting it into your email footer or wherever you want. |
 One such service will
create an ASCII text design for you, using just the
characters that you will find in emails - no fancy symbol
characters that won't reproduce properly - effectively
using a number of different font designs. The URL is
One such service will
create an ASCII text design for you, using just the
characters that you will find in emails - no fancy symbol
characters that won't reproduce properly - effectively
using a number of different font designs. The URL is Extending ASCII text with outline imagesOnce you have your text just the way you want it, there is nothing stopping you from adding your own images. This example is from OpenBSD - a free, open source, hardened BSD that is well suited to hostile production environments. Puffy the puffer fish was adopted to represent the inclusion of the Blowfish encryption algorithm for version 2.6 in 1999. We'd love to know who 'VK' is so that he/she can be credited with this _
(_)
| .
. |L /| . _
_ . |\ _| \--+._/| . (_)
/ ||\| Y J ) / |/| ./
J |)'( | ` F`.'/ _
-<| F __ .-< (_)
| / .-'. `. /-. L___ _____ ____ _____ _____
J \ < \ | | O\|.-' _ / ___ \ | _ \ / ____| __ \
_J \ .- \/ O | | \ |F (_) / / / /___ ___ ____ | |_) | (___ | | | |
'-F -<_. \ .-' `-' L__ / / / / __ \/ _ \/ __ \| _ < \___ \| | | |
__J _ _. >-' )._. |-' / /__/ / /_/ / __/ / / /| |_) |____) | |__| |
`-|.' /_. \_| F \_____/ .___/\___/_/ /_/ |____/|_____/|_____/
/.- . _.< ======/ /======================================
/' /.' .' `\ /_/
/L /' |/ _.-'-\
/'J ___.---'\|
|\ .--' V | `. `
|/`. `-. `._)
/ .-.\
VK \ ( `\
`.\
All of the characters are easily accessible through the keyboard - note the use of letter 'O' for the reflection in the eyes. In this case, the characters used represent the outline of the image but you can use other characters if you want to represent half-tones. |
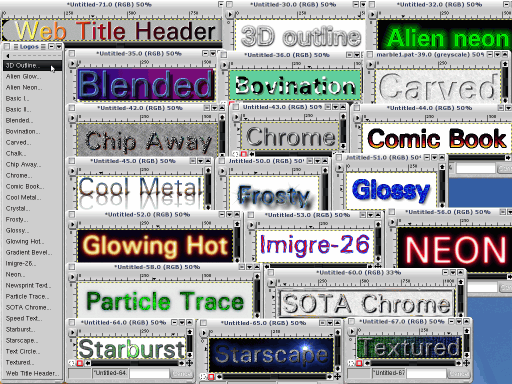
Flexible logos with The GIMP
Some image processors have macros that you can use to record actions and then play them back later - this facility has been available for at least a decade with one example being Micrographx Picture Publisher. However, many macros are not particularly flexible and
you might well have to create new ones for different
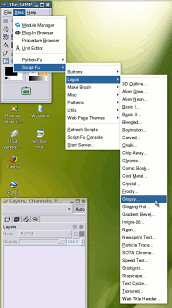
situations such as font size and so on. The GIMP, provides a set of macros that will produce logos in different styles that you can size to make large headers or small links. Each one allows you a number of options such as font and various colours, along with any other relevant parameters. You can get to the logos menu by selecting 'Xtns', 'Script-Fu', 'Logos' and then you can start experimenting. Click on the image on the right to see the output and
a few tips. |
|
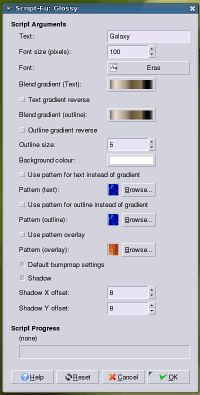 This is one of the more extensive dialogue
boxes - many of them are a lot simpler than this. This is one of the more extensive dialogue
boxes - many of them are a lot simpler than this.At the top, you can type in (or paste in) any text you want (assuming that the characters you are using are in the font you are going to use). Next, you have the font size (in pixels) and below that, the font itself. Click on this button and a pop-up window appears, allowing you to select a different font. These three controls are pretty standard amongst these
dialogue boxes. |
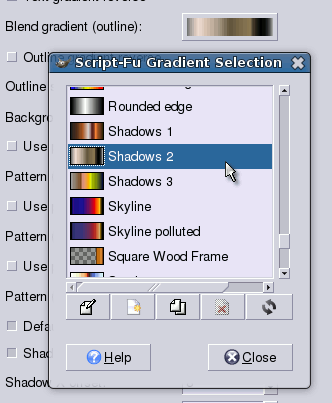 Next, you have the blend gradients for the
text and outline along with a few other options. Next, you have the blend gradients for the
text and outline along with a few other options.If you click on the gradient button (top-right), the gradient selection dialogue box appears. You can do with this what you would normally - select one or edit/create one - clicking on the close button when you have finished. Below this, you will find the option to reverse the
gradient and then the blend gradient for the outline,
along with the option to reverse that and then how big
the outline should be. |
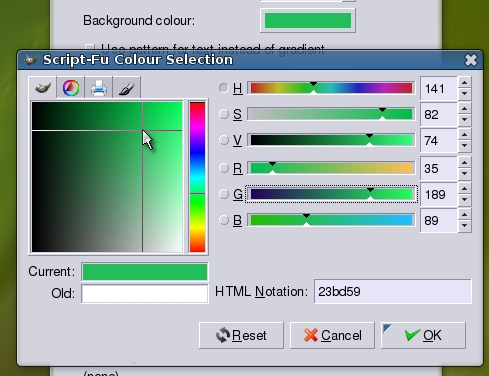 Next, you can select a background colour -
again, by clicking on the button. Next, you can select a background colour -
again, by clicking on the button.This time, the colour selection dialogue box opens up with all of its usual functions and options. Clicking on 'OK' closes it. |
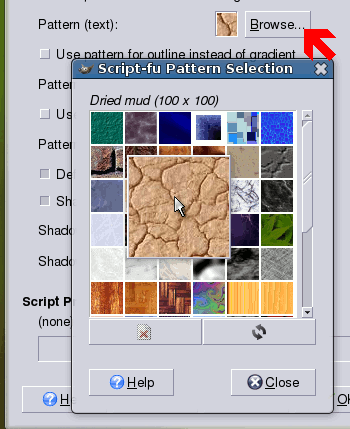 Following that, there are three patterns to
choose. Following that, there are three patterns to
choose.Again, click on the browse button to display the pattern selection dialogue box. Once you have what you want, click on 'Close'. Below that there are various options regarding what
you can put where and finally at the bottom, you have the
options of including a drop shadow, along with the x and
y offsets. |
 Finally, click on 'OK' and your logo will be
produced. Finally, click on 'OK' and your logo will be
produced. |
 Note that in the layers dialogue box, you
can see that your image is still in layers. Note that in the layers dialogue box, you
can see that your image is still in layers.You can select a layer and drag a colour into it or even a pattern. You might find that some layers will overwrite completely if you do this (click on the image window and press [Ctrl][Z] to undo it) and others will work out okay. Also, you can remove the background layer (in the layers dialogue, right-click on the layer and then select 'Delete Layer') to make the logo transparent and then make it into one layer (right-click as before and then select 'Merge Visible Layers' then select 'Expand as necessary' and click 'OK'). You can then save this as a PNG file or some other
format that supports half-tone transparency. |
 This is the sort of thing you can get by
messing around, dragging patterns into the image. This is the sort of thing you can get by
messing around, dragging patterns into the image.Once you have something that you like that you can test at different sizes, make a note of the parameters you used (from the dialogue box) and then make your logo/style sets for your web site. |
 What to do...
Installing The GIMP in Vista
Certainly, it does appear to grind to a halt but this only happens for the first time and is only a minute or so (depending upon the speed of your machine, number of fonts and so on). In Vista, the fonts are in a different location to other versions of Windows so The GIMP searches for them (and finds them). All you have to do is wait and once it has finished doing this, it doesn't have to do it again because it now knows where they all are. |
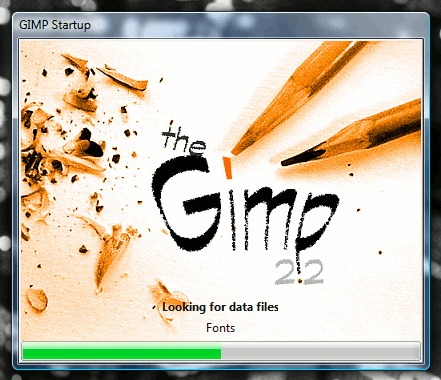 Some people have been
saying that the GIMP hangs during first boot when it
starts looking for fonts the first time that it is run in
Windows Vista.
Some people have been
saying that the GIMP hangs during first boot when it
starts looking for fonts the first time that it is run in
Windows Vista.No root GUI on Ubuntu
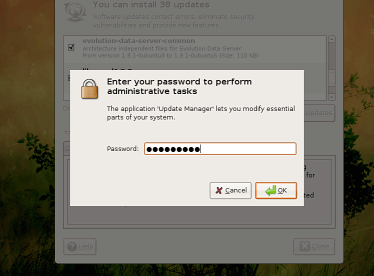
Ubuntu doesn't allow users to log on as root and all normal activities are performed as an unprivileged user. As a GUI user wanting to do something as a super user, you have to supply your regular password to do this when prompted. In fact, root is not permitted to open a GUI session. This way, ordinary users have an easier time of coping with security but without the risk of being permitted to log on as root and then go browsing on the Internet and opening up the machine to whatever anybody wants to throw at them. By having only one password to remember - the one that they use all of the time any way - they will not be locked out by forgetting it. If a user does need to use the command line, they can type 'sudo [command]' or, if they need an interactive shell, they can type 'sudo -i'. The disadvantage is, of course, that there is only one password. |
 It is possible to run
a system without a root GUI - this is something that is
done with Ubuntu.
It is possible to run
a system without a root GUI - this is something that is
done with Ubuntu.FTP to a machine without an FTP serverSometimes, you need to use ftp or its secure equivalent but the machine you want to log into has no such server although you can log onto it.
All you need to do is install an ftp server on your own machine. You should have at least one included in your distribution and they are fairly easy to configure - vsftpd is a good one and the vsftpd.conf file is fairly well explained. Being your own machine, you have the final say on what
goes on it and what doesn't so you can install your own
ftp server and adjust your firewall accordingly. |
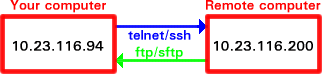
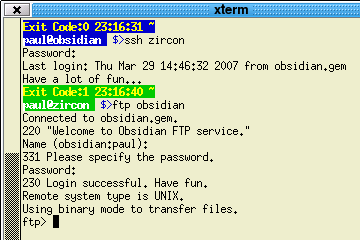 Next, log into the remote machine using ssh
(or telnet if that is what you use) and then ftp back to
your machine. Next, log into the remote machine using ssh
(or telnet if that is what you use) and then ftp back to
your machine.In the diagram above, the command for the telnet/ssh is in blue as you can see with the command line for paul@obsidian, 'ssh'ing into 'zircon. Next, when in zircon, ftp back out to your computer - this is in green as is the command line for zircon so you can see that from paul@zircon, I'm 'ftp'ing back to obsidian. Finally, remember that when you 'put' a file, you are transferring it to your machine from the remote and vice versa with 'get'. |
 This
problem, though, is not as difficult as it might at first
seem.
This
problem, though, is not as difficult as it might at first
seem.
|
 One feature these servers have is to convert
a new line character ('LF') to a carriage-return/new-line
pair ('CRLF') which effectively makes the carriage return
to the left and the paper to feed by one line. Think
teleprinter or typewriter here. One feature these servers have is to convert
a new line character ('LF') to a carriage-return/new-line
pair ('CRLF') which effectively makes the carriage return
to the left and the paper to feed by one line. Think
teleprinter or typewriter here.This is fine for printing text but with graphics, it is a completely different issue. Graphics usually consist of a special code telling the printer details such as: the length of the following graphics string; the physical horizontal and vertical space required for each pixel; the colour depth; and, so on, followed by the graphics codes which have the range 0..255 (or 0x00 to 0xFF). This range includes the code for a linefeed. As a result of this, each time the server sees the
code for an LF (10 or 0x0A), it inserts a 'CR' (13 or
0x0D thus making a 0x0A into a 0x0D0A or 0x0A0D which is
two bytes instead of one), shifting all of the other
codes along by one. As a result, the last character(s)
meant for graphics end(s) up being printed as a character
for each 'CR' inserted as it appears no longer within the
graphics string. |
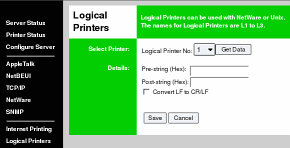
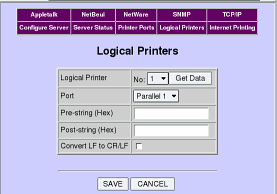 The solution is to log onto the printer
server's web page. On one of the pages - usually 'Logical
Printers' or similar (see the screenshots on the right
and above-right for two different examples that contain
essentially the same information) - you should find an
option to 'Convert LF to CR/LF'. The solution is to log onto the printer
server's web page. On one of the pages - usually 'Logical
Printers' or similar (see the screenshots on the right
and above-right for two different examples that contain
essentially the same information) - you should find an
option to 'Convert LF to CR/LF'.Make sure that this is unchecked and save it - you might have to switch the server off and on again for this to take effect. Your printer should now work as well as when it was plugged directly into the computer. |
 Clever printer server
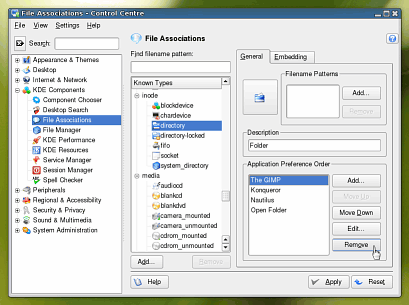
Undoing file associationsOpening files with a mouse click is easy and adding a file association is almost as easy but make a mistake and you need to know about undoing file associations. If you right-clicked on an image file on a network share and selected 'Open With', 'Other' and then selected The GIMP (or any other program for that matter) and checked the 'remember' box, you might have problems later on because following that, each time you click on any directory to open it up, it will try to open up The GIMP and it, in turn, will give you an error message. The problem is that with a network share (certainly for SMB), you managed to associate an inode with the GIMP.
In the File Associations pane on the right, expand the 'inode' section of the tree by clicking on the '+'. Click on 'Directory' and a further section will open on the right of that. On the 'Application Preference Order' list, click on the GIMP and then on the 'Remove' button on the right. This will remove the GIMP from the list. Next, click on 'system_directory' and if it is there, remove it from that list in the same way. Once you have done this, you can also work your way through the image types as well while you are at it. If you mostly want to view jpeg and png images with, say, Gwenview, instead of edit them, you can click on those types, click on the programs in the list on the right and prioritise them with the move buttons. When you have finished, click on 'Apply' and you can use your account again. |
 However, you can
solve this by opening up 'Control Centre (Configure the
Desktop)' and then selecting 'KDE Components' and 'File
Associations'.
However, you can
solve this by opening up 'Control Centre (Configure the
Desktop)' and then selecting 'KDE Components' and 'File
Associations'.GRUB - disc identitiesGrub needs to be able to boot any operating system, whether it is Linux, Solaris, BSD or Windows. This means that it has to make sense of some very different ways of looking at your system's hard drives and their partitions. Each OS has its own way of looking at hard drive space:
Grub has to make sense of all of these - a thankless task. One problem you can have is if you put several OSes onto one system. Naturally, you want to be able to boot into each one from a boot menu and this is where GRUB comes into it. First of all, let's look at two physical system configurations.
The normal system is what you would get if you went and bought one from a shop - it has one HDD and, of course, it makes sense to have both the optical drive and the HDD as masters on different channels. That way, if you are burning a CD or DVD - exercises where redundancy in channel bandwidth capability are essential - the data flows better through the system. The custom built system is what you might end up with if you built one yourself using three HDDs. The first HDD (master on channel 0) has the OS(es) on it and is used by the system to run the system - there is little traffic there once the system is up and running, apart from log files and other stuff that is more intermittent and not likely to interfere with CD or DVD burning. Another consideration is that the main data storage should be on a different channel to the optical drive. The optical drive only occupies one slot so it makes sense to have that on the remaining slot on channel 0 and have a data drive or two on channel 1 so that either you have one HDD there and can expand it or, have two to start with - either way, you are not going to have to move your optical drive. So, there goes the myth that the optical drive is always hdc in Linux. Grub has to make sense of all of this so it makes the first HDD the first drive, the second HDD the second drive and so on. The count starts with zero so now, our mapping looks like this...
|
||||||||||||||||||||||||||||||||||||||||||||||||||||||||||||||||||||||||||||||||||||||||||||||||||||||||||||||||||||||
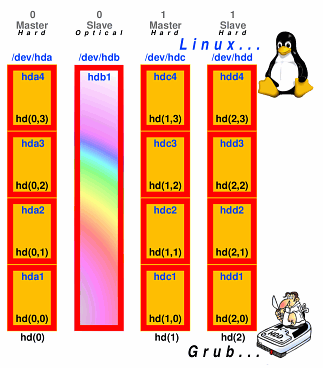 If you only installed
one OS, you would never need to know any of this but if
you install several, you need to understand how Grub
allocates the names to each drive and partition because
here, we have hdc (the third drive) as hd1. If you only installed
one OS, you would never need to know any of this but if
you install several, you need to understand how Grub
allocates the names to each drive and partition because
here, we have hdc (the third drive) as hd1.On the right, you can see how the partitions are allocated (I've put the numbers in brackets to make them clearer). The master boot record for the first drive is hd0 and that is what you would use if you wanted to install grub there. The first partition of the first drive is hd0,0 and if you want to install grub into the boot record for that partition, that is what you use. When you install other operating systems, you get a chance to install grub where you want with them and for the sake of preserving your system, I would recommend choosing a partition boot record that has not already got Grub in it - this way, the configuration files will be preserved. One way of being able to boot into all of your OSes is to edit the first copy of Grub's menu file so that it includes them. All you do is add a line to the /boot/grub/menu.lst file for each one a bit like the following. title OpenSolaris 10
root (hd1,0)
chainloader (hd1,0)+1
This will will make it chainload into Solaris' copy of grub so you end up with another boot loader menu. And, there is nothing wrong with that. However, you might want to have all of your OSes accessible directly through your first Grub menu. To do this, you need to do the following Once you have another copy of grub installed with another partition, you can log on as root in that OS and make a copy of /boot/grub/menu.lst which is where the menu is stored and save that on a drive you can get at from both systems (you might want to use a small partition formatted in vfat, a network drive or maybe a pen drive). Once you get back into your first OS (the one that the system boots into by default) you open its '/boot/grub/menu.lst' in a text editor and add the extra lines (don't delete the old lines, just remark them out by starting each line you want to remove with a hash mark '#'. Grub will just ignore these and they will not appear. You can also do this with commands in grub if you are experimenting). Now, when you boot the computer, you should get each OS with a line of its own However, there are some things that can go wrong. When you install Linux (or Solaris, FreeBSD and so on), you get the opportunity to install Grub (the GRand Unified Bootloader) wherever you want. This includes the disc's master boot record in addition to each partition's. For the first hard drive (normally the master on channel 0), the master boot record is hd0 and for the second, it is hd1. For a machine that has been bought with one hard drive, normally, your optical drive would be the master on channel 1. However, if you want to have a smallish drive for your OS and enormous DVD-editing storage, you might have three HDDs so that any CD/DVD writing you do will be from a drive on channel 1 (as in the configuration in the diagram) to the optical drive in the slave on channel 0 as noted above. Of course, with Grub, the optical drive is ignored so
in this instance, hd1 is the master on channel 1 which,
under Linux, is hdc. The problem is that: unless you have
run into problems with this, there is no reason why you
should know any of it. As a result, when you have
installed your new, second OS, you can install grub on
the partition boot sector where you think it needs to go
- which will most likely be wrong. |
||||||||||||||||||||||||||||||||||||||||||||||||||||||||||||||||||||||||||||||||||||||||||||||||||||||||||||||||||||||
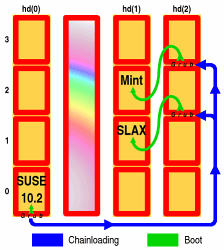 This can lead to the situation on the right
where you chainload into versions of Grub that are on a
different drive to the one where the OSes they refer to
are installed. This can lead to the situation on the right
where you chainload into versions of Grub that are on a
different drive to the one where the OSes they refer to
are installed.Again, this is not a problem unless that hard drive fails or you do something that overwrites one of its partition boot sectors. Putting all of your OS Grub menu list files into one will solve this but be aware of which OS is installed on which partition so that you can refer to it correctly. |
GRUB - booting different OSesLinux will load using Grub, which copes with it well. You can pass options to it and it understands the file system. However, there are some where you do have to chainload. Examples below are OpenSolaris, OpenBSD and Windows. This is what a menu.lst file might look like if you had all of these on your system (note that the partitions refer to this hypothetical situation - see above for actual drive/partition designations). default 0
timeout 12
gfxmenu (hd0,0)/message
title OpenSUSE 10.2
root (hd0,0)
kernel /vmlinuz-2.6.18.2-34-default root=/dev/hda4 vga=0x31a resume=/dev/hda3
initrd /initrd-2.6.18.2-34-default
title 64 Studio
root (hd1,1)
kernel /boot/vmlinuz-2.6.17-1-multimedia-amd64-k8 root=/dev/hdc2 ro vga=791
initrd /boot/initrd.img-2.6.17-1-multimedia-amd64-k8
title Ubuntu
root (hd1,2)
kernel /boot/vmlinuz-2.6.17-11-generic root=/dev/hdc3 ro quiet splash
initrd /boot/initrd.img-2.6.17-11-generic
boot
title OpenSolaris 10
    root (hd1,0)
    chainloader (hd1,0)+1
title FreeBSD
root (hd1,3,a)
kernel /boot/loader
title OpenBSD
chainloader (hd0,1)+1
title Windows Vista
chainloader (hd0,2)+1
This will give you a menu that looks like this...
|
64Studio - Multimedia on your 64-bit PC
You don't need a lot of power to edit MIDI and if you have a dedicated sound card that can do all of the processing for you, even a Pentium 200MHz machine running Cakewalk Professional 2.0 on Windows 98SE will do an excellent job. (Click on the image on the right to
show the image at its true size.) |
 However, if you want to do sound
processing, post-production and CD image burning (as well
as CD cover design and so on), you'll need the power of a
modern machine. However, if you want to do sound
processing, post-production and CD image burning (as well
as CD cover design and so on), you'll need the power of a
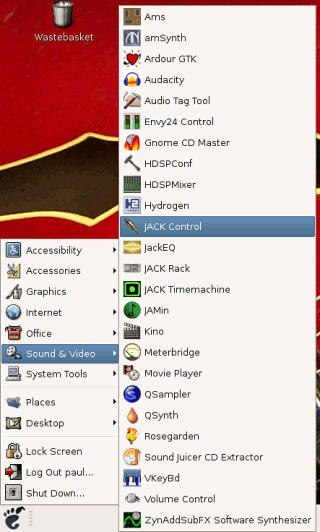
modern machine.For a production environment, 64Studio is excellent. This Linux distribution has a custom-configured, multimedia kernel, compiled for AMD 64-bit and Intel EM64T processors ( http://www.64studio.com/ ) and will handle dual core processors as well. In addition, it has the stability and security of Linux and, it's free. 64Studio uses the Gnome interface so it is all fairly straight forward and easy to follow. Under 'Sound & Video', you have all of the audio tools that you should need to write, play and record virtually anything - whether you are transcribing Rossini to MIDI for a university project or producing an album for distribution on CD. Drum editing can be done with Hydrogen without using
any other programs on 64Studio. You can save the files
from this in MIDI format to import into other songs if
you wish. |
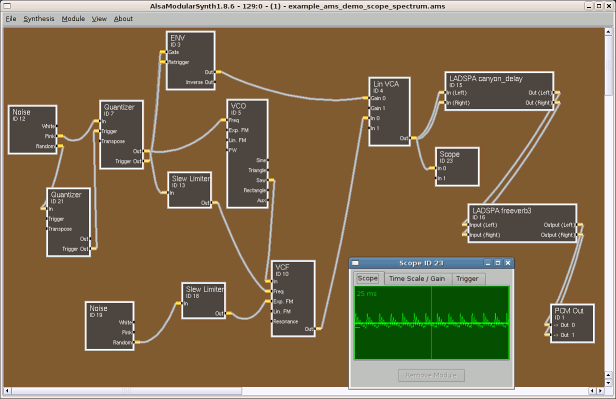
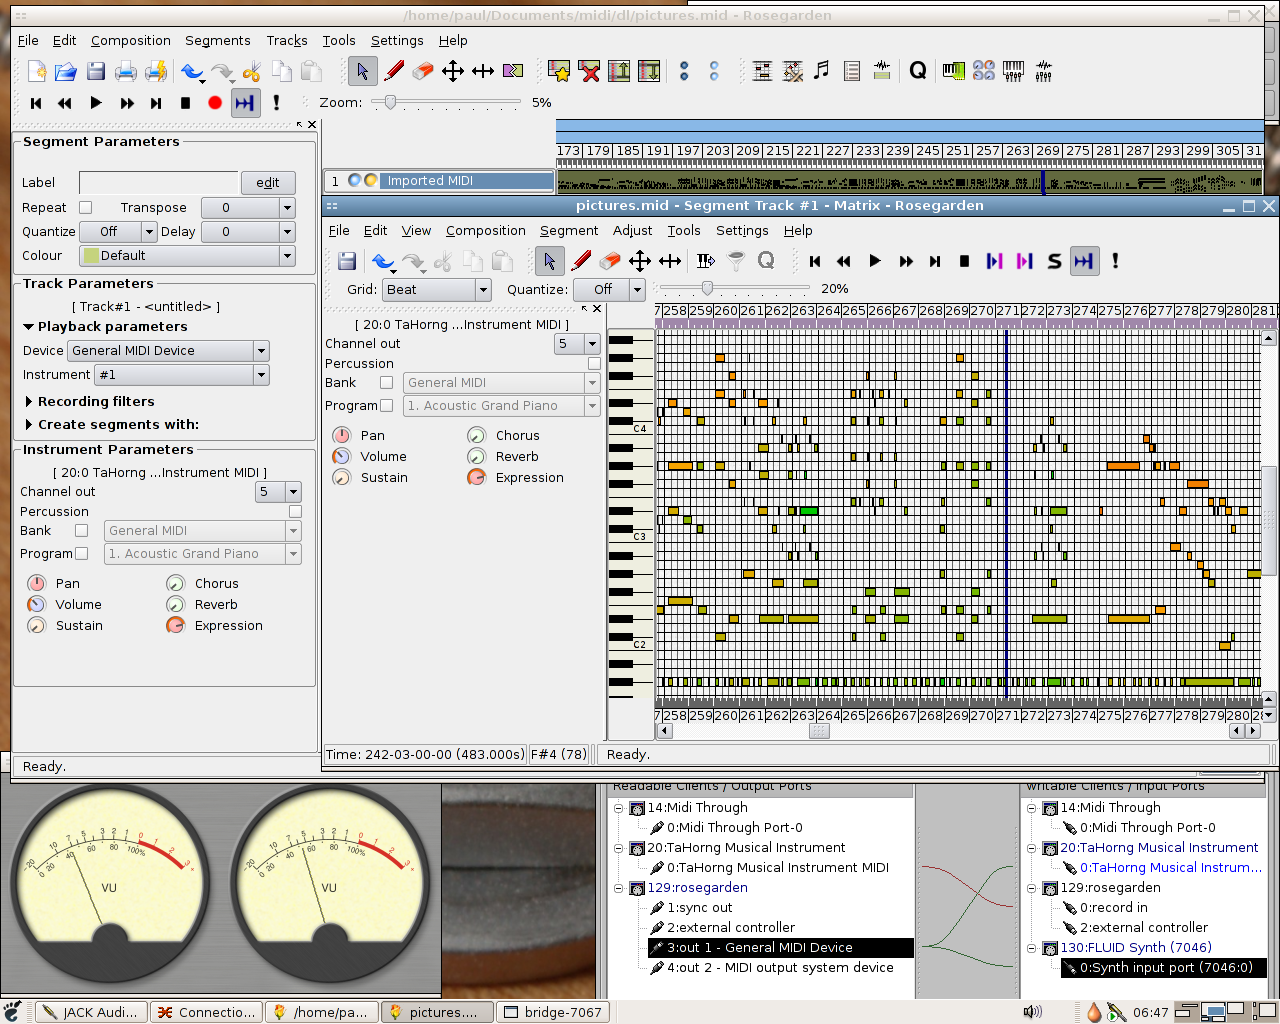 If you want to set up the system to do
general MIDI editing with sound, you need to load the
JACK Audio Connection Kit (Jack Control). Click on
'Connect' and you can see the Audio and MIDI patches.
Next, if you aren't using a sound card, load QSynth and
for MIDI editing, use Rosegarden. If you want to set up the system to do
general MIDI editing with sound, you need to load the
JACK Audio Connection Kit (Jack Control). Click on
'Connect' and you can see the Audio and MIDI patches.
Next, if you aren't using a sound card, load QSynth and
for MIDI editing, use Rosegarden.(Click on the image on the right to show the image at its true size.) If you want to have all of the fun of a Moog
Synthesiser, run the Alsa Modular Synthesiser (AMS) which
takes MIDI and audio as input and generates audio output.
You can see the audio and MIDI connections in the Jack
Connections kit. |
| Behind the AMS is voltage control. You can use a low frequency oscillator to generate a voltage that changes slowly. This, you can then use as the control voltage for a voltage controlled oscillator, voltage controlled filter and so on. You can change the waveforms of these and even how they change by restricting slew rate (like a portamento), adding other voltages or signals to them, using a sample and hold which will take a sample of the voltage and add it to the voltage that it already has (integrating it) and then hold it for a time (which you can also change) and so on. |
 |
| Using a ring modulator, you can do
anything from producing a Dalek voice to making sounds
like bells. The AMS can either be used to produce a live
sound from midi output (say, from Rosegarden) or to
produce a recorded sound for inclusion on a track. Once you have a patch system set up the way you like it, you can save the configuration by opening the patchbay form and clicking on 'New'. In the new patchbay definition dialogue, where you are asked if you want to create a patchbay definition as a snapshot of all actual client connections, click on 'Yes' and then 'Save'. |

|
SoundFonts
The SoundFont format used by QSynth is '.SF2'. These files can contain just one instrument or a whole General MIDI set of 128 instruments from an acoustic grand piano through to a gunshot (plus the drums of course). Unless you happen to have just what you want, the best
place to look is, of course the Internet. There are many
sites that have free sound fonts. Some are free to use
under any circumstances, some have restrictions that they
can only be used for non-commercial, personal use and
others, you will have to buy. |
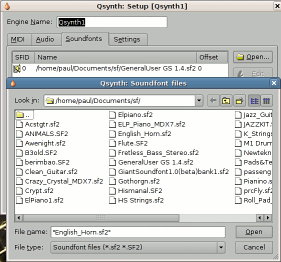 Whilst many single-voice SoundFonts are
quite small - a few hundred KiB to several MiB - a full
sound font is in the order of 100MB or so. Whilst many single-voice SoundFonts are
quite small - a few hundred KiB to several MiB - a full
sound font is in the order of 100MB or so.This is something worth considering if you are not on at least a T1 connection. |

Rig-building tipsWe hear of all sorts of precautions about static when assembling hardware but are any of them worth doing? It is a fact that static electricity will destroy electronic circuitry such as memory and mother boards. However, these are a lot less sensitive to it than they were - things have advanced and whilst CMOS and similar technologies will still die, they are better protected now.
So, here is a non-exhaustive list of precautions - some of which might sound a little odd but they are all reasonable:
Your mobile phone doesn't need to be switched off; and, your torch doesn't need to be BASEEFA-certified. Note that at no point did you need a wrist band although if you are in a wheel chair, that would be a good thing to use in case you have to move around a lot. |
 Although it is safer,
it is still risky. However, if you take these basic
steps, you can build your own rig or add a memory stick
without any significant risk to the hardware. You need to
make sure that the opportunity for static build-up is not
there and, if it should be, the components are not put at
risk.
Although it is safer,
it is still risky. However, if you take these basic
steps, you can build your own rig or add a memory stick
without any significant risk to the hardware. You need to
make sure that the opportunity for static build-up is not
there and, if it should be, the components are not put at
risk.