PC Plus HelpDesk - issue 226
This month, Paul Grosse gives you more insight into
some of the topics dealt with in HelpDesk and HelpDesk
Extra
|
 |
HelpDesk
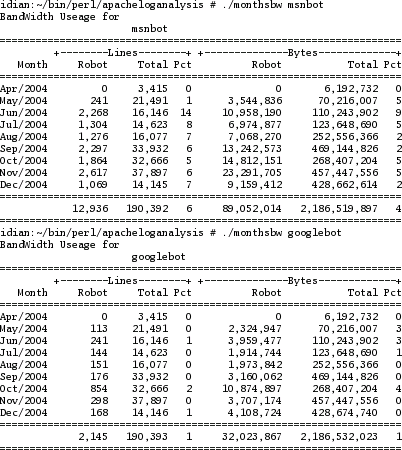
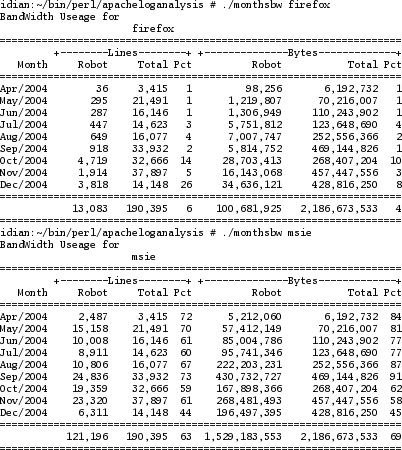
Robot BandwidthThis is a little program I wrote earlier - the code is below. Again, I have coded it in such a was as to make it easier to understand so there are some things that could go on one line (successive checks using 'and's instead) that I have spread over several for clarity.
|
Disposing of printed material
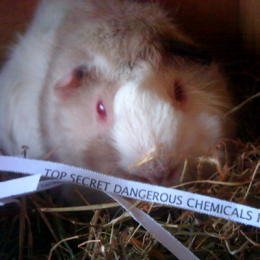
The ultimate way of disposing of sensitive material is clearly to burn them but sometimes this is not convenient - Do you save up enough to have a proper fire? Where do you keep it whilst you are saving it up? Should you burn it in little bits as you produce it? What if you haven't got a garden incinerator? What if you haven't got a garden? What about health and safety considerations? So, if organising a conflagration is out of the question, what should you do? The biggest risk is from the dumpster diver - someone who searches through your rubbish for anything that could be of interest. It makes sense to shred papers but if you then put them into a guinea pig's cage, they will quite happily sit on them, weave them into a nest, eat them and do all manner of things with them that you shouldn't think about too much if you are reading this whilst eating. Every day, you can collect the remains and put them in your bin in the full knowledge that anybody who wants to extract information will have to sort through smelly, stained, wet, partially eaten shreddings which they will then have to sort out from food, hay, other paper (old copies of the Guardian and the local paper) and various substances that are perhaps best described as 'other stuff'. |
 We all 'know' that we
can delete files from our hard discs using programs that
overwrite the data repeatedly (go to one of my lectures
on computer forensics and you won't) but what about
printed materials?
We all 'know' that we
can delete files from our hard discs using programs that
overwrite the data repeatedly (go to one of my lectures
on computer forensics and you won't) but what about
printed materials?HelpDesk Extra
OpenOffice.org PresentationSupported platformsThe OpenOffice.org office suite is released for a number of different platforms. They are:
This has two main effects as far as the individual user is concerned and they are that they can get a copy which will work on their computer (OpenBSD will emulate Linux and can be made to emulate FreeBSD); and, that if you have a mixed network with central storage (or shares that are available through, say, SMB/Samba), you can work on the same document on any of the machines that you have OOo installed on that have access to that share. One point about OOo is that it has the same interface so, for example, I work on OOo on Linux and on Windows and there are no real differences (other than using '/' and '\'). One (of many) advantage is that you can still use your legacy MS presentations on this program. |
License considerationsOOo is licensed in such a way that for ordinary users (those that are not going to make a contribution to the open source code that makes the program, ie, you are going to use the program as an end user), they can have as many copies as they like in as many places as they like and it doesn't cost them a penny. This means that if you use it at work and you need to do some work at home, you can install it on your home machine without having to pay for a license, perfectly legally. This of course has the implication that there is no pressure from some software company, that they will sue you and therefore that is one thing less thing for a system administrator or any manager for that matter to worry about. |
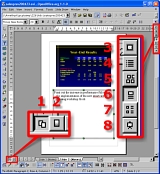
Those little buttons
In 8, dragging the mouse to draw on the screen is handy because you can see the image displayed on your laptop as well so you can make a decent job of it. However, if it is just students asking about things, you can either move the mouse (not brilliant with a pad on a laptop) or, I have found better, use a laser pointer and point it as the projected image. |
 Small though they
might be, they are the key to using this program.
Small though they
might be, they are the key to using this program.Setting up a masterThere are hundreds of barge-pole standard masters out
there so, Click on button 3 and then on button 2 - this will allow you to edit the master. For your background, you can just click on the filled rectangle on the left and then drag it from the top left to the bottom right of the image. This will effectively change the background (you can push it to the back using the arrange button). Next you can change its colour, if necessary, creating a gradient as described in the magazine. After this, you can build an implicit frame if you want. Here, I've just used two lines and then, in the bottom right corner, implied the rest of the frame with three little squares. In all, I have used just six rectangles/squares - no clipart, just boxes. |
 in order
not to be grouped in with the other members of the 'I
really can't be bothered' brigade, spend a little time
making one of your own. On the SuperDisc, you will find
the
in order
not to be grouped in with the other members of the 'I
really can't be bothered' brigade, spend a little time
making one of your own. On the SuperDisc, you will find
the Continuously transparent graphicsIf you want to add a little more to it such as a company logo, there is no reason why you should be restricted to having a rectangular block with the logo in it as this will most likely look awful - especially if you have a gradient as your background. Logos look far better if they seem to be a part of the image as opposed to apart from it. Either you will have to obtain a copy of the image with transparency or create one of your own. The best way of doing the latter is to use a program like the GIMP (which again is free). Take your logo (as big a copy as you can get - or at least several times as many pixels larger than you will finally want it to be) and mask off the background (possibly feathering the mask). Copy it into the clipboard then paste it into a transparent image. Next, shrink it down to roughly the size you are going to use it at so that any hard pixel boundaries are smoothed out. Next, save it as a PNG image - this will preserve the transparency so that gradient backgrounds will render okay with the logo. (You can add transparent graphics to any part of the process - it doesn't have to be only in the master.) One other advantage of PNG files is that they use lossless compression - they keep all of their detail so no need to compress the colours down to 256 colours as in GIF or put up with curious edge artefacts that you get with JPEGs regardless of how little compression you use.
If you are viewing this with a browser that does not support gradual transparency, the image on the right will not render correctly as it is the PNG file. This does not trouble OOo though and it does render correctly in that. |
Outputting your presentation to various file typesOnce you have finished, you will need to produce various versions of your presentation for various people. PresentingYou can do your presentation directly from OOo which will probably be more convenient for you. However, a word of warning about this is that if you have any special fonts, you need to make sure that the machine that you are using to give your presentation has the same ones that the machine you wrote it on has. If you are using a Linux (or other Unix-like OS), this could be a little bit of a problem if you are not aware of what is going on. In Windows, fonts have names like Times New Roman and so on. These are just simplified versions of the real names which can be quite long and complex. In Linux, similar things have happened for some versions of some fonts so Times in Linux might not be exactly the same as Times in Windows. It is easiest - if you are going to mix OSs - to copy the fonts across to Linux. If you are only using one of the many non-MS OSs, you shouldn't find this a problem. One way of getting around this - to such an extent that it allows you to do your presentation on OSs that are not even supported by OOo - is to export them to PDF. You can do presentations from PDF in full-screen mode although (in my experience) it is forward only. Printing
Exporting/ SavingStudents will often need a PDF version that they can look at after the lecture (jog their memory). If you have any pages that are superfluous, create a version of your presentation with those pages taken out and export to PDF from that. PDF is not the only way to export/ save as you can export to Macromedia Flash (SWF) HTML, various image file formats and save to StarDraw, StarImpress and even to legacy MS PowerPoint (PPT) format. |