PC Plus HelpDesk - issue 238
This month, Paul Grosse gives you more insight into
some of the topics dealt with in HelpDesk
|
 |
HelpDesk
Audio CDs and CDROMS
As far as reasons go, the main suspect is that the disc in the drive was mounted as an Audio CD and you are using a shortcut that is for a CD ROM (as in the screenshot). CDROMs are block devices (as are other data storage devices such as hard discs and so on) whereas Audio CDs are character devices. If you have a block device in there, you might not be able to unmount it/ eject it by using the eject option on a character device, even though it is on the same piece of hardware. One solution is, say you already have a link for a CDROM, to have a link for an Audio CD as well (and vice versa). |
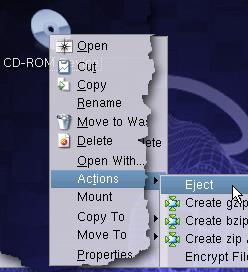 On some UNIX-like
operating systems (some suffer from this and others
don't), you might find that you have some trouble
ejecting the CD or CDROM from the device using the eject
option on a drop-down menu.
On some UNIX-like
operating systems (some suffer from this and others
don't), you might find that you have some trouble
ejecting the CD or CDROM from the device using the eject
option on a drop-down menu.NumLock status, BIOS passwords and keyboards
It is also tempting to do the same with a BIOS on laptop. However, this can become a problem if you already have a password set. When you next boot up, you need to type in the password so that the BIOS can recognise it - if you have a keyboard similar to the one on the right, a P will end up as a *, an O as a 6 and so on. You can overcome this - if you must have the NumLock on on a laptop - by typing a new password for the BIOS. Take the NumLock off to type in your current password, if you need to and then, put the NumLock on to type in your new one. It doesn't matter if you have a password that ends up with numbers in it such as 'killkilo' (which would end up as '25332536') because you can remember it by the keys you press ('killkilo') rather than the numbers that it produces - as long as you don't change keyboards to one that has a different alignment or no overlap at all. As the number lock on a laptop only has a use if you are typing in large numbers of digit-only sequences, I would recommend that you don't set it on in the BIOS in the first place. |
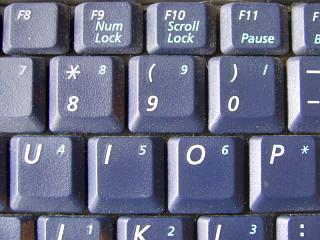 On many computer
keyboards - especially desktop keyboards - the arrow pad
on the right, turns into a number pad when the NumLock
light is on. As there is already a set of arrow keys
between the right hand set and the normal, qwerty part of
the keyboard, it makes sense to have the NumLock set so
that it is on when you start the computer up - this being
set by the BIOS.
On many computer
keyboards - especially desktop keyboards - the arrow pad
on the right, turns into a number pad when the NumLock
light is on. As there is already a set of arrow keys
between the right hand set and the normal, qwerty part of
the keyboard, it makes sense to have the NumLock set so
that it is on when you start the computer up - this being
set by the BIOS.Trackerballs - high precision mouse
|
 The
main problem with a mouse is that when you want
to click or double-click, you are applying a
force to the same device as what you used to
position the mouse pointer in the first place. It
is inevitable that when you apply the relatively
heavy, repeated pressure that is required to
double-click, you will move the mouse to some
extent because the mouse's job is to measure
small movements relative to the surface it is on.
The
main problem with a mouse is that when you want
to click or double-click, you are applying a
force to the same device as what you used to
position the mouse pointer in the first place. It
is inevitable that when you apply the relatively
heavy, repeated pressure that is required to
double-click, you will move the mouse to some
extent because the mouse's job is to measure
small movements relative to the surface it is on. The
image on the right is a close-up of the ball. The
sensor work in the red/infrared region and
therefore to it, it looks like a white ball with
black spots on it.
The
image on the right is a close-up of the ball. The
sensor work in the red/infrared region and
therefore to it, it looks like a white ball with
black spots on it.Browser security warnings
|
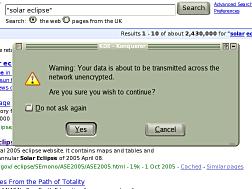 There
are essentially three situations that warrant
warnings on browsers with regard to sending
information and the security of the connection.
There
are essentially three situations that warrant
warnings on browsers with regard to sending
information and the security of the connection.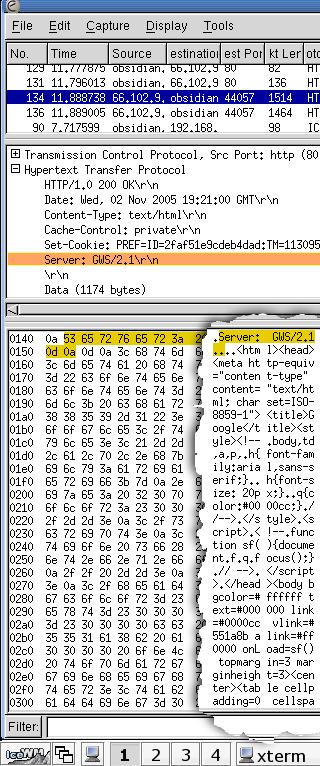 You
can see in the screenshot what a sample of http
network traffic looks like using Ethereal - a
network traffic analyser or 'packet sniffer'.
You
can see in the screenshot what a sample of http
network traffic looks like using Ethereal - a
network traffic analyser or 'packet sniffer'.Linux User Groups
You can find them LUG home page here and a list of regions here. Most LUGs have their own mailing list but the is a list of specialised mailing lists - relating to particular distributions here. |
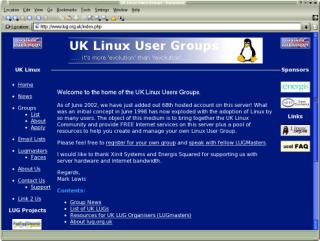 If you are thinking
of moving over to Linux or you have installed it and need
a little help with something then you can contact your
local Linux User Group (LUG). There, if it is anything
like the one in Derby, you will meet people who have been
using it for years and have a knowledge of larger,
non-Windows systems as well as complete beginners.
If you are thinking
of moving over to Linux or you have installed it and need
a little help with something then you can contact your
local Linux User Group (LUG). There, if it is anything
like the one in Derby, you will meet people who have been
using it for years and have a knowledge of larger,
non-Windows systems as well as complete beginners.Better long downloads with wget
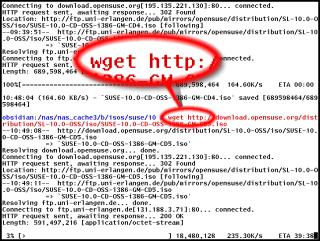
If you are trying ot download an ISO or two (or more) then these large files which are usually around the 600MB size, can seriously eat into your download allowance or at least frustrate you if they fail at some stage (usually towards the end of the download). One other problem is that you might want to download a number of these files - one after the other - and you cannot sit around for hours, clicking on links. WGET is a program that will download files using a number of protocols, either from the command line or you can use a URL list in a file. It will also, if you want, spider a site, using hyperlinks so that it can download the whole site. It obeys the robots.txt files so shouldn't provide a headache to server admins. You can also control the way it downloads them so that it doesn't clobber a server. Being able to run from a batch file or a crontab/scheduler, if can be made to work automatically so that you can download that large ISO in the early hours of the morning so that the contention is better and there are less users online. You can get wget (if it didn't come with your system) from here (the main page - http - ftp) or here (the download mirrors page) and if you are running Windows, from here. When you run wget, it lets you know what is going on and how far it has got. It also keeps a log file if you want so that you can see what has happened if you have been downloading overnight (or if you went to the shops/down the pub or something). |
 Downloading a large
file just by clicking on a link in a web page is quite
simple as long as it works. The problems arise if: the
download is particularly large (so it needs to have
near-perfect performance over a longer, continuous time);
the connection has a lot of contention (there are other
people competing for your bandwidth); your machine has to
compete with others on the LAN (more crowding of a
limited bandwidth); and you have a limited download size
per day.
Downloading a large
file just by clicking on a link in a web page is quite
simple as long as it works. The problems arise if: the
download is particularly large (so it needs to have
near-perfect performance over a longer, continuous time);
the connection has a lot of contention (there are other
people competing for your bandwidth); your machine has to
compete with others on the LAN (more crowding of a
limited bandwidth); and you have a limited download size
per day.Browser-based FTP - 'get'ting
|
 ost
of us have used ftp with a web browser to
download files and the anonymous login is handled
transparently by the browser. However, if you
need to log in on an account that you have, using
a UserID and password, you will find that the ftp
server is not particularly helpful - usually
saying that you have no access rights. This is
because you typed in just the IP address or
domain name. Non-anonymous ftp needs more than
that.
ost
of us have used ftp with a web browser to
download files and the anonymous login is handled
transparently by the browser. However, if you
need to log in on an account that you have, using
a UserID and password, you will find that the ftp
server is not particularly helpful - usually
saying that you have no access rights. This is
because you typed in just the IP address or
domain name. Non-anonymous ftp needs more than
that.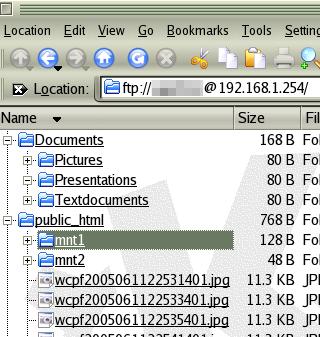 Once
you are in, the account name will be in the
address bar as in the screenshot on the right.
Once
you are in, the account name will be in the
address bar as in the screenshot on the right.FTP on the command line
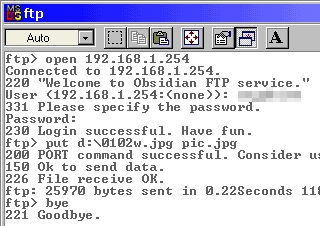
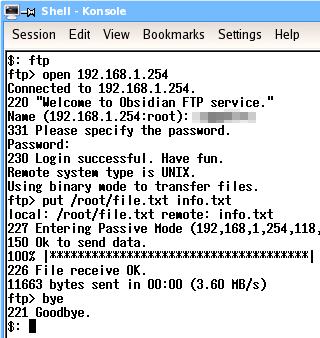
Most operating systems have an ftp client. Even Windows 98 has one. As ftp is well established and the client programs work on many platforms, the general command set is pretty much the same. Essentially, with ftp, you log onto a server, navigate around the viewable file system, upload and download various files and then log off. There are many other things you can do but these are the commands that you will need to use the most. If you want to use others, just look up ftp in the help or manual pages or go online and look it up on the Internet. One other way is to run ftp and type help at the ftp prompt. You will see a list of the commands and their important options. If you type help and the name of the command, you will see its help in detail. LoginIn the screenshots, you can see a typical ftp session (the top one is using the ftp client in Windows 98SE and the bottom one is using the ftp client in NetBSD). On the command line, enter 'ftp'. Next, at the ftp command line ('ftp>'), you need to open the account on the server so you type 'open address' where the address is either the domain name or the IP address of the server you want to contact. In this case, it is a local ftp server at 192.168.1.254. When it has connected, it will give a welcome message and then a error/success code, in this case, 220. Next, it asks you to log in with your UserID and then your password. If all is well, you will be told that it is. You are now logged in. NavigationYou can work your way around the file system using the CD command in the same way that you would if you were navigating around a Windows/DOS or UNIX-like system. To go down a level, type 'cd directory' where directory is the name of the directory you want to go to. If you want to go up a level, type 'cd ..'. If you want to go up a level and then back down one, type 'cd ../directory'. You can see what is in a directory by asking it to list its contents. This is either done with 'ls' or with 'dir'. You can use either on the same system. You can navigate by typing ls and then cding to the directory you can see. This is sometimes easier than trying to remember full paths and then making a mistake. One other feature is that you can press the up arrow key and get previous commands. UploadingWhen you upload a file (ie you copy a file from the computer you are on, to the server that you have logged into), you effectively 'put' the file there. So, to put a file, just enter put [path/]filename at the ftp prompt. If it is in the current directory, you can leave out the path. This will copy the file from your machine to the remote one, leaving it in the current directory on that machine, using the same file name that it had on the machie it originated from. You can specify a different name if you want. DownloadingDownloading is pretty much the same as far as the command line goes. In this case though, you are getting the file so your command line looks like this... get [path/]filename which, like put, will keep the file name the same and drop it in the current local directory. Again, you can change the name if you want. Logging offTo log off, just type 'bye' If your remote machine doesn't have an ftp server on it but yours does, you can log onto the remote machine using telnet or (better) ssh and then ftp back the the machine you are actually sitting at. However, if you do this, you must remember whether you are getting or putting because you will now be looking at the transfer from teh other side. |
UNIX-like-OS file systems
|
||||||||||||||||||||||||||||||||||||||||||||||||||||
 There
is much apprehension from people who have had no
experience of UNIX-like systems such as Linux,
that they will not be able to navigate their way
around the file system. suppose the question is
'can you navigate your way around a Windows file
system?'
There
is much apprehension from people who have had no
experience of UNIX-like systems such as Linux,
that they will not be able to navigate their way
around the file system. suppose the question is
'can you navigate your way around a Windows file
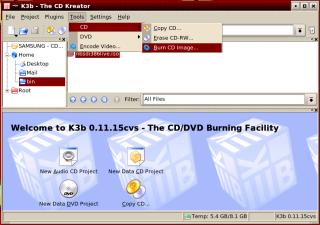
system?'Burning CD ISOs with K3bBurning a CDR with an ISO on a Linux system is very straight forward. First of all, download your ISOs - if you are burning a free operating system such as Linux or one of the BSDs, you will likely have several ISOs to burn so download them all first - using wget as above possibly. If you have limited space on the machine you are burning them from, download them to another machine on your LAN and then you can transfer them across when you need them - this only takes a few minutes for a 600MB ISO.
And that is all there is to it. |
 With
your ISO image in a local directory, just click
on the ISO file in Konqueror and K3b should open
up and the ISO should be the current file.
With
your ISO image in a local directory, just click
on the ISO file in Konqueror and K3b should open
up and the ISO should be the current file.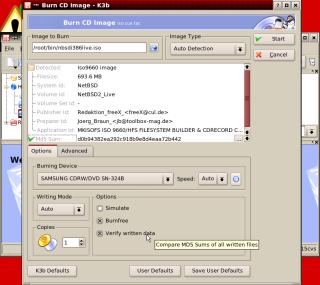 Next,
you have some options at the bottom of the form.
If you are trying out your CD burning for the
first time or are using a storage medium that
might be a bit on the slow side, you need to
select 'Simulate' Simulate will go through the
burning procedure without burning the CD. Whilst
this might seem pointless, it is checking that
the pipeline between the data storage and the CD
will all work throughout the duration of the burn
process. If the simulation fails, you need to
change something but you haven't sacrificed a CD
in the process.
Next,
you have some options at the bottom of the form.
If you are trying out your CD burning for the
first time or are using a storage medium that
might be a bit on the slow side, you need to
select 'Simulate' Simulate will go through the
burning procedure without burning the CD. Whilst
this might seem pointless, it is checking that
the pipeline between the data storage and the CD
will all work throughout the duration of the burn
process. If the simulation fails, you need to
change something but you haven't sacrificed a CD
in the process.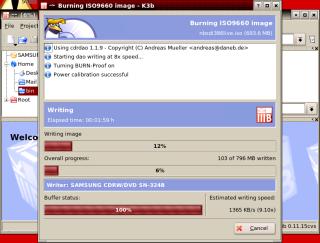 If
you have asked it to simulate the process, it
will go through that first and if there are no
problems, it will start writing to the disk at
the speed it has worked out will work.
If
you have asked it to simulate the process, it
will go through that first and if there are no
problems, it will start writing to the disk at
the speed it has worked out will work.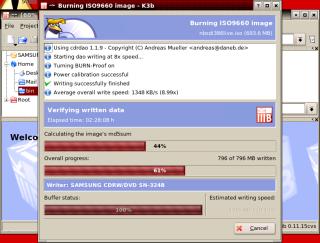 Once
it has successfully finished the burn (ie, it
didn't fail because of any buffers running dry),
it then, if you have asked it to, checks the
image that it has stored locally. It does this by
putting the whole file through an algorithm
called MD5.
Once
it has successfully finished the burn (ie, it
didn't fail because of any buffers running dry),
it then, if you have asked it to, checks the
image that it has stored locally. It does this by
putting the whole file through an algorithm
called MD5.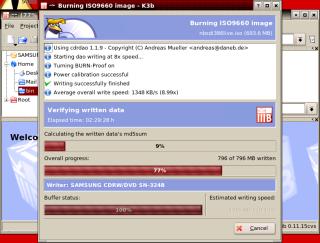 Next,
it reads the data off the CD and works out the
md5 checksum of that.
Next,
it reads the data off the CD and works out the
md5 checksum of that.