PC Plus HelpDesk - issue 241
This month, Paul Grosse gives you more insight into
some of the topics dealt with in HelpDesk.
|
 |
HelpDesk
The GIMP - Why so many windows?
On Windows, it looks pretty much the same as the screen shot on the right (except that that was taken on Gnome running on UNIX). With Multiple desktops, you can be multi-tasking as well as the operating system. |
||||||||||
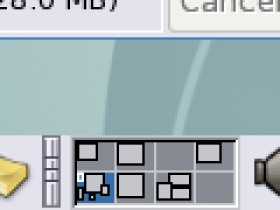 Next to the system tray, there is a little
icon that displays the position of windows on each
desktop. Next to the system tray, there is a little
icon that displays the position of windows on each
desktop.Numbered from the top left to the bottom right, we are currently on desktop 5 (bottom-left). In this way, you can interrupt a job and start another one without having to clear your desktop - you just go to a spare one. Also, you can arrange your work in a specific way that allows you to make good use of all of that extra space. I normally work on a computer with 10 desktops arranged as follows. Whenever I use Windows, it feels very cramped and is not an efficient way of working at all. |
||||||||||
|
||||||||||
 So, with images spread over several
desktops, how do we get tools and menus? If you click on
the menu at the top of each image or if you right-click
on the image itself, you get access to all of the
facilities that the GIMP affords you. So, with images spread over several
desktops, how do we get tools and menus? If you click on
the menu at the top of each image or if you right-click
on the image itself, you get access to all of the
facilities that the GIMP affords you.Once you get used to this minor culture change (it is nothing more, despite what PSP users claim) it is easier to use and provides a better organised workspace for increased efficiency. |
 Some
people ask; 'Why does the GIMP have so many windows?' The
answer is that it is cross-platform and Microsoft Windows
is just one of the many operating systems it is used on.
On almost every other operating system (ie, not Macs),
you have multiple desktops.
Some
people ask; 'Why does the GIMP have so many windows?' The
answer is that it is cross-platform and Microsoft Windows
is just one of the many operating systems it is used on.
On almost every other operating system (ie, not Macs),
you have multiple desktops.Another Free OS - Solaris 10
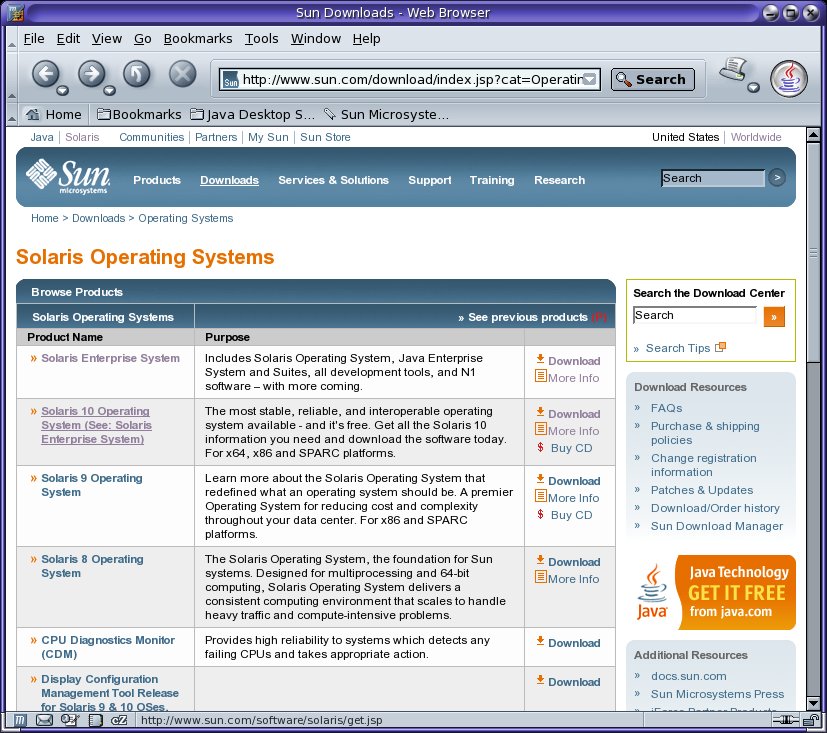
Many of us know that other operating systems will run on them such as the many flavours of Linux, (Philip Nichols') OS/2, the BSD family of OSes and so on. However there is another one that is usually associated with a desktop machine (or more usually with mainframe machines) that runs a special processor chip - the Sun Sparc processor (in its various incarnations). However, there is also a version of Solaris that will work on x86 processors. You can download this from http://www.sun.com/ - just make sure you select Solaris 10 and click on the Download link. You will need 4 CDs to burn it and the installation takes a while but at the end of it, you will have a nice, clean non-Windows installation. |
Using KNOPPIX to gather system information
Ideally, you need to have some piece of software that can probe your hardware and cough up the answers in a way that will make sense to whatever it is you want to install. Also, you need to be able to run it with your new OS installed but leave it untouched. KNOPPIX is good at this. You can run KInfoCenter and ControlCenter which might tell you what you need to know - look for the amount of memory available to the graphics card here. Also, if you press [Ctrl][Alt][0] (as in zero), you will get the initial boot screen which will tell you anything that it has found out such as the video chipset, the monitor's horizontal and vertical scan rates, any resolutions it might want to use and so on. Once you have finished, press [Ctrl][Alt][5] to take you back to the GUI and log out. Once you have noted this, boot up your OS and go to /usr/X11/bin/ from which you need to run xf86config. |
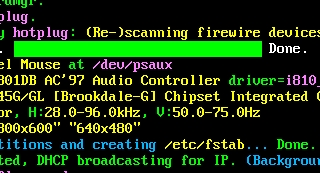 Sometimes, you need
to know a bit about your system so that you can install
another operating system. You usually find this out when
you have run XWindows and it starts off with a 640x480
display when every other XWindows-using OS you have
installed detected it properly.
Sometimes, you need
to know a bit about your system so that you can install
another operating system. You usually find this out when
you have run XWindows and it starts off with a 640x480
display when every other XWindows-using OS you have
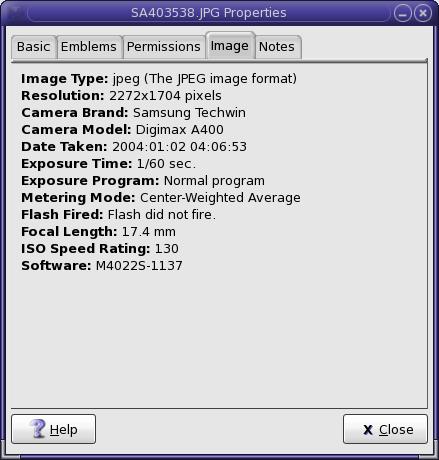
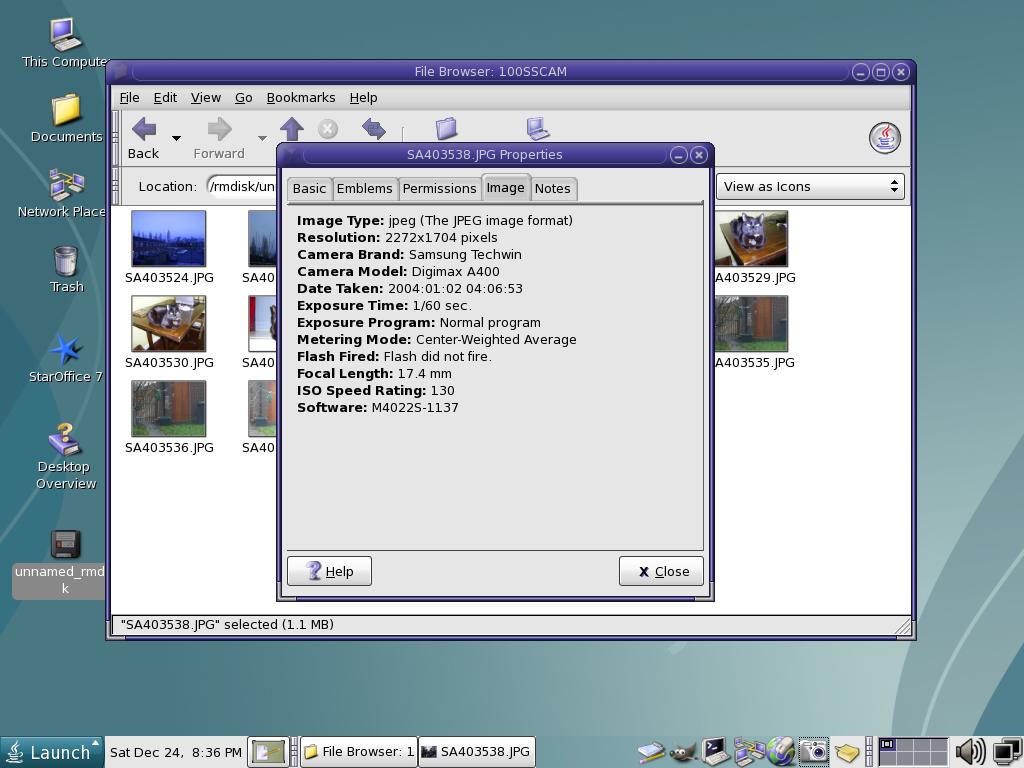
installed detected it properly.JPEG Image Meta-information
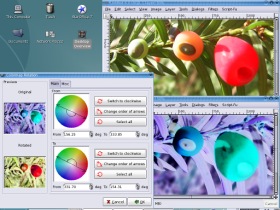
Right-clicking on an image will give you a drop-down menu. If you click on Properties, you can see the form in the screen shot on the right. This is in Gnome, running on Solaris using the Java Desktop. (click on it to see the full image.) On the right, you can see the meta-data (data about data) that is saved with an image from a digital camera. (if you click on the image, you can see it full-sized.) |
 This is it close up. The additional
notes that you can add yourself are under the Notes tab -
right-click to see full-sized. On some operating systems
(such as the various flavours of UNIX), the default file
browser will even let you add your own comments so that
you know what the picture is about. This is it close up. The additional
notes that you can add yourself are under the Notes tab -
right-click to see full-sized. On some operating systems
(such as the various flavours of UNIX), the default file
browser will even let you add your own comments so that
you know what the picture is about. |
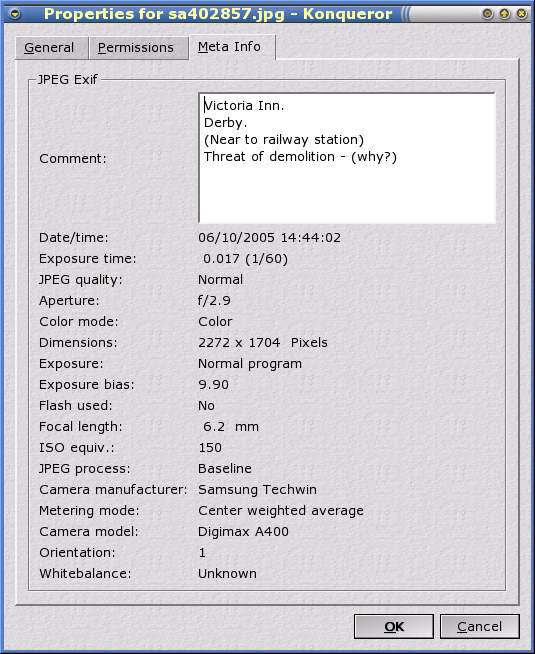 This is KDE running on Linux (SuSE 8.2
professional). In addition to the metadata, there is also
room for any comments you want to write. This is KDE running on Linux (SuSE 8.2
professional). In addition to the metadata, there is also
room for any comments you want to write.You can see that there are a lot of camera-based data in there. If you edit the file - even just 'load' and 'save as', the camera-based data are lost and replaced by image editing-based data. Using The GIMP, the comments remain intact though so you can edit or add to them as you go. If you want to get a set of comments from each image you use if you are adding several together in a montage, you can collect the comments from the properties dialogue in KDE or Gnome. Note that if you receive an image that purports to be an original - say of a crime scene - and there is no camera-specific data there (possibly only image editor type data) then you can, with a fair amount of confidence, state that the image is not an original and unless a verifiable link can be proved, the chain of evidence has been broken. However, if you do find the metadata there that is camera-specific, that does not prove that the image is still the original because this data can be place there by a hex file editor. So, if you have been accused of parking on double yellow lines and there is a digital photograph (or a set of such photographs) and you are sure you were not parked on double yellow lines, you need to demand to see the metadata for the original photographs - if it is not there then the chain of evidence has been broken and a case cannot include those photographs as evidence (they could be used as evidence in a fraud case against the person making the claim against you though). |
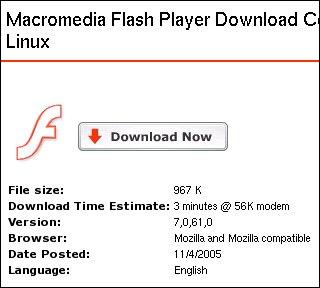
Cross-platform browsing plug-ins - Flash
Flash, as you know, is used essentially as a browser plug-in and like html and pdf, if a platform supports a reader for it, you can use it regardless of the operating system This is the case with Macromedia Flash Player - in this case for Linux. |
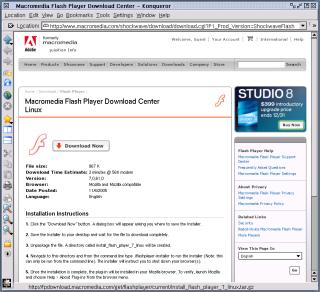
 Windows installation is usually a
downloadable executable or an installation file that is
read by a program that is already on Windows but with
Linux and a number of other OSes, it is usually a .tar.gz
file or similar. Windows installation is usually a
downloadable executable or an installation file that is
read by a program that is already on Windows but with
Linux and a number of other OSes, it is usually a .tar.gz
file or similar.Unlike many companies that simply say that they don't support Linux (primarily because they can't be bothered), there are instructions on what you should do with the Macromedia Flash Player, including what you should type, drag and drop and where. |
| You can find the binaries for most OSes but ironically, at the time of writing, the Sun website had a multi-media clip that was in a Real Media format and I couldn't find a Real Media plug-in that was compiled for Solaris on x86. |
 Whilst
Flash fails the Internet usability test of 'graceful
failure', it is used widely and if you do want to see
graphics, it is fairly good at providing them.
Whilst
Flash fails the Internet usability test of 'graceful
failure', it is used widely and if you do want to see
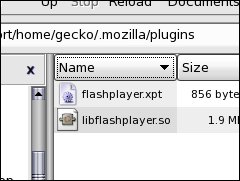
graphics, it is fairly good at providing them.Adding a Mozilla browser plug-in in Solaris 10 as a user
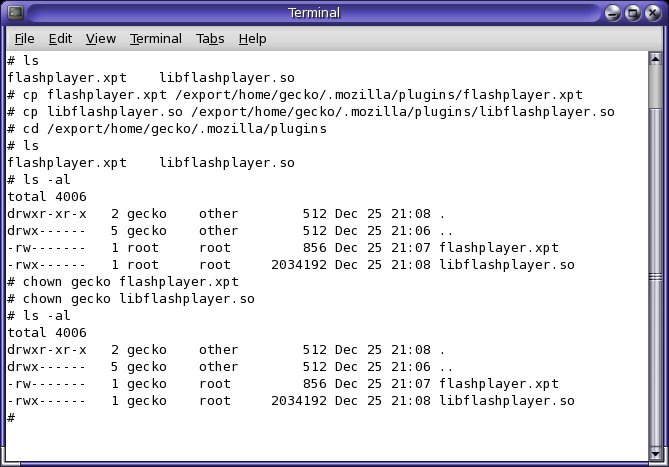
So, having already run Mozilla as the user you need to install the plug-in as, you need create the plugins directory which should give you a path something like... /export/home/gecko/.mozilla/plugins ...(where 'gecko' is the name of the user in this case) which you can do from nautilus (the file manager). Next, you need to open up a shell and su to root so that you can go into another directory and do the things that we need to do. 'cd' to the existing user's plug-in directory (the one that already has the plug-ins installed) and then copy them to the new user's directory. You can do this fairly easily by entering ls to get a listing of the plug-ins in the 'plugins' directory. Next, type 'cp ' and then use the mouse to highlight the first file name you want to copy by double-clicking on it. Next, press [Ctrl][Shift][C] to copy it and then [Ctrl][Shift][V] to paste it at the command line. Next, press [Space] and then type the path to the new user's 'plugins' directory and then, without another space, press [Ctrl][Shift][V] again and press [Enter]. Repeat for the other file(s) in the directory. Next, cd to your new plugins directory 'cd /export/home/gecko/.mozilla/plugins' and if you type 'ls -al', you can see that the owner of the new files is still 'root'. You need to change them so change the owner of the files by typing 'chown gecko' (substituting 'gecko' with your user's name) then do the trick with copying the names of the files - repeating for each of the files. Finally, typing 'ls -al' will show that you have changed the owner of the files. You are now ready to use the browser. |
 If you want to run the GUI as root, all you
need to do is create the 'plugins' subdirectory in
'.mozilla' and copy the files across by dragging and
dropping them. If you want to run the GUI as root, all you
need to do is create the 'plugins' subdirectory in
'.mozilla' and copy the files across by dragging and
dropping them. |
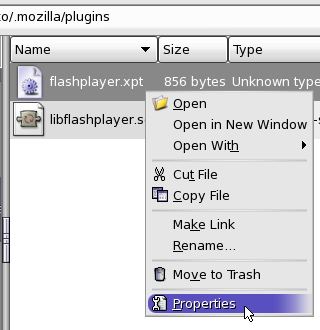 Next, highlight the one of the files,
right-click on it and select 'Properties'. Next, highlight the one of the files,
right-click on it and select 'Properties'. |
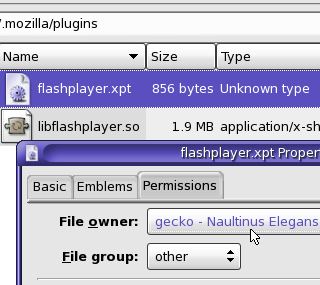 In the properties dialogue, click on the
'Permissions' tab and then select the file owner from the
list (click on it and a list of owners will appear from
which you can select one). In the properties dialogue, click on the
'Permissions' tab and then select the file owner from the
list (click on it and a list of owners will appear from
which you can select one).Repeat with the other files in there and that is the job completed. Note that if you try to chown with more than one file at a time with the GUI, it will not allow you to do that - even as root. If you've done it the GUI way, remember to log out and then log back in again as a normal user once you have finished - don't use a browser as root. |
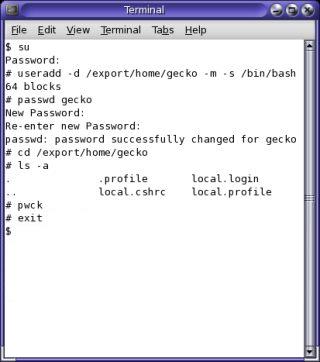
Adding a new user
To add a user, enter... useradd -d /export/home/gecko -m -s /bin/bash gecko Next, create a password for the new account - this has to be done to prevent the account being used without needing a password. Do this by entering... passwd gecko where you would use the user's ID instead of gecko. The system then prompts you to input the password, and then again, just to confirm. Note that you should not have the [Caps Lock] key down unless you know what you are doing when entering a password (the same with [Num Lock] on a laptop keyboard. If you now cd to the new directory... cd /export/home/gecko ...and then enter 'ls -a', you should see the new files. A quick check that all is okay with the password file by entering 'pwck' - if all is okay, you should get nothing as in the screen shot above - and then, if you were not logged in as root originally, remember to enter 'exit' to get back to being a normal user - or you could just close the shell. Now, when you go to log in, you should be able to type the new user ID and password and get into the new account. |
 Adding a new user in
a UNIX-like operating system is quite easy - arguably
easier than loading up a GUI-based program and running
that. All you need to do is add the user and give them a
password - you do that like this...
Adding a new user in
a UNIX-like operating system is quite easy - arguably
easier than loading up a GUI-based program and running
that. All you need to do is add the user and give them a
password - you do that like this...Avoiding JPEG Artefacts
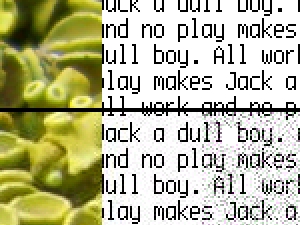
In the image on the right, you can see a very low level of compression on the top half of the image (this is so that it is a jpeg for your browser but not displaying the artefacts) and on the bottom half, a little more compression (just what you would normally use). With the photograph on the left (it is actually some lichen that was growing on a stone wall) the top and the bottom are fairly similar. However, on the right of that, there is noticeable 'noise' added to the image around the letters which is just not present in the upper (clean) half. On the far right, I have squashed the middle out of the density range of the image so that you can see what the noise looks like when it is made more obvious. |
 On the right is a dynamic-range-exaggerated
image that has been compressed to a value of 0.8 (you may
find that the scale on your favourite image processor is
different). If you click here, you can see the two files in png
(lossless) format - before and after jpeg compression so
that you can run the dropper/pixel sampler tool over them
and see how the density changes. On the right is a dynamic-range-exaggerated
image that has been compressed to a value of 0.8 (you may
find that the scale on your favourite image processor is
different). If you click here, you can see the two files in png
(lossless) format - before and after jpeg compression so
that you can run the dropper/pixel sampler tool over them
and see how the density changes.I have taken the clean image (ymc1.png) and compressed it using jpeg compression to produce the second image (ymc2.png). I have then squashed out the middle of the dynamic range so that the first and last eighths of the density range use the full density range thus illustrating the loss of picture quality. |
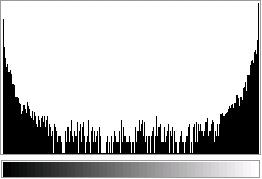 Here, you can see the density range of the
the non-exaggerated jpeg compressed image (ymc2.png)
looks. The original has only WYCGMRBK so the values are
only 0 or 255. Here, they have been spread all between
(logarithmic vertical scale) Here, you can see the density range of the
the non-exaggerated jpeg compressed image (ymc2.png)
looks. The original has only WYCGMRBK so the values are
only 0 or 255. Here, they have been spread all between
(logarithmic vertical scale)So, how do you get around this? Either you need to use a lower level of compression or use a file format that can cope with what you are giving it. If you want to have images that use no more than 256 colours, you can use GIF (the patent has run out on it now). However, if you want a lossless compression that also handles transparency properly (if you need to use it), use PNG. |
 JPEG offers a fairly
good compression on normal, photographic images and for
most of the time, it is good enough. However, when you
start trying to compress images that have a lot of local
contrast or saturation, such as with text and diagrams,
you run into problems with compression artefacts such as
dots and loss of dynamic range.
JPEG offers a fairly
good compression on normal, photographic images and for
most of the time, it is good enough. However, when you
start trying to compress images that have a lot of local
contrast or saturation, such as with text and diagrams,
you run into problems with compression artefacts such as
dots and loss of dynamic range.JDS Gnome Panel Applications
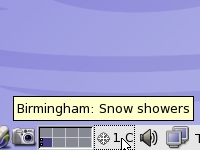
In the screen shot on the right, you can see the Weather report application (yes, that is a snow flake with a symmetry of 4 instead of 6 - so much for the 'Standard Model'). If you right-click on the application once you have installed it in the panel, you can select 'Preferences...' from the menu. In the 'Preferences' dialogue box, you can change from degrees Fahrenheit to Celcius in the 'General' tab (by checking the 'Use metric system units' box) and under the 'Location' tab, choose your location - here, 'Europe'/ 'United Kingdom'/ 'Midlands'/ 'Birmingham' which is about as close as it gets to Derby. |
 In addition to the
usual application shortcuts that you can add to the
panel, you can also add a number of other applications
that are meant to run specifically in the panel. You add
these by right-clicking on the panel, selecting 'Add to
Panel'/ 'Accessories'/ and then the accessory you want.
There are:
In addition to the
usual application shortcuts that you can add to the
panel, you can also add a number of other applications
that are meant to run specifically in the panel. You add
these by right-clicking on the panel, selecting 'Add to
Panel'/ 'Accessories'/ and then the accessory you want.
There are:System monitoring using CLI outputWhilst you can use 'top' ('prstat' on Solaris) to get details of the processes on your system, you will not get the current PID.
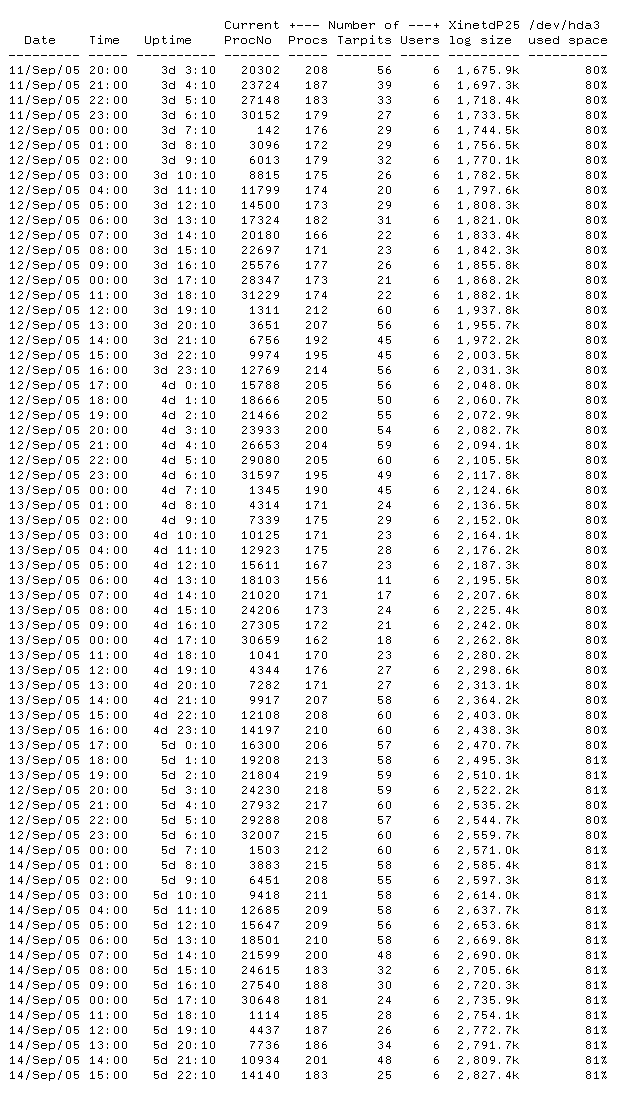
#!/usr/bin/perl
print localtime(time)." $$\n";
This works flawlessly on every UNIX-like OS, but OpenBSD will give random results because the PIDs are not allocated sequentially on OpenBSD. You could run this repeatedly throughout the day but you are better off running it from a crontab (see the link at the bottom of this article). You can monitor many things and it's often easiest to use the system commands. Within Perl, use the following fragment to produce an array which you can then pull apart with regular expressions. $rp = "df | grep c0d0s7"; @freedisk = readpipe($rp); The nice thing about producing a program is that you can fine-tune the regexs to give you exactly what you want from your system, whichever OS it uses. Some useful commands that you can pull apart are:
Once you have all of your information, append it to a file or print it out using 'lpr'. Such an example file is here. You can see how strings have been processed. Note that rather than using fancy but cryptic Perl code, I have generally opted for coding that allows more people to understand what is happening. In the directory, there is an example crontab entry ('crontab.frag'), some example output from the file ('example.output') and the status program itself. |
Batch files from the crontabThe crontab is a really good way of running programs automatically - you can perform your web stats, monitor systems and do many things - but there is one aspect of it that is easy to overlook. When you specify a file name in the etc/crontab file, you use the full path to it so that the system knows where to look for it. However, it is all to easy to develop a program or script that is intended to be run from the crontab by using a shell that is open in the directory within which the program or script resides, only to forget that the crontab sets the user's home directory as the current directory. The way around this is to write your program remembering that all programs it calls and paths it refers to or even is likely to refer to implicitly, should be the correct one from the user's home directory (preferably an absolute path). If you write a program that works all right in a shell that is in the program's current directory but fails when it is run from the crontab, you are likely to find files and things it writes in the user's home directory instead. |
Regular Expressions in PerlAll of the best word processors and, if you are lucky enough to be running UNIX (such as Solaris) or one of the UNIX-like operating systems such as Linux or the *BSDs, basic text editors give you access to regular expressions. These systems - being more mature - also come with Perl as part of the basic distribution. We've covered regular expressions on the SuperDisc in previous issues of PC Plus (issue 237 being most recent) and also in my 'Learning Programming with Perl' Masterclass series in 2005 so we don't need to go into how to construct them here. Instead, we'll look at several ways that they can be used: MatchMatching a string allows us to say whether or not a substring was in a larger string. If we have a variable $string and we want to find out if a substring ('an' in this case) was in it, we can simply say... if ($string =~ m/an/) {
#do something here
};
This lets us know that the string was found. If we were looking for one of a series of characters, we might have if ($string =~ m/[qwerty]/) {
#do something here
};
but here, we would not know which one was found. If we needed a different structure in the if anonymous subroutine for each of the characters, we could be better off writing one for each letter (one for 'q', one for 'w' and so on) but if the subroutine is essentially the same (print 'the letter found was' ...) then we need to know which. We can do this using memories. Like so... if ($string =~ m/([qwerty])/) {
print "The letter found was $1.\n";
};
Now, we have a set of brackets around the options we are searching for which makes Perl put the result into memory. In the following line, we use this memory ('$1') to produce our output. If you need more than one memory, you just use more sets of brackets and the variables use higher values like so... if ($string =~ m/([qwerty])([asdfgh])/) {
print "The first letter found was $1 and\n";
print "the second letter found was $2.\n";
};
We can also use it outside an if statement in these ways: $1 = ""; $text =~ m/([qwert])/; $accumulated_text .= $1; or $text =~ m/([qwert])/ and do{
#do something here
};
as the equivalent of 'if then'. Search and ReplaceSearch and replace has the same structure as match but you can do more with it. Like match, it can be used in 'if' statements and other control structures but it can be used on its own. It has the form s///; where the first part is the same as a match but the second is what is used to replace what is matched in the first. Eg... $text =~ s/th([ey])/m$1/; Here we have used a memory but the initial 'th' of the search string is not memorised. However, it is used as the search so it is replaced. In this case, 'the' is replaced by 'me' and 'thy' is replaced with 'my'. You can use several memories to format strings: say to insert thousands commas in a string like so... 1 while (s/(\d+)(\d\d\d)/$1,$2/); TransliterationThis is a simple place-for-place replacement whereby if the first character is found in the list, it is replaced by the first one in the second string. So, to produce a ROT13 transformation, just use this fragment... tr/[a-z]/[n-za-m]/g; You can see that when it comes across an 'a', it gets transformed into an 'n' and so on. |