PC Plus HelpDesk - issue 254
 |
This month, Paul Grosse gives you more
insight into some of the topics dealt with in HelpDesk
|
 |
HelpDesk
In memory of Wilf HeyIn the afternoon of 2nd January 2007, Wilf Hey died peacefully in hospital following a gradual deterioration of his health. Wilf Hey had worked on PC Plus since issue 51 and, with over 200 issues behind him, was by far the longest standing contributor to the magazine. Although he was born in the UK, he and his family moved to Canada. Wilf went straight from school into IT, working in Canada and the US. Eventually, he moved back to the Ilford in the UK and after a while, moved to Bath, starting on PC Plus Magazine. I first got to know Wilf in 1992 when he was the Cover Disk Editor for PC plus magazine - he had written to me, letting me know that he would like to put my Mah Jong game simulator on the cover disk (back then, it was a 5.25" and a 3.5" diskette holding a total of 1.2 and 1.44MB respectively). We talked and found that we had a lot of interests in common. He liked science fiction and loved logic problems, both of us recently working out Sudoku generating programs independently of each other (when we discussed this on the telephone, we found that we had worked them out in pretty much the same way, using the same structures, general algorithms and so on, only he had written his for 1:1 interaction on a PC using BASIC and mine used Perl, worked on its own on a server running a crontab and generated PNG files for its output). In 1994, he demonstrated his love of Perry Mason's courtroom method when he completely debunked a company's evidence, using the company's own written evidence to demonstrate each and every one of the company's witnesses as ... less than completely honest. He would get the witnesses to make statements that they wholly agreed with and then demonstrated in the court how the company's own evidence called each of them a liar. One witness stated that he called Wilf in November (although we both knew that the telephone conversation really occurred several months earlier), claiming that he had got Wilf's number from a computerised log which the company had provided a copy of in its bundle of evidence. Wilf asked him to point out which entry he had used, which he did, then Wilf showed him that the number was incomplete. The witness searched through to the next entry, stated that that was the one and Wilf told him that one was incomplete as well. Next, the witness searched for the first complete entry - there had been a temporary fault on the system where the last digit was not being recorded - and eventually found one. He stated that he knew that that was the one and that he remember definitely that it was. Wilf then pointed out that it was in December and that the witness had stated the call entry appeared in November. The witness then stated that he now definitely remembered that he called directory enquiries and asked for Wilf's telephone number. After that day's hearing, Wilf went home and asked directory enquiries for the nearest Wilf Hey which was several miles away. He also confirmed that the nearest S W Hey was himself because, unknown to the witness, Wilf's name is actually Stephen Wilfrid Hey, was in the telephone directory under S W Hey and so the witness was lying about that as well. Also, there was the fact that the witness had been seen looking through a filofax with Wilf's number entered in it under the name Wilf Hey. Another witness claimed to be the author of the computer report. However, Wilf had previously carried out an investigation at the Cabinet Office so, unlike the company's computer consultant, Wilf did know what he was talking about. Eventually, after getting that witness to agree to many things and make himself look particularly stupid (he stated that even though he had been instructed in the request for the report to look for any evidence of tampering of the operating system, and the time stamp of the OS files included many impossible times, he had apparently failed to notice any of them, also that time stamp editing had gone on elsewhere with one program apparently being developed backwards in time), Wilf eventually cornered him. The witness looked up at the ceiling as though his script was written there, then down at the table in front of him (but it was not there either). After a short while, he said, 'All right, all right, I admit it. [the company] told me what to write in the report.' The company in question had been supplying a chemical (used in munitions) to the South African Government - whether this was in the knowledge of the appropriate minister was never determined. There were other serious issues with the company, concerning the environment and Wilf supplied me with some direct-line telephone numbers to senior investigators in government departments in case I needed to contact them. During the course of that case, two witnesses died of heart attacks just before they were due to give evidence and one of the tribunal members was almost killed when he nearly stepped into an empty lift shaft on the seventh floor. Following that, Wilf and I communicated using heavily encrypted emails with random headers, using one-time passwords with plenty of trivial traffic to frustrate traffic profiling and plain text attacks. We also fed Barium meal into the telephone system which came up positive so we knew that something was going on. After that, I worked with him on a number of projects for Programmer's Workshop including SIRDS, WIRES and so on. One of these projects was a Water Rocket Computer Model and Wilf, Ian Sharpe and I spent a wet afternoon on a hillside in Bath, photographing plastic pop bottles shooting off into the heavens. Around ten years ago, he introduced me to computer security journalism and together, we wrote for Computer Wire's Data Security Tools Bulletin, Secure Computing magazine (reviews of books software and hardware) and four years ago, on issue 203 we started writing for the PC Plus HelpDesk section. Recently, as his health was deteriorating, he had started writing Wilf's programmer's Workshop in advance and had written up to issue 253 (the reason for the delays in all of this is that the magazine writes different parts of different sections anything up to two months in advance with HelpDesk usually being the first section in - I had submitted the SuperDVD section in December). Wilf liked science fiction - Star Trek, H2G2 to name but a few of the series - and just as though he had paid that bit too much attention to H2G2, taking a leaf from the writer's book, he liked the thrill of the chase when it came to deadlines. Unfortunately for the rest of us, he appears to have met the ultimate deadline at least 20 years, in my opinion, too early. For those that didn't know him, you've probably heard of some of the things that he has done or had a hand in:
For those who did know him as a friend, he will be remembered for his generosity, wisdom and cats. Wilf, it has been a pleasure knowing you and working with you. |
Making ICO files
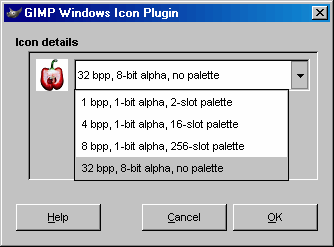
The GIMP comes to the rescue here. There is enough flexibility in the .ICO format to allow 32bit colour and pretty much any size you are going to need as an icon. In addition to this, you are not limited to 1:1 aspect ratios or powers of two pixels for sizes. Once you have the image you want, all you need to do
is right-click (or menu), 'Save as...', and then use
'.ico' as the extension. The dialogue box on the right
appears (this is in Windows Vista using the quicker Win98
look-alike interface) and you can select which version
you want. |
 This is
fine for producing distinct files for program icons but
sometimes you need to embed the image in your code. The
GIMP has another couple of options for files so that you
can do this. This is
fine for producing distinct files for program icons but
sometimes you need to embed the image in your code. The
GIMP has another couple of options for files so that you
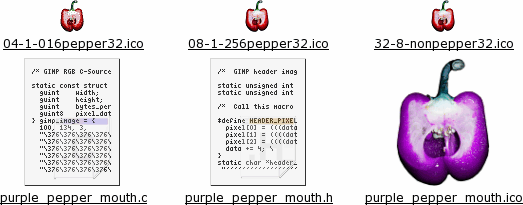
can do this.Save them as C source files or header files by using '.c' or '.h' extensions respectively. On the right, you can see the contents of the directory (click here to open up the directory in a new browser window). The purple pepper is just hue-shifted and larger with an odd aspect ratio, proving the point that you don't need to stick with 32x32 icon files. The .c and .h files are of this image. |
 There are
a number of specialist programs that you can pay for,
that will create 32x32 pixel ICO files for you. However,
many of these are limited to 16 colours and with some,
you even need to sacrifice one of the colours for the
transparency. You can do better than this and for less
expense.
There are
a number of specialist programs that you can pay for,
that will create 32x32 pixel ICO files for you. However,
many of these are limited to 16 colours and with some,
you even need to sacrifice one of the colours for the
transparency. You can do better than this and for less
expense.Sending signals
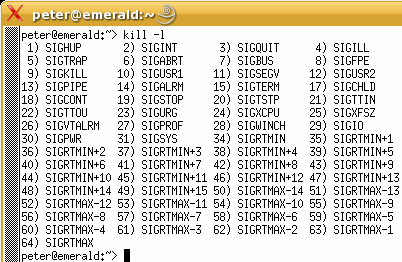
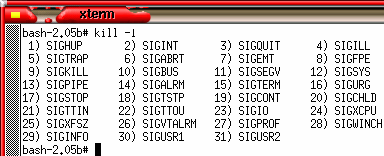
Signals have both a name and a number - it being the number that is sent to the process, not the name. We use the name as humans because it means more to us than just the number. Also, on different systems, the numbers can be different so, if you got into the habit of sending a '7' for a SIGBUS on Linux but then went to an OpenBSD system, you would have sent a SIGEMT signal - it is better to stick to the names. If you want to find out which signals are available on your system, just enter 'kill -l' to list them. On the right, you can see the output in Bash running on SuSE Linux version 8.2 professional. |
 This is in
Bash on SUSE Linux 10.0. You can see that the commands
are the same but there are some additional signals. This is in
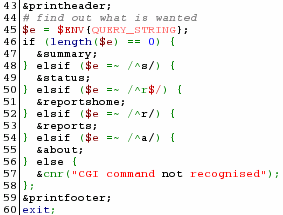
Bash on SUSE Linux 10.0. You can see that the commands
are the same but there are some additional signals. |
 This is in
the default terminal on OpenBSD 3.5. The signals that are
available are also a function of the terminal program you
use. This is in
the default terminal on OpenBSD 3.5. The signals that are
available are also a function of the terminal program you
use. |
 This is
still in the same OpenBSD operating system but this time,
using Bash. This is
still in the same OpenBSD operating system but this time,
using Bash. |
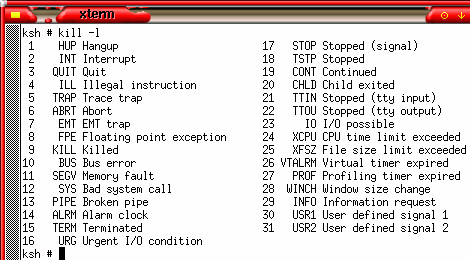 Again,
this uses the same OpenBSD OS but this time, we are in
'ksh'. You can see that this is more helpful as the 'kill
-l' command tells you what each signal does. Again,
this uses the same OpenBSD OS but this time, we are in
'ksh'. You can see that this is more helpful as the 'kill
-l' command tells you what each signal does.You can capture all of these except '-SIGKILL' in the programs you write - allocating your own procedures to handle them thus allowing intelligent handling of closed pipes, alarms, instructions to close. In Perl, they are captured and if you have assigned a subroutine to any of them (using a hash table), that is run instead. Perl has the advantage that it will run on any OS so if you are writing something to run on any OS, use the names and let Perl figure out the numbers for you. |
 On a UNIX
system such as Linux, you can send a process a signal
using the 'kill' command. Signals can do anything that
the system or the writer of the program wants them to do.
Examples include re-reading a configuration file, saving
data in a file or a pipe or exiting in a civilised
manner.
On a UNIX
system such as Linux, you can send a process a signal
using the 'kill' command. Signals can do anything that
the system or the writer of the program wants them to do.
Examples include re-reading a configuration file, saving
data in a file or a pipe or exiting in a civilised
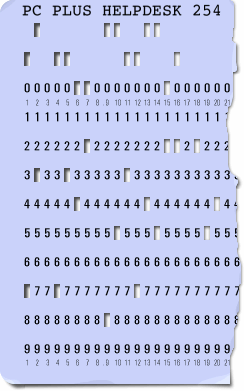
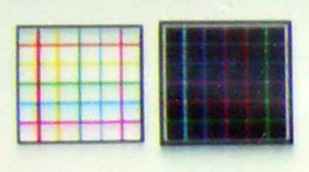
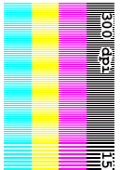
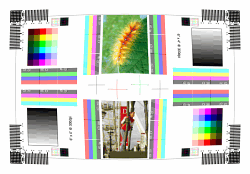
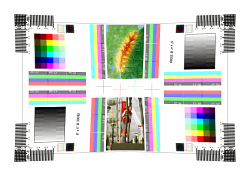
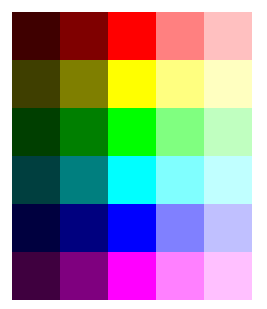
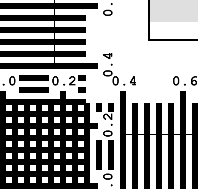
manner.Photos at your chemistMany chemists will print out your photographs on-site, using either an overnight or an 'instant' (hourly) service. However, you might like to compare them objectively and to do this, you will need a test card that tests each of the qualities you might be interested in. One problem of the service is that the only way of guaranteeing no border on a photograph is to allow the image to run over the edge. This inevitably leads image loss so it would be nice to find out just how much of this there is. We can construct a test image with the right aspect ratio for 6"x4" and has a ruler that goes up to the edge. You can make this yourself or use the one that I have provided here. There are also a number of other tests that have been included:
The instant prints are done using CYMK dye sublimation and are not produced optically. The overnight prints are conventional prints using three dyes and in the machine at my local chemist, they are produced using a scanner so there is no lens system to produce lens-type artefacts (dispersion, curvilinear distortion, alignment). |
|||||||||||||||
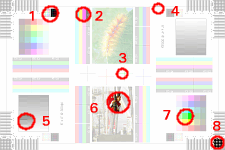 So, here
are the parts of the image that you can examine and what
they mean. So, here
are the parts of the image that you can examine and what
they mean.1 dispersion; 2 spacial responsiveness; 3 alignment; 4 curvilinear distortion; 5 half-tone- and 6 real-world reproduction; 7 saturation; and, 8 cropping. |
|||||||||||||||
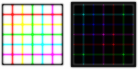
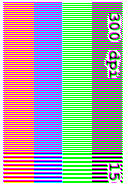
1 - DispersionOn a lens-based system, the refractive index of even the best lens glass will vary with wavelength. In order to correct this, combinations of two (achromatic) or three (apochromatic) lenses are used for each element. With achromatic systems, the red and green bands are corrected for, leaving the blue on its own whereas with apochromatic systems, the red, green and blue bands are corrected for (there are still variations but these are minimised). This test takes pure coloured lines, well away from the centre of the image and allows the lens to mess them up if it can. The four images on the left are the original and three synthesised versions, allowing you to see what the effects look like. The image on the right is the real thing. There is clearly no dispersion as you would expect. However, with dye sublimation, there is a 'trailing' effect caused by dye vapour moving onto the print paper after it has moved - this time trailing downwards.
|
|||||||||||||||
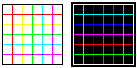
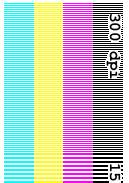
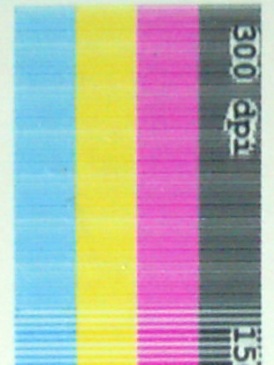
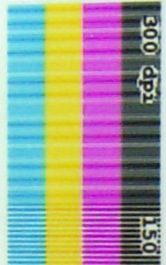
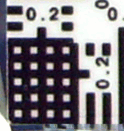
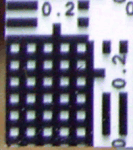
2 Spacial responsivenessThis tests the printer's ability to print out lines. At 300dpi, it is able to print out 150 lines per inch. In the two images on the right, you can see several things. One is that the ability to print 150 lines per inch is severely limited. Another is that the software somewhere in the system changes to a different resolution and moire fringes are created. Another thing is that you can see that the yellow and the magenta in the four colour (dye sublimation) system are purer than in the three colour system. See 'saturation' below for more on this.
You can see that neither print is particularly good at this. |
|||||||||||||||
3 alignmentThis is done at the centre of the image. You are only likely to get this if the image is printed in several passes with the printer letting go if the paper between passes (i.e. it gets fed into a tray) or, if it is done with inkjet, if the heads haven't been aligned properly when they were last changed The tests on my local chemist showed no signs of poor alignment.
These crosses are in the middle of the image where - if a lens system was being used - there would be minimal dispersion. |
|||||||||||||||
4 curvilinear distortionThis is caused when there is a difference in focal length between the centre and the periphery of a lens. In order to see if there is any effect (only if you are using a lens-based system), take a ruler to the print and align it so that the edge of the ruler sits half way across the line. Look to see if there is any apparent change in the amount of line you can see (if it gets darker towards the middle of the line, for example) and then, just to make sure that it is not the ruler that is bent, turn the ruler around by 180 degrees and repeat the test on the same line - if it is still darker towards the middle in our example, then it is the ruler that is bent. Remember that these lines - at 300dpi - are only 3 thousandths of an inch across - thinner than a human hair.
There was no curvilinear distortion found in either of the test prints indicating that both processes were done using scanner technology rather than lens technology. |
|||||||||||||||
5 half-tone reproductionYou need a good density range from white through to black and you need the colours in between to remain balanced. Whilst a grey scale doesn't seem to tell us vary much at all, it is a rather powerful tool.
|
|||||||||||||||
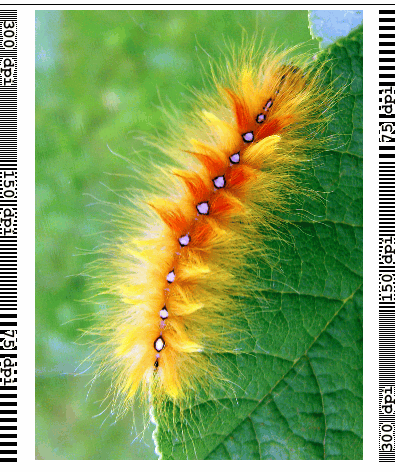
6 real-world reproductionHere, you get a chance to look at real images and see how well they perform. On the images I obtained from my local chemist, I found that the hairs on the caterpillar and the superstructure of the London Eye came out exceptionally sharp with the dye sublimation. However, there was the line-trailing vapour effect mentioned above and the yellows were a little washed out. On the conventional print, there was a slight orange cast on the London Eye image but the caterpillar colours were a lot better. However, there was noticeably less definition than with the dye sublimation although the hairs on the caterpillar looked a lot less 'jagged' - they are only 1 pixel wide. Neither of the prints were poor quality and both were good enough for general use - which is what the process was designed for.
|
|||||||||||||||
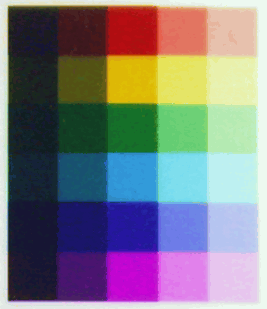
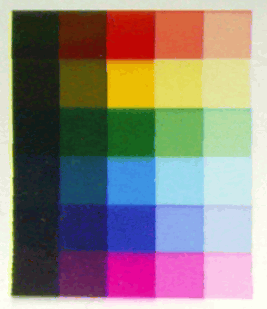
7 saturationGood colours are, of course, essential. This block takes the saturated colours and displays them at 25% and 50% with black, 100%, 50% and 25% with white. The yellow and the magenta are the most different with the dye sublimation giving the better colours generally, because it is a four colour system.
There are several reasons for the differences in saturation between the three- and four-colour systems:
As a result of different dyes, some print stocks look better on different types of picture (portraits, landscapes) to others where different colours are predominant. For example: portraits will tend to have pinks/browns in them (the human visual system is very sensitive to hue errors in the red to green range); landscapes (of English countryside ) will tend to be green; and underwater photography tends to be blues. |
|||||||||||||||
8 croppingYou don't want to loose too much of your image so knowing how much you are going to lose will help you with composition. The outer side of the larger lines gives the distance that is enumerated. So, in the 3 colour image, you can see that the cut-off is at 0.12 and 0.14 inches horizontally and between 0.8 and 1.0 inches vertically. The dye sublimation image has been cut off horizontally between 0.8 and 1.0 inches and vertically between 0.2 and 0.4 inches. This is, of course, not taking into account that the image (including the scale) has been enlarged slightly.
This pattern is repeated in each corner so that you can see that the cropping is not skewed and that it is consistent. |
|||||||||||||||
 These
images are produced using a pixel-for-pixel process. This
means that the prints are effectively a contact print
(which is why there is no curvilinear distortion or
dispersion). However, the number of pixels per inch in
the printer, once the image has been processed by the
image processing software, does not match up. Hence the
moire fringes. These
images are produced using a pixel-for-pixel process. This
means that the prints are effectively a contact print
(which is why there is no curvilinear distortion or
dispersion). However, the number of pixels per inch in
the printer, once the image has been processed by the
image processing software, does not match up. Hence the
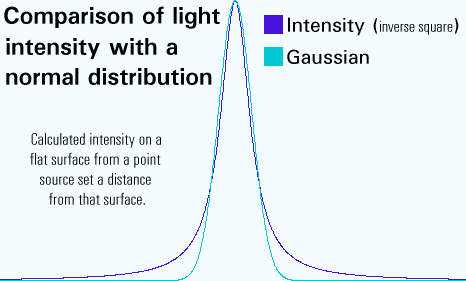
moire fringes.You can see clearly the drifting sublimated dye where it has settled on the print paper after it has passed by, by looking at what looks like 'motion blur'. However, one effect that is in both of these is that the pixels are not sharp. This is because the source of the exposure (the sublimating dye or the light, respectively) is a distance away. If you look at the intensity of light on a flat surface (ignoring reflections at shallower angles), you get the blue graph on the right. This is more spread out than the Gaussian curve and shows a broader spread. |


TTL - Useful or not
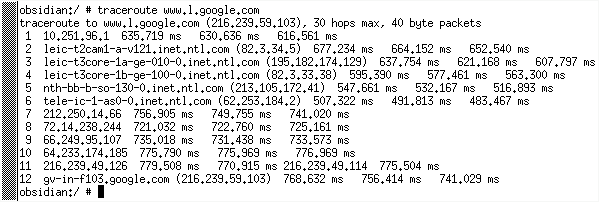
Sometimes, you see large starting values such as 128 or 255 and these will never get used up between the client and the server because there aren't enough routers. You can check this out for yourself - for example, if, as root, you type 'traceroute www.l.google.com', you will find that there are a number of hops (12 hops between my machine and www.l.google.com) and traceroute uses TTL to determine how many hops away a given IP address is. However, apart from traceroute, there is a good reason for still using TTL. Routers can make mistakes in choosing the paths for packets and it is possible to end up with packets travelling in a circle. If the TTL was not decremented as it went along, it would be possible for these packets to accumulate and take over the bandwidth on these routes. Eventually, as they would never die, those routes would contain only circuitously routed packets. So, whilst 255 sounds high, there is a reason why it is still used. |
 TTL or
'Time To Live' is not some redundant artefact of an
antiquated networking system, it has a real-life function
that is quite important.
TTL or
'Time To Live' is not some redundant artefact of an
antiquated networking system, it has a real-life function
that is quite important.Vista - changing workgroup
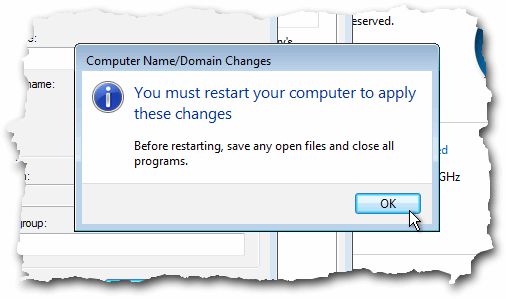
The dialogue box is well hidden (unless you just happened across it) and you need to know which button to press in order to get to it - there are a number of different paths to get to this. First of all, click on the Start menu icon then click on Control Panel. Make sure that it is 'Classic View' and double-click on 'System'. Under 'Computer name, domain, and workgroup settings' [sic] click on 'Change settings'. If you are not in an administrator account, you will now need to enter an administrator's account password. Now, the system properties dialogue box should open up. Under the 'Computer Name' tab, click on the 'Change...' button at the bottom, so as to change the computer's domain or workgroup. Next, in the 'Computer Name/Domain Changes' dialogue box, in the 'Member of' frame, make sure that the 'Workgroup' option is chosen and type in the name of your workgroup. Click on 'OK' and you will be greeted with the message that you are going to have to shut down the computer and start it again - restarting the computer like this was supposed to have stopped years ago. Come on Microsoft - this is the 21st century. On many other systems, the service can be stopped and restarted on its own - although some services either don't need to be played with at all and others maybe need to be sent a signal to re-read their configuration file. |
 Sometimes,
you just seem to go from one dialogue box to the next
without achieving anything other than clocking up the
number of times you've gone around the circle. It can be
like this with things that you know are there (or at
least should be) but you can't quite find them. This is
how to change the workgroup you are in under Vista.
Sometimes,
you just seem to go from one dialogue box to the next
without achieving anything other than clocking up the
number of times you've gone around the circle. It can be
like this with things that you know are there (or at
least should be) but you can't quite find them. This is
how to change the workgroup you are in under Vista.Safer CGI scriptingRunning your own web server is undoubtedly fun but there are some risks involved such as CGI (Common Gateway Interface) scripts. So, how can we get safer CGI scripting? Well, you see plenty of web sites running CGI scripts that allow users to run them directly from the '/cgi-bin' directory - you see http://somedomain.com/cgi-bin/somescript.cgi?somestuff in the address bar. From that, unwanted visitors can try hacking them to death or downloading the script itself although your web server configuration file should have a directive preventing this. If all is configured correctly, the server only sends them its output. However, they can still try hacking them for two reasons: they know where they are ('/cgi-bin') and what they are called (it was in the address bar).
<!--#exec cgi="/cgi-bin/prog.cgi"--> ...where 'cgi-bin' and 'prog.cgi' are replaced with
whatever you want. In practice, the user never sees the
location of the cgi directory or the script so they can't
try to download them directly because it looks like the
screen shot on the right. |
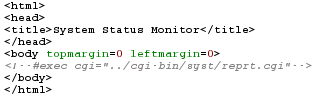 The html
file consists entirely of the few lines on the right. The
rest of the page is generated from the reprt.cgi program. The html
file consists entirely of the few lines on the right. The
rest of the page is generated from the reprt.cgi program.If you want, you can write your CGI script so that it looks to see what document has sent it (look at the appropriate environment hash variable) and get it to run properly when things are as they should but perhaps send output to a log file when it appears that someone is trying to hack it (maybe block user activity from that IP address for an amount of time (say 10 minutes or 1 day) so that people cannot hack it very quickly). Note that on a Windows system, you need to tell your web server that you are using SSIs by having that file extension (usually .shtml) as the file type. The problem with that is that you are telling them explicitly that the file contains SSIs (although this would be obvious from the '?something' that appears after the file name when in use.) |
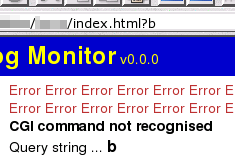 Hackers
can still try to send it arguments to try to crack the
program you have but they cannot use a broken server to
get the code itself. It is best to use a CGI program
module but if you are just writing a small piece of code,
you should be careful about how you process the
information on the address line. The one here filters out
anything that it doesn't like the look of and if it
cannot find what it wants, it produces the following
output. Hackers
can still try to send it arguments to try to crack the
program you have but they cannot use a broken server to
get the code itself. It is best to use a CGI program
module but if you are just writing a small piece of code,
you should be careful about how you process the
information on the address line. The one here filters out
anything that it doesn't like the look of and if it
cannot find what it wants, it produces the following
output. |
 You can
counter these by: renaming the cgi-bin directory to
anything ('bf309c8a0b7a' for example - remember to use
this in the httpd.conf file); and, give your scripts
obscure names (in a similar style to the directory name).
In order for these to remain hidden, you need to run
Server-Side Includes (SSIs) and use a shell of a web page
that calls the SSI using a line like the following...
You can
counter these by: renaming the cgi-bin directory to
anything ('bf309c8a0b7a' for example - remember to use
this in the httpd.conf file); and, give your scripts
obscure names (in a similar style to the directory name).
In order for these to remain hidden, you need to run
Server-Side Includes (SSIs) and use a shell of a web page
that calls the SSI using a line like the following...Processing CGI InputOne of the biggest headaches for programmers is processing error-riddled end-user input. When people try to break your program, you have to be careful right from the beginning. When writing a program, Perl identifies this tainted input when you use the '-t' switch - your program just dies if you use it incorrectly. However, there is a way of writing programs that are a lot safer than others and all you need to do is think of how an application level gateway works.
|
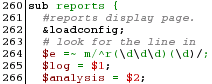 This is the
beginning of the reports subroutine. It takes our query
string and if, after the 'r', it finds four digits, it
puts the first three in the $log variable and the fourth
in the $analysis variable. Whilst it is possible to look
for other data after these, this program is written so
that it only looks for four digits. This is the
beginning of the reports subroutine. It takes our query
string and if, after the 'r', it finds four digits, it
puts the first three in the $log variable and the fourth
in the $analysis variable. Whilst it is possible to look
for other data after these, this program is written so
that it only looks for four digits. |
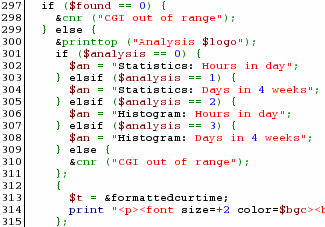 After it
has found them, it processes them specifically as in the
code snippet on the right. Note that it does not pass the
data on, it only finds out if the values equal what is
expected and if it doesn't, it is rejected. After it
has found them, it processes them specifically as in the
code snippet on the right. Note that it does not pass the
data on, it only finds out if the values equal what is
expected and if it doesn't, it is rejected. |
If your program needs more flexibility - say, you
were looking for a number in the format #.#### to
###.#### and it had to be preceded at the beginning of
the string by 'r=' - you would perhaps use a more
flexible approach by using a regular expression such
as...m/^r=([\d]{1,3}\.[\d]{4,4})/
You can have an informative error message if you like
as long as you remember to make sure that this error
message is not presented in the program's production
environment - there have been hacks on commercial
databases because the 'helpful' error messages have been
left operational and revealed the structure of the
database. You could have a variable set in the test
environment (or look at the UID) - the absence of which
(or different UID) stops the helpful messages; or, you
could take out the code (remark it out) or a mixture of
both. |
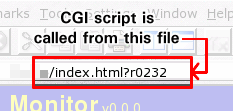
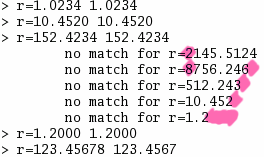 This is
the output of the above program. You can find the program
at by clicking
here to open up the directory in a new window. You
can see that where the input conforms to the
specification, it is accepted but where it doesn't, it
fails. This is
the output of the above program. You can find the program
at by clicking
here to open up the directory in a new window. You
can see that where the input conforms to the
specification, it is accepted but where it doesn't, it
fails.Note that in the second example, there is a trailing zero and that is accepted whereas the same value is used without the trailing zero in the fourth example from the end and it fails - even though it has the same numerical value. This is also the case with the 1.2 and 1.2000 examples. If your program only outputs numbers in a certain format, you can be specific about that format when you examine the strings. Once you have your string in the right format, you can do what you like with it - 12.4567 might not be a number, it might be 12.4 followed by 567 if you want it to be. |
 The
program snippet on the right prints out the top of the
page and then copies the $ENV{QUERY_STRING} hash value
(the bit after the '?') to a variable. It then queries
the length of the string and if it is longer than zero
bytes, it looks at the first character - taking action on
that.
The
program snippet on the right prints out the top of the
page and then copies the $ENV{QUERY_STRING} hash value
(the bit after the '?') to a variable. It then queries
the length of the string and if it is longer than zero
bytes, it looks at the first character - taking action on
that.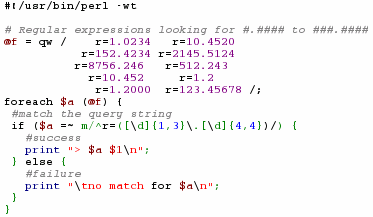 In this
case, we only accept a string that starts with 'r=', then
has between one and three digits, then a dot, then we
take the next four digits (note that in addition to
having a digit repeated between four and four times (i.e.
[\d]{4,4}),
you could also specify four digits (i.e. \d\d\d\d
)). All of this goes into the variable $1 (which is what
the brackets are for. In the code sample on the right,
you can see that we try out our test regular expression
with a number of values held in the array '@f'. If the
match is made, we go into the success part of the program
structure and if we fail, we use the other part - in
reality, you would have a default routine that returned a
page stating that the process had failed.
In this
case, we only accept a string that starts with 'r=', then
has between one and three digits, then a dot, then we
take the next four digits (note that in addition to
having a digit repeated between four and four times (i.e.
[\d]{4,4}),
you could also specify four digits (i.e. \d\d\d\d
)). All of this goes into the variable $1 (which is what
the brackets are for. In the code sample on the right,
you can see that we try out our test regular expression
with a number of values held in the array '@f'. If the
match is made, we go into the success part of the program
structure and if we fail, we use the other part - in
reality, you would have a default routine that returned a
page stating that the process had failed.Concatenation and CoercionYou sometimes hear about concatenation and coercion but what are they and why would you need to use any particular one? Concatenation is simply glueing strings end to end whereas coercion is forcing them to interact. This is best demonstrated with examples so let's have two variables: $a = 1 and $b = 2. This can be written as... ($a, $b) = 1, 2; In Perl, you concatenate strings by using a dot ('.') and coerce them using an arithmetical operator such as '+'. So, if... $c = $a . $b; $d = $a + $b;
So, why would you want to do that? Typed user input is one instance of concatenation. In
a calculator application, for example, you need to
concatenate the numbers as the user types them. Then,
once they have finished, you need to treat it like a
number. |
| Perl allows you to do this without changing variable
types from string to integer or floating point because of
the way that it handles scalars. In comparisons such as 'greater than or equals', Perl decides which you mean by the operators you use such as... if ($a ge $b) {
# some action or other
}
...for string comparison and... if ($a >= $b) {
# some action or other
}
for a numerical comparison.
You can find the relevant Perl Script in a directory just by clicking here. |
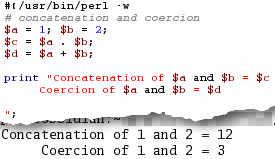 $c ends up
with a value of 12 and $d with 3.
$c ends up
with a value of 12 and $d with 3. 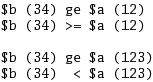 In the
program example on the right, you can see how two strings
are compared using different comparison methods
(numerical and string) even though the variables are $a
and $b. Whilst 34 is greater than or equal to 123 when
compared using string comparisons, 34 is less than 123
numerically.
In the
program example on the right, you can see how two strings
are compared using different comparison methods
(numerical and string) even though the variables are $a
and $b. Whilst 34 is greater than or equal to 123 when
compared using string comparisons, 34 is less than 123
numerically.Colour-blind websitesIf you're trying to make a website easy to use for people with disabilities, you might like to consider colour-blindness.
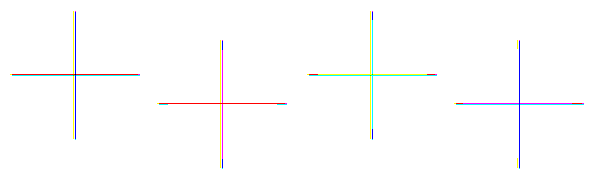
Colour-blindness normally manifests itself with an inability (partial or complete) to distinguish between red and green (and all of the colours in between such as yellow and orange). There are quite a few variants (such as one where red looks dark) and whilst the only way you would know would be if you were colour-blind, you can get an idea of what this looks like by taking an ordinary image such as the one on the right and then processing it so that you cannot distinguish between reds, yellows and greens. |
 Using the
GIMP, you can: Using the
GIMP, you can:
|
 Afterwards,
you should end up with something like this... Afterwards,
you should end up with something like this...So, how
does this manifest itself with a web page? |
 This is
Nagios as it looks in full colour. This is
Nagios as it looks in full colour.You can see that any resources that need your immediate attention are easy to spot as they stand out well from the others by using traffic light colours. ... |
 Unless you
are colour-blind that is. Unless you
are colour-blind that is.So, how do we solve this problem? One way is to have an alternative set of colours so that some colour-blind people can distinguish them, use icons that are different and so on. Above, I mentioned traffic light colours so, how do
traffic lights solve this problem? It isn't a requirement
that any road user should have any amount of colour
vision so what is that solution? |
 This is it.
You can see that the light on the top left is a red
although at the bottom, to the colour-blind person, it
looks the same as any other. This is it.
You can see that the light on the top left is a red
although at the bottom, to the colour-blind person, it
looks the same as any other.The solution is to use a reflective, white border so, whilst people with colour vision can see that it is red, colour-blind people can see that it is the one at the top. All you have to do is apply to your website the same level of lateral thinking that they have done here. |
 For those
who don't know, the epidemiological prevalence of
red-green colour-blindness in Caucasian males is around
eight per cent and therefore significant. So, what does
colour-blindness look like and how can we do something
about it?
For those
who don't know, the epidemiological prevalence of
red-green colour-blindness in Caucasian males is around
eight per cent and therefore significant. So, what does
colour-blindness look like and how can we do something
about it?Cheap network storageDisc storage with a USB socket on has been around for a while but now, we are beginning to see them appearing with an RJ45 socket on as well. This looks convenient but raises some issues that need consideration. The file system limitations reveal a lot about some of these devices. In USB mode, it appears that they work like any other USB-mounted file device with each partition (NTFS and FAT32) appearing as a different drive. This is because the computer that it is plugged into has the software to perform the necessary operations with the disc drive and it would appear that it could just as easily format it with ReiserFS or ext3. However, this is not the network storage you require. When working as network storage, the storage device it needs its own operating system - this will be in its on-board chipset. In effect the OS is a configurable interface between any read/write operations on the disc and any network protocols used - this includes DHCP, SMB and FTP in addition to HTTP for configuration. The decision to use only FAT32 on some of these suggests that there has been little thought in the design.
So, poor disc usage, lack of journalling, UPS requirement, poor security and lack of compliance with standards all point towards many of these being a 'no, no' - unless you need it really, really badly. |
Difference between switches and routers
If you want to connect a number of network devices together so as to make a Local Area Network (LAN), you need to plug the leads into a switch. The switch allows them all to communicate as though they are all equal to each other. You can plug two switches into each other so that you can have more devices plugged into your LAN. If you want to allow your LAN to connect with machines on another network (say, the Internet), you need a router of some sort. The router uses a list of routes between the 'inner' and 'outer' networks, usually labelled 'LAN' and 'WAN' ('Wide Area Network'). Looking at the diagram, the router needs to know that a machine on your network with an address in the range 192.168.127.1 to 192.168.127.253 can connect through the router to a computer with an address in the range 0.0.0.0 to 255.255.255.255 (excepting the internal address range). So, if your IP camera uploads to a server on the Internet every 20 seconds, the router needs to know that 192.168.127.240 needs to have a route to whatever (say 1.2.3.4). However, whilst the switch needs to know where 192.168.127.10 and 192.168.127.11 are so that they can share files, the router knows that it doesn't pass this traffic out onto the Internet. Usually, certainly in the home-user environment, routers will have one WAN address and anything connecting to the WAN from the LAN will have its headers changed so that it appears to come from the router. Incoming connections are usually all blocked but you can configure it to allow certain ports through to certain IP addresses on the LAN if, say, you run a web server on one of your machines. The reason why some domestic switches are cheaper than others is that their top speed is only 10Mbps. |
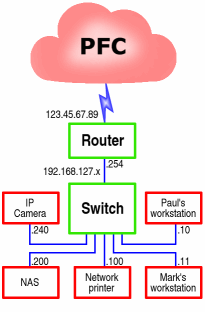 To the
uninitiated, the names of different network devices
(other than things like computers and so on) can be quite
confusing.
To the
uninitiated, the names of different network devices
(other than things like computers and so on) can be quite
confusing.Chaining switches
If you plug one switch into another, you might notice the link speed is 10Mbps instead of 100Mbps or, as in the case on the right, your full duplex light (FDX) isn't on. Clearly, in this case, some limit has been exceeded or the wrong type of wire used. So, what are the limits for networks? Even though 1Gbps cards and switches are appearing now (10Gbps is now a reality but don't hold your breath), most still run at 100 or 10Mbps. For a 100BaseTx network, you are limited to 100 metres of twisted pair (segment length), then a switch, then 5 metres of twisted pair, another switch and 100 metres of twisted pair. So, without using a router, the furthest apart you can have two machines is 205 metres. With 10BaseT, segment length is 100m although with higher quality cable, this can be increased to 150 metres or so. As for the number of segments, if switches are used, you can just keep on adding them until it refuses to work (10BaseT is quite fault tolerant). There is something called the 5-4-3 rule which applies if you uses repeaters instead of switches: you are limited to 5 segments joined by 4 repeaters with 3 segments in between. The reason for this is to keep latency down - switches buffer the traffic. Just in case you were wondering - maybe thinking about connecting up the house using this stuff - the segment length on 100BaseFx (fibre optic pair using lasers) is limited to 2 kilometres so you could wire up the folly at the other end of your country estate. |
 You can
chain switches so that you have many computers connected
but you might enquire about the limits?
You can
chain switches so that you have many computers connected
but you might enquire about the limits?Vista - cascading menus (reclaiming sanity)
Right-click on an empty bit of the task bar and then
click on 'Properties' in the menu that appears. Next,
click on the 'Start Menu' tab and then, make sure that
the 'Classic Start menu' option is selected. |
 Now, when
you use the start menu, you will get your visually
intuitive cascading menus. Now, when
you use the start menu, you will get your visually
intuitive cascading menus.One thing to be aware of is that whilst you are in the 'Start Menu' tab, you can customise the 'Classic Start menu' by clicking on the 'Customize...' button. To this, you can opt to display administrative tools, 'favorites' [sic], expand various resources such as documents, pictures and network connections. Click on 'OK' to finish and then 'Apply' or 'OK' to see how your hard work presents itself. You might as well use all of that screen real-estate and make your menus more user-friendly, after all, menus have a certain transient nature. |
 If you
find that the new Vista start menu is difficult to use
because there is little differentiation between the
levels in the menu display - Microsoft's decision to make
one list is visually confusing but there is a way of
getting something like XP's style of cascading start
menus although you might argue that it is more like
Windows 98SE.
If you
find that the new Vista start menu is difficult to use
because there is little differentiation between the
levels in the menu display - Microsoft's decision to make
one list is visually confusing but there is a way of
getting something like XP's style of cascading start
menus although you might argue that it is more like
Windows 98SE.Secure data erasureSelling old hard drives is the green option but you need to know how effective data erasure programs really are. Gone are the days when deleting a file removed it - in fact, those days never existed. When a file is deleted, its meta information is edited so that the first character of the file name is a '$'. This means that when the OS needs to write to that space, it treats it as unallocated disc space. There are programs that will recover files that have not been written over and just to add insult to injury, even formatting a drive/partition doesn't overwrite the data - it copies the metadata to another part of the drive/partition and creates a new one so once again, the data is recoverable. So, to delete a file properly, you need to write random data to the file's blocks on the hard drive at least seven times and mostly, that works. However, it is important to know when it does not. If you are using FAT, you know where your data is on the drive as long as you don't defragment your drive. Once it is defragmented, it has a fair chance that it is now in at least three places on the drive and you can only find the current location. And that is ignoring the swap file. If you are using Then, there is clever hardware. If your hard drive thinks that there is a bad area on the disc, it will relocate that cylinder so that it is slightly offset. The old cylinder position can still be read and data copied from it but not all of its width can be overwritten. In the diagram, you can see the red cylinder has been relocated to the blue position and is never completely overwritten - no matter how many times it is re-written, the red bit that is left will never be touched. This can be done deliberately at a low level in order
to hide data on a drive so even a forensically prepared
digital copy of such a drive is not valid evidence
because that data will be missing. |
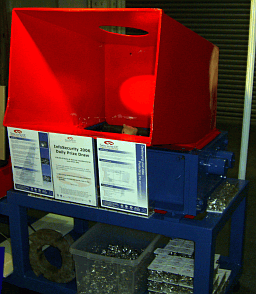 So, if you
want to be sure that no data can be extracted from one of
your hard drives, you need to shred it - the drive, that
is, not the data. So, if you
want to be sure that no data can be extracted from one of
your hard drives, you need to shred it - the drive, that
is, not the data.This is one such shredder. It was at InfoSecurity 2007 at Olympia. This machine did not move during the event - it was
just there to show what it looked like. At the bottom
left, you can see one of the shredding wheels. Inside it,
you can see a teddy. |
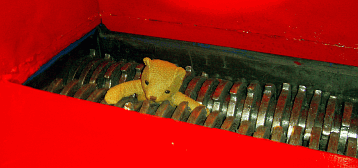 Just for
those with a nervous disposition and a sentimental
streak, the teddy was stuffed into the gaps in the
stationary machine, not pulled into it (screaming). Just for
those with a nervous disposition and a sentimental
streak, the teddy was stuffed into the gaps in the
stationary machine, not pulled into it (screaming).You can see how they mesh together. The hard drives undergo two processes: degaussing and shredding. Here, the whole disk drive (including the cast case)
is thrown in and pulled through and sliced up. |
 This is a
close-up of the final disc. This is a
close-up of the final disc.These parts are no wider than 1.5cm. The surface is stretched, bent, folded and torn and the disc itself has been degaussed. It would be very expensive to recover any of the data that was on there - if there is any trace left. |
 a file system with a journal of some sort
such as NTFS (this uses a partial journal), you might not
know where it is at all because it is written to several
places. More advanced systems also use block
sub-allocation and tail-packing so your program can't
just go overwriting whole blocks.
a file system with a journal of some sort
such as NTFS (this uses a partial journal), you might not
know where it is at all because it is written to several
places. More advanced systems also use block
sub-allocation and tail-packing so your program can't
just go overwriting whole blocks.Network card stats
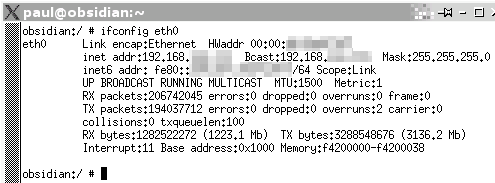
Well, no, the card doesn't crash when the number gets too high, it just wraps around. The number is actually a 32-bit number so the most you will see it is when it is the equivalent of 0xffffffff or 4,294,967,295 - the next byte taking it back to zero. If you run a server, you might like to keep track of it. Typing 'ifconfig eth0' in a console (substituting eth0 as appropriate), gives you the stats for that card so it is fairly easy to construct a little program that reads the information and then saves it, along with the epoch time in a log file. You can then interpret that later on. In the case of Linux, the information is on the eighth
returned line - the bit we are interested in is preceded
by 'TX :'. |
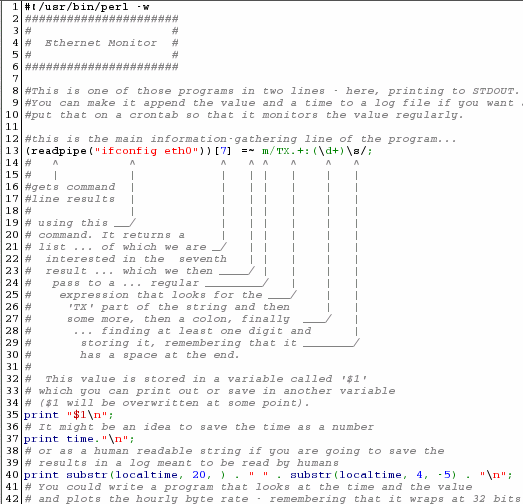 Perl is
the best language for this and you can make it read the
data and store it in a variable called '$1' in just one
line, like so... Perl is
the best language for this and you can make it read the
data and store it in a variable called '$1' in just one
line, like so...(readpipe("ifconfig eth0"))[7] =~ m/TX.+:(\d+)\s/;
...which works like this. We run 'ifconfig eth0' using readpipe which returns a list that can be turned into an array. We want element number seven (remember that the first element in an array is element zero) and we can then bind that to a regular expression match using the binding operator '=~'. The 'm' is optional but the regular expression lies between the two slashes and as Perl scans along the line that is bound to it, it looks for the characters 'TX' followed by at least one other character and then a colon. The brackets make sure that Perl puts what is in them in the variable '$1' and this can be one or more digits. Finally, the next character has to be a space. $1 can then be copied to another variable if required and then you can do what you like with it including save it, along with a time stamp of some sort to a log file which can then be read by another program that interprets the data. You can find the file by clicking here which will open up the directory in a new window. |
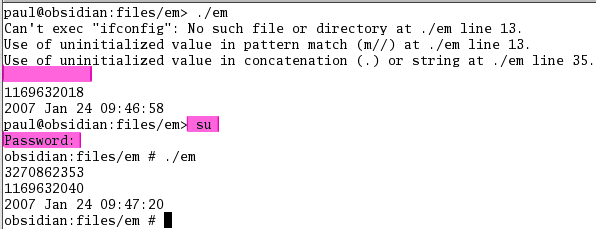 Note that
you need to be root to run this. Note that
you need to be root to run this.You can see that without being root, the program fails because you cannot escalate your privileges like this. If you su to root, it will run all right. |
 You might
use ifconfig occasionally to look at the number of bytes
your Ethernet card has transmitted. You might then wonder
why the most you've ever seen it get up to is around
three or so short billion. So, what happens when it gets
higher? Does it crash and restart?
You might
use ifconfig occasionally to look at the number of bytes
your Ethernet card has transmitted. You might then wonder
why the most you've ever seen it get up to is around
three or so short billion. So, what happens when it gets
higher? Does it crash and restart?Manual (man) pages - examples
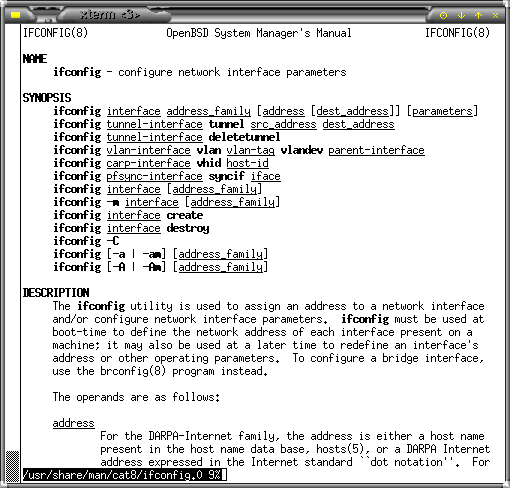
If you are at a console and cannot quite remember how a particular option works or which you need, you might well turn to the manual pages or 'man' pages. These are effectively the on-line version of the system administrator's shelf-full of books, telling him how to use the system. The problem with them is that mostly, they are written for systems administrators and make a lot of assumptions. There is also a glaring hole in them and, for a species that learns best by example, it has to be the examples themselves that are missing. However, there is one OS in particular that has well-written man pages - complete with useful examples. If you aren't afraid to use a console and want to cut your UNIX/Linux teeth on a well-written, secure OS, you couldn't do better than choosing OpenBSD. It is free, non-US (that is to say that its security isn't emasculated by US export restrictions) and updated every six months. If you just want to look at the man pages, go to http://openbsd.org/ and click on the manuals link. On the right, you can see the top of the ifconfig man
page and... |
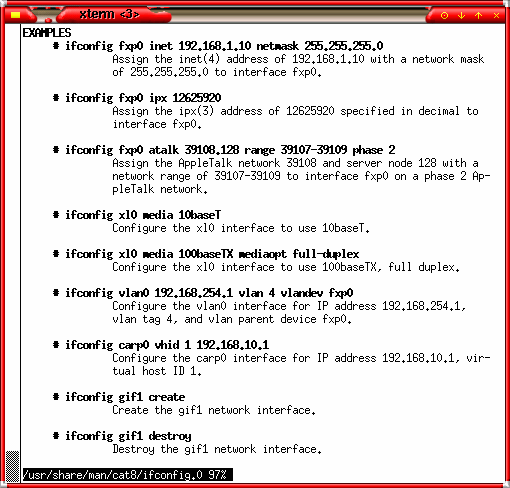 ...here,
you can see examples. ...here,
you can see examples.Yes, examples. There are a lot of similarities between the BSDs and Linux so you might just find what you are looking for on the OpenBSD man pages, even if you are not running OpenBSD. |
 The Manual
pages on UNIX/Linux systems are not particularly
user-friendly but don't be put off by what you normally
see.
The Manual
pages on UNIX/Linux systems are not particularly
user-friendly but don't be put off by what you normally
see.Informative bash prompt
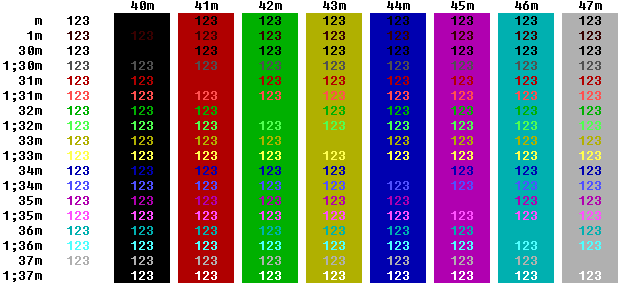
If you have several consoles open at the same time for different machines and cannot remember which is which, you might want to know that it is the workstation you are shutting down and not the server. Or, you might need to know the time or get it to ring the bell each time it has finished a job. You can do this by typing PS1="sequence" where the sequence is a series of characters and escapes. For example, "\h\t \$" will give you the host name up to the first '.' followed by the time in hh:mm:ss format and then a '$' unless you are root which gives a '#' instead. You can use anything, including the exit code for the last command ('\$?'), writing a the clock in the upper right-hand part of the console before moving back down to where the prompt was or just about anything you find useful - or even useless:
If you have a number of different
things to put on your line, you can use the new line
character to give you a clear line for your command. |
||||||||||||||||||||||||||||||||||||||||||||||||||||
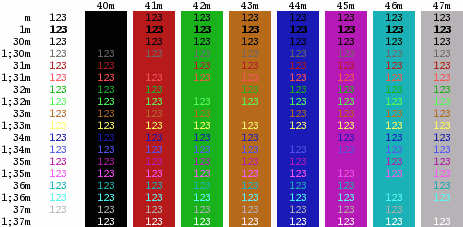 Essentially,
you set a console variable called PS1 to any characters
you like, along with any escape sequences that allow
other text (see above). You can also make it change
colour. To do this, you need to use a string Essentially,
you set a console variable called PS1 to any characters
you like, along with any escape sequences that allow
other text (see above). You can also make it change
colour. To do this, you need to use a string\[\033[X\] where X is one of the following on the right (this is a screen shot of Konsole running under KDE on Linux)... eg 1;36m for bright cyan letters or 44m for blue
background. |
||||||||||||||||||||||||||||||||||||||||||||||||||||
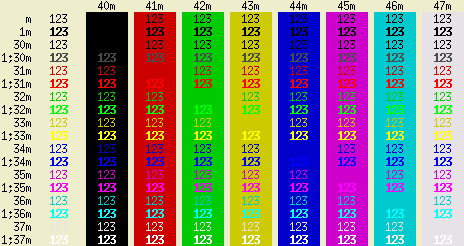
 Here, you
can see that the colours are essentially the same. This
is PuTTY running on a Windows 98SE machine running Bash
remotely over ssh on a SuSE Linux machine. Here, you
can see that the colours are essentially the same. This
is PuTTY running on a Windows 98SE machine running Bash
remotely over ssh on a SuSE Linux machine.Note that
you can put the foreground and background colours in the
same 033 escape command but it is not reliable and you
are better off using separate commands. |
||||||||||||||||||||||||||||||||||||||||||||||||||||
 However,
there are some differences. This is XTerm and apart from
the yellow being orange and the bright yellow being
yellow, in each bright case (the ones with the leading
'1;'), the colour is the same but the font is bold
instead. However,
there are some differences. This is XTerm and apart from
the yellow being orange and the bright yellow being
yellow, in each bright case (the ones with the leading
'1;'), the colour is the same but the font is bold
instead.Once you have your command looking the way you want it, you can save it in your '.bashrc' file. |
||||||||||||||||||||||||||||||||||||||||||||||||||||
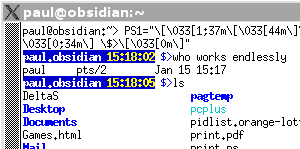
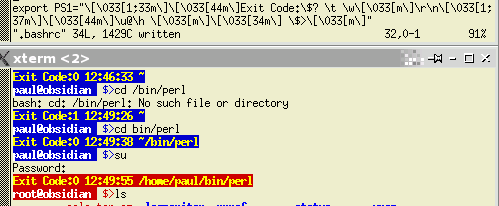 This is it
in use. The top window is everybody's favourite text
editor, 'vi', editing the .bashrc file that is in your
home directory. This is it
in use. The top window is everybody's favourite text
editor, 'vi', editing the .bashrc file that is in your
home directory.Below it is the output that it produces. Note that when the user 'su's to 'root', root's own .bashrc file is used in which the same PS1 string is used, except that it uses red as a background. This is especially useful for reminding you who you are and probably which machine you are on as well (so if you reboot, you know that you are doing it to the workstation and not the server). If you want to cut and past this code into the command
line so that you can see what it does, without first
committing it to the .bashrc file (and then, you can use
[Up] to bring it back and edit it), here it is... PS1="\[\033[1;33m\]\[\033[44m\]Exit Code:\$? \t \w\[\033\[m\]\r\n\[\033[1;37m\]\[\033[44m\]\u@\h \[\033[m\]\[\033[34m\] \$>\[\033[m\]" ...and here is the version for root... PS1="\[\033[1;33m\]\[\033[41m\]Exit Code:\$? \t \w\[\033\[m\]\r\n\[\033[1;37m\]\[\033[41m\]\u@\h \[\033[m\]\[\033[34m\] \$>\[\033[m\]" Just remember that in the .bashrc file, use export so the start of your line looks like this... export PS1="\[\033[1;33m\]\[\033[44m ... If you decide that you don't like the look of what you have done and want to go back to your original prompt, just delete the PS1= line in the .bashrc file. |
 Most
people will never change their default console prompt
settings simply because they don't need to - 'if it ain't
broke, don't mend it.' However, sometimes you need a more
informative bash prompt.
Most
people will never change their default console prompt
settings simply because they don't need to - 'if it ain't
broke, don't mend it.' However, sometimes you need a more
informative bash prompt.UNIX and Windows times
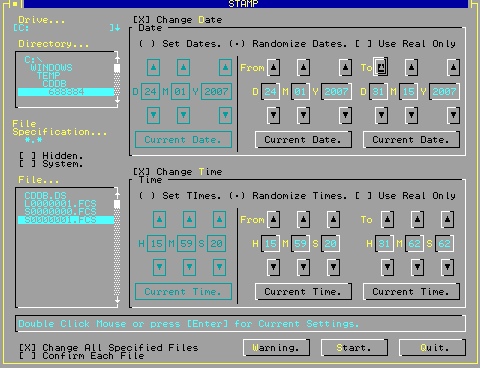
UNIX time counts in seconds from midnight on 1st January 1970 - taking into account a few leap seconds here and there by ignoring them. This is stored in file system meta-data and in other places as a 32-bit, signed integer, allowing for around 68 years before roll-over although we should all be using 64-bit by 2038. As a result, all values from 0..0x7fffffff are valid. The program on the right is a VBDOS GUI timestamp
editor that I wrote in late 1994. It has the option to
use only real dates or, as you can see on the right,
create dates that would be impossible in real life
without a major change in the calendar as we know it. |
|||||||||||||||||||||||||||||||||||
On Windows FAT systems, file time is broken down in a
similar way to BCD.
Normally, the number of seconds is not
displayed in directory listings so the fact that they are
all even is never exposed to the normal user. |
|||||||||||||||||||||||||||||||||||
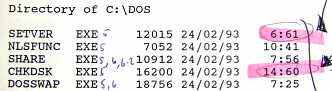 However,
out-of-range Windows time stamps have been used in the
past as forensic evidence demonstrating the use of an
incompetently written time-stamp randomiser. This one, on
the right was produced at the end of 1993 and displays
classical timestamp randomisation without bounds
checking. However,
out-of-range Windows time stamps have been used in the
past as forensic evidence demonstrating the use of an
incompetently written time-stamp randomiser. This one, on
the right was produced at the end of 1993 and displays
classical timestamp randomisation without bounds
checking.Normally, the date stamps in a DOS system directory all have a time that represents the version of the OS such as 5:01. Here, they have been randomised although the file length gives away the version so clearly hiding the DOS version was not the motive. |
 Knowing
how Windows and UNIX epoch times are stored can help
highlight problems with time stamps and remember, even
though separated only by a decade, UNIX and Windows times
are stored completely differently.
Knowing
how Windows and UNIX epoch times are stored can help
highlight problems with time stamps and remember, even
though separated only by a decade, UNIX and Windows times
are stored completely differently.