PC Plus HelpDesk - issue 221
This month, Paul Grosse gives you more insight into
some of the topics dealt with in HelpDesk
|
 |
HelpDesk
Transposed colour Infra red with Digital Cameras
|
||||||||||||||||||||||||||||||||||||||||||||||||||||||||||||
 This is the
camera looking at the near infra red from a
garden incinerator.
This is the
camera looking at the near infra red from a
garden incinerator.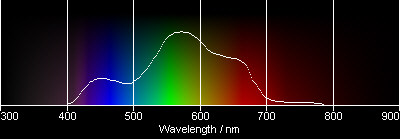
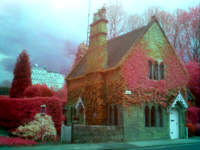 the ability
to see into the near infra red region of the
spectrum and record it, we can take some
interesting photographs like the one of the lodge
on the right.
the ability
to see into the near infra red region of the
spectrum and record it, we can take some
interesting photographs like the one of the lodge
on the right.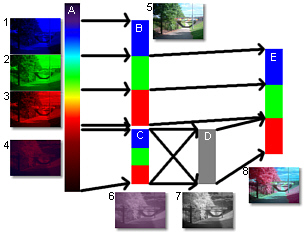

 700-600nm. The following
three images are the three layers of the colour
photograph.
700-600nm. The following
three images are the three layers of the colour
photograph. 600-500nm. This is the
green layer. Note that the leaves on the trees
are brighter in this layer and also that the sky
is getting progressively lighter as we go through
the layers.
600-500nm. This is the
green layer. Note that the leaves on the trees
are brighter in this layer and also that the sky
is getting progressively lighter as we go through
the layers.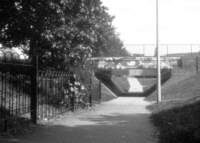 500-400nm. This is the
blue layer. The sky is very bright and, no doubt,
if we carried on with the UV, it would be
brighter still. The brightness of the sky is due
to dust particles that interfere with the sun's
light, effectively filtering out the blue light
from the direct image (why the sun looks
yellowish) and adding that light (remember that
it is scattered and not absorbed) to the rest of
the sky. We have not got a yellow sun, we have
got a white sun that looks yellow when the blue
light is scattered.
500-400nm. This is the
blue layer. The sky is very bright and, no doubt,
if we carried on with the UV, it would be
brighter still. The brightness of the sky is due
to dust particles that interfere with the sun's
light, effectively filtering out the blue light
from the direct image (why the sun looks
yellowish) and adding that light (remember that
it is scattered and not absorbed) to the rest of
the sky. We have not got a yellow sun, we have
got a white sun that looks yellow when the blue
light is scattered.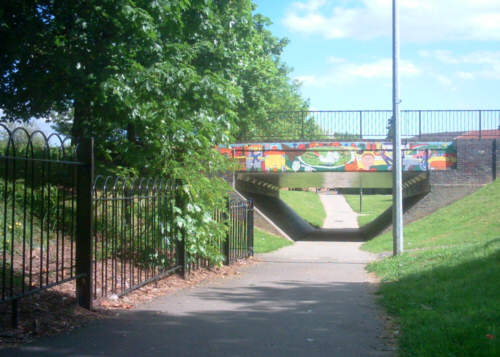
 900-500nm. This is the
colour shifted photograph, using the IR, R and G
layers and putting them into the R, G and B
layers that we can see so that we can visualise
it.
900-500nm. This is the
colour shifted photograph, using the IR, R and G
layers and putting them into the R, G and B
layers that we can see so that we can visualise
it.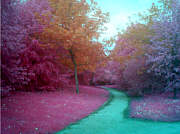 As you can see from the above
composite examples that grass is a nice magenta
and so are the trees. However, there are trees
that do not reflect as much green such as copper
beeches. In this shot, we see a number of
different types of tree and the orange ones are
the copper beech (deep red and IR make orange).
As you can see from the above
composite examples that grass is a nice magenta
and so are the trees. However, there are trees
that do not reflect as much green such as copper
beeches. In this shot, we see a number of
different types of tree and the orange ones are
the copper beech (deep red and IR make orange).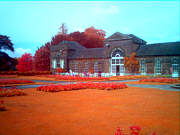 This is the Orangery in
Markeaton Park in Derby. It is called that
because the buildings used to be used to grow
oranges, not because of the way its young grass
(this was taken in May) shows up in IR
composites.
This is the Orangery in
Markeaton Park in Derby. It is called that
because the buildings used to be used to grow
oranges, not because of the way its young grass
(this was taken in May) shows up in IR
composites.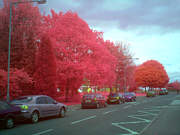 When I was researching
this for digital cameras, I went around, taking
shots of all types of things and chose this
because of the different types of trees in it.
However, there was an unanticipated result in
this.
When I was researching
this for digital cameras, I went around, taking
shots of all types of things and chose this
because of the different types of trees in it.
However, there was an unanticipated result in
this.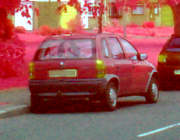 However, whilst in
visible light, the car looks as though it has a
fairly uniform paint finish (you cannot tell any
difference between parts of it) in IR, a
different story is revealed.
However, whilst in
visible light, the car looks as though it has a
fairly uniform paint finish (you cannot tell any
difference between parts of it) in IR, a
different story is revealed.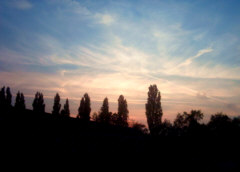 So, we have seen how shifting the
colours along by one can effectively bring things
that are merely very hot into the extremely hot
range and also make the world around us look
weird. So, what does this do to our already
colourful sunsets? There's only one way to find
out...
So, we have seen how shifting the
colours along by one can effectively bring things
that are merely very hot into the extremely hot
range and also make the world around us look
weird. So, what does this do to our already
colourful sunsets? There's only one way to find
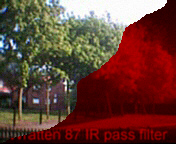
out...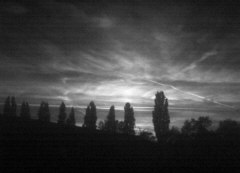 This is the same sunset, taken a few
seconds later using the Wratten 87 filter
This is the same sunset, taken a few
seconds later using the Wratten 87 filter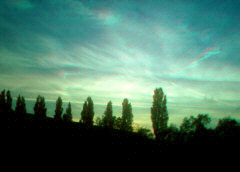 This is the IR-R-G > R-G-B
composite. You know from your own experience that
as the sun gets closer to the horizon, the
overall light balance shifts towards the red.
This is the IR-R-G > R-G-B
composite. You know from your own experience that
as the sun gets closer to the horizon, the
overall light balance shifts towards the red.Novelty CDR dish
First of all, if you are going to try this, make sure that you both own the oven and that you are the one that uses it for cooking - if you decide to try this, you do so entirely at your own risk. Having made sure that the kitchen windows and door are open and that any doors into the rest of the house are closed, set the oven to gas mark 6. Put a clean, dry plant pot with a small base (2.5 to 3cm) upside down on a clean baking tray. Place the CDR on it and when the oven as got up to temperature, place the baking tray, complete with plant pot and CDR, on a shelf in the middle of the oven. Leave it there for five minutes and then check it. It should have started to droop by then and if your oven is set a little on the hot side, you might find that it is already done. If not, leave it for a few more minutes. Once it is ready, take it out of the oven and let it cool down, noting how long it took for your oven. Once it has become rigid enough, you can put it under a cold tap if you want to. Don't put the plant pot in the water or you might crack it. You might notice the smell of hot plastic but remember that you should have the kitchen well ventilated and that you are not even melting the plastic, let alone burning it so the smell you have is similar to the one in the pressing plant where local exhaust ventilation is all that is used (a plastic injection moulding plant that I worked on for a while didn't even have that). With your new, novelty dish with some kitchen towel in the bottom you can put some peanuts in and it will be the talking point of the LAN party. |
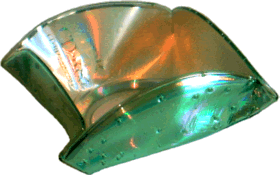 This
is one thing that you can do if your burning activities
go amiss - one step further on from just using them as
coasters. It is based on the widely publicised activity
that many children did with vinyl records in the 1960s
and 70s using a flower pot and an oven - there is nothing
new here, it is just brought up-to-date in the age of the
CD.
This
is one thing that you can do if your burning activities
go amiss - one step further on from just using them as
coasters. It is based on the widely publicised activity
that many children did with vinyl records in the 1960s
and 70s using a flower pot and an oven - there is nothing
new here, it is just brought up-to-date in the age of the
CD.Spam-bot honey potSpammers have to get their spam out through somewhere and with known open mail relays being isolated, they have to comply with the rules for other relays. This usually involves making sure that a certain proportion of mails are not bounced and if someone is monitoring the amount of bounces, sending something that is not spam is the only way to ensure it. This is why we get mails that are either empty or have some piece of (formerly) genuine text in which the spam filters will not be able to filter out: send 20,000,000 mails of which 10,000,000 contain no spam and you automatically have a 50% non-bounce success rate with the mail relay. Of, course, this depends upon the mail addresses all being real ones. If the list has been poisoned with false email addresses, they will all bounce, reducing the proportion regardless of the nature of the content. So, how can we poison the email lists? We know that email address list compilers use spiders to work their way around the Internet, looking for mailto: strings in web pages or even joe (at) bloggs (dot) com is not clever enough nowadays. So, all we have to do is provide them with a web page or twenty, filled with bogus email addresses. If you have a website, but do not use that IP address for mail services, you can have a few pages of dedicated email links that are all false. You can stop genuine search engine spiders from looking at them by using the robots.txt file - something that a spam-bot might use to point it in the right direction. When the spam-bots spider your web pages, they will pick up on all of these addresses and think that they have hit gold. All you need to do is have a convincing looking set of pages that look like they are a directory of company employees or customers that the spam-bot can see. Obtaining name listsHow do we make one of these? First of all, we need some names. There are various lists of first names and last names on the Internet that you can download - just type 'first names list' and get the results. Some of these have the frequency next to them so that instead of the same unlikely name popping up with the same frequency as common names ('John' appearing the same number of times as 'Shula'), you can use the frequencies to change their probabilities of being selected. If you get a combined list of boy's and girl's names, you can copy the table into a spreadsheet which will put them into columns for you. You will then be able to highlight the columns you want for each list (male/female name + frequency) and paste it into a text editor, then saving it as a text file. Using the listNext, you need to write a program that will use these names to create email addresses. With frequenciesIf you have a list with the frequencies (these are usually census data with the empirical frequency next to each name), you can write a program that will first of all, load up the names into an array (this can be done with male and female names in the same array if you want equal distribution) of the form [string][longinteger], add up the frequency totals and then choose random numbers between 1 and the total (or 0 and the total-1 if you are doing it that way). Next, start at the second long integer value and add the previous long integer to it, storing the result in the second long integer array element. Thus... Before... John 5467 Fred 4629 Chris 3761 ...and after... John 5467 Fred 10096 Chris 13857 So, if the last number was 120,000, choose a number between 1 (for the first of the first name) and 120,000. If our random number is 12,642, this represents 'Chris' in our example because the end of the Freds is at 10096 and the end of the Chrises is at 13857. You can speed up a search of a thousand names by using successive approximation where you start in the middle and if it is higher, you go to the middle of the upper half and so on. As these numbers are skewed, you might find that you can get quicker results if you choose a different starting point for each iteration if the computer time is that important to you. Without frequenciesYou just need to load up the names into an array and then choose them. If they were compiled by frequency (ie, is not an alphabetical list), you can skew the probabilities by using a function of the random number. Next...We now have a list of names that we can pluck proper sounding names from. Next, we need to make them into email addresses. Email addresses come in a number of formats when used by corporations which include:
These can be with or without the dot in the username part of the address. As for a company name, you can register a free domain name on a permanent basis (ie not temporary) and point it at your firewall (note that at the beginning, I said that you should use an address that does not use mail services - this is because your firewall will reject the mail traffic but the domain name will turn out correct. To get around this, the spammers will have to check that a mail server exists at that address which, no doubt will be the next battle in the war. Finally...We need to turn these into a web page. So, in your program, configure it to... load up the name files # ie check that it is going to work
write an html header # top of the page including
# <head> and so on, leading into the body
# with the top of the page
generate a reasonable number of mailto: links
write the footer # possibly with links to other
# honeypot pages
tidy up.
If you add a line to your robots.txt file that says that spiders shouldn't look there, then, if they use that, the will go straight there. If you want them to get there anyway, you can put an invisible link on your page (small white text on a white background) and then word it so that anybody who stumbles across there by mistake knows not to use them. |
HelpDesk Extra
SpreadsheetsBasicsThe cells are all given a letter and a number to reference them. A1 is in the top left and, depending upon the size of your program (version or memory dependent) the bottom right could be Z255, BA8191, ZZ65535 or whatever. Interestingly, spreadsheets work by storing cell contents in a database rather than storing the whole sheet as an array. This means that if you have 2 cells occupied, it should not take up a significantly different amount of memory whether they are in A1 and B2 or in A1 and ZZ21436 (or anywhere in the vicinity of ZZ9 Plural Z Alpha for that matter) Spreadsheets need to know what type of input they are looking at so that they know how to render it and how to process it.
since Abacus on the Sinclair QL, the emphasis has changed so that users now can just type text implicitly, having to use a special character to use a function. In OOo Calc, only the beginning of the cell entry needs the '=' so if you had =IF(VLOOKUP(E3;D8:F31;3)>7;SUM(A9:A26);K15), only the first function needs it. Number FunctionsThere are many number functions and, excluding the statistical functions, they are as listed below... ABS, ACOS, ACOSH, ACOT, ACOTH, ASIN, ASINH, ATAN, ATAN2, ATANH, CEILING, COMBIN, COMBINA, CONVERT, COS, COSH, COT, COTH, COUNTBLANK, COUNTIF, DEGREES, EVEN, EXP, FACT, FLOOR, GCD, GCD_ADD, INT, ISEVEN, ISODD, LCM, LCM_ADD, LN, LOG, LOG10, MOD, MROUND, MULTINOMIAL, ODD, PI, POWER, PRODUCT, QUOTIENT, RADIANS, RAND, RANDBETWEEN, ROUND, ROUNDDOWN, ROUNDUP, SERIESSUM, SIGN, SIN, SINH, SQRT, SQRTPI, SUBTOTAL, SUM, SUMIF, SUMSQ, TAN, TANH, TRUNC. Many of them are self-explanatory and for those that are not, there is the help, either on the spreadsheet itself or as the extra help files that come with the program. String FunctionsThe string (text) functions are pretty similar to those that you will find in any high-level programming language They are... ARABIC, BASE, CHAR, CLEAN, CODE, CONCATENATE, DECIMAL, DOLLAR, EXACT, FIND, FIXED, LEFT, LEN, LOWER, MID, PROPER, REPLACE, REPT, RIGHT, ROMAN, SEARCH, SUBSTITUTE, T, TEXT, TRIM, UPPER, VALUE. Conditional ExpressionsConditional expressions (ie IF) allow you to use the output of an expression that can be evaluated in logical terms (whether something is equal to something else (or greater than, less than and so on) and giving the contents of that cell accordingly. These can also be nested and mixed with other functions allowing things like =IF(VLOOKUP(E3;D8:F31;3)>7;SUM(A9:A26);K15). Double Entry BookThe double entry book spreadsheet that is in the magazine can be found for Lotus 1-2-3 97, MS Excel and OOo Calc in the files directory which you can enter by clicking here. In this version, the months have been typed in manually but if you want to try out the method described in the magazine and then change the language, you can see what happens. Caesar and Horst FeistelThis is about ROT13 (one of the text (string) functions). ROT 13 is a Caesar cipher where each letter is displaced by an offset - in this case 13. A Feistel network shifts bits around to encrypt data. There is more about Horst Feistel on the Internet FilesYou can find the files for this month's work in the files directory which you can enter by clicking here. |
|||||||||||||||||||||||||