Paintings look better in a frame - even paintings that go over the edge, onto the side of the canvas, look better in a tray frame. The value that a frame adds to the look of a painting - whether it is for sale or not - by far exceeds the cost of the frame itself. So, what are the options with frames?
There are a number of options that you can choose from:
1. Ready-made frames.
Swept frames.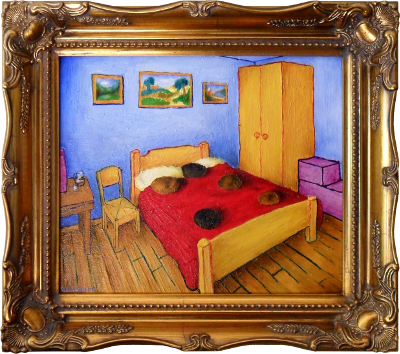 These can be simple: like the sort of thing you
might buy in a supermarket for framing a
photograph; or, they can be as ornate as you
like - the disadvantage to this is that you
are rather limited for choice in size and style.
The one here is a commercially available 10"x12" (25.4x30.5cm)
and cost around £35.
2. Frames made from commercial mouldings.
Double frames with gilded inner frame.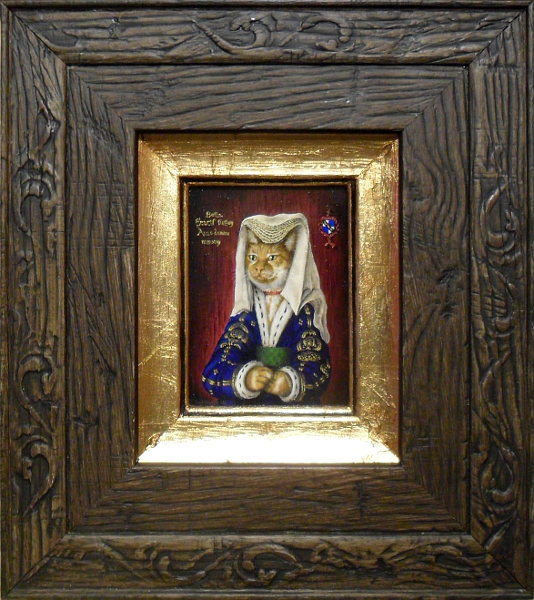 Online, you select the moulding that you want
and the supplier can either make the complete
frame for you or you can buy the lengths ready
cut (a 'chop service' or mitre them yourself
from the original lengths) and then underpin
them yourself. This allows you to put a frame
within a frame if you want and gives you a great
deal of choice although you are still limited to
the 'currently fashionable' mouldings and you are
usually stuck with minimum order quantities that
can be enough for anywhere between five and twenty frames.
The frame above is made from lengths that I mitred
and underpinned myself - a 2.125" (5.4cm) brown
patterned driftwood framing a 1" (2.54cm) oak
spoon (cavetto) with gold leaf around a 3"x4"
(7.5x10cm) miniature on panel - some chop services
don't go this small.
3. Carve your own mouldings
Silled frames hand-carved from oak.
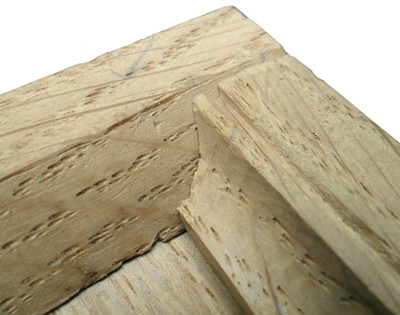 This is one corner from a real silled frame. You can see how the way that the sill forms part of the joint means that the shape of the moulding works perfectly at the joint.
This is carved completely from rectangular cross-section wood without any rebates or anything. Moulding, grooves for the panel and the joints in the corners are all hand carved.
However, we can't always have the luxury of being able to carve all of it, sometimes you can only create the impression of that the corners are cut like this...
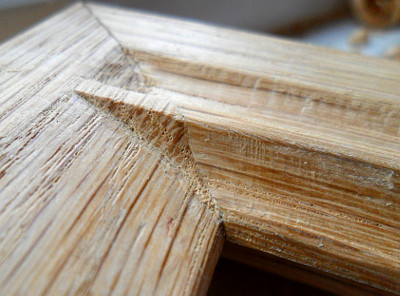 You can take a 'blank' moulding - one that is fairly
featureless - and carve it yourself using your own tools.
In that way you can make a frame that is totally non-
standard or one that conforms to standards that are not
current such as the silled frames that existed up until
roughly half way through the fifteenth century.
This frame is a double cavetto with sloping, flat bottom
sill, made from 35mm unfinished flat oak that is 20mm
deep with a 12mm deep rebate, giving 8mm depth. The
supplier had already mitred it so I couldn't do a lap or
other joint with it. The reason that the corner between
the flat sill and the sight-edge curve looks curved is
that it is a planear cross-section of a cylinder which,
of course, is an elipse.
It is this last example that I am going to cover here because it is the
most interesting to do and to look at - limiting the front-facing moulding to manufacture using only the tools (or modern analogues) that were available
600 years ago: a plane; a gouge; and, a chisel. I used a modern drill because I couldn't get hold of one that was the same as what was around 600 years
ago but there are no nails used in the frame itself - it is held together with oak dowels and glue.
Hand-carving from a commercial 'blank' profile
Tools used
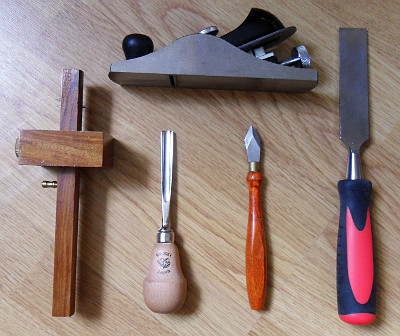 These are the tools I used for carving the wood. On the top: a plane, set with the cut very small because I was cutting into oak, and on the bottom, left to right: Mortise gauge; 8mm gouge; Marking knife; and, a 25mm chisel. The marking knife has a short, thick blade that comes to a point and is good at cutting right into sharp corners.
Frame component profiles
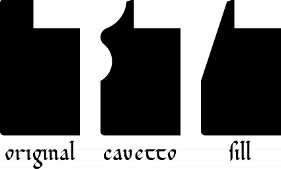 The first profile is the solid oak moulding that I started from - a cross section of 20mm deep by 35mm wide. it has a rebate that is 12mm deep giving an 8mm sight edge to the frame which is just about right for what is going to happen to it. The wood itself is not treated at all so no wax or oil to mess things up. The second and third profiles are what is going to be made from this wood with the flat, sloping sill being the sort of thing that went at the bottom of a frame up until around half way through the 15th century - the idea being that the frame joins the inside of the room with an alternative universe which in this case is whatever the painting is about or, in the case of a normal window, the outside world. By looking like a stylised window frame, it enhances the illusion.
Securing the rails and stiles - no nails
Pre-mitred mouldings supplied
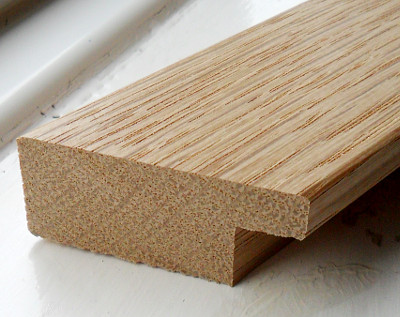 Like all chop services, the mouldings were sullplied pre-mitred so that all I would have to do was to butt-join them to make them into the frame. With softer woods, this is done by underpinning the joint using 'V' nails which are the little 'w' shaped clips that hold the corners together. These are put in using a machine but there are two reasons why not to use this method of making a joint: firstly, it is oak and too hard to underpiin manually without a machine that would need its own workshop; and, secondly, there was no such method 600 years ago.
Fixing methods
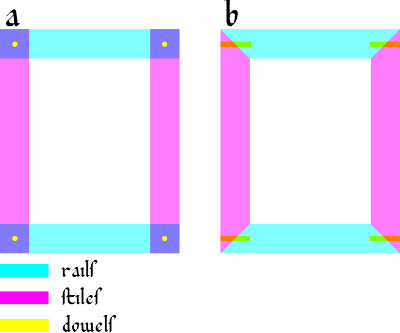 However, a glued butt joint is not very strong and six centuries, ago, they would have made a lap joint or a mortice joint and pegged it with wooden pegs like in 'a' or, a clever joint that is one of the two but where the face and internals of the joint are shaped differently say 45 degree cut at the front between the stiles and the upper rail but with a different cut between the sill and the stiles - one that lays the profile of the stiles over the sill. Here however, I haven't got the luxury of having been supplied mouldings that are square-ended so I can't play around with that but I can still strengthen the butt joint with dowel by going in from the side 'b' - still no nails but strengthened with dowel.
Oak dowels
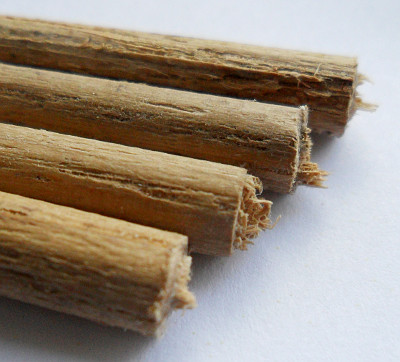 Here are the 6mm oak dowels that I used - the diameter of the dowels used in the Van Eyck self-portrait are around 6mm so this is about right. You can see the Van Eyck self-portrait for yourself in the National Gallery.
Cutting the Mouldings
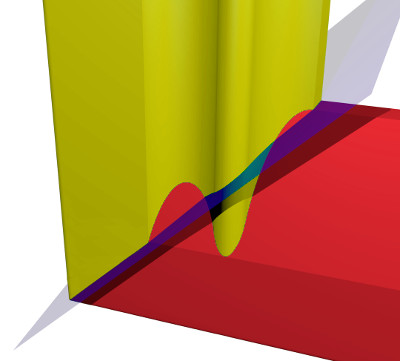 Here is how the plane of the 45 degree cut from the chop service interracts with the required surface, showing why you can't just extend the cut to
the end of the moulding. You can see that the profiles both extend beyond the mitre cut so we can't just cut up to the end of the moulding, we are
going to have to do that bit when it is all stuck together.
If instead, we had the opportunity to use mortice and tennon or lap joints,
we could just extend all of the mouldings to the end and for the top rail/stile joints, use a mitre and for the sill/stile joints, extend the
profile of the sill into the joint just like they did six hundred years ago.
Looking back in hindsight, I would have ordered the
chop-service mouldings so that they were longer by twice the width of the moulding and then make all of the joints myself or better- just order
the plain, rectangular cross-section wood and then instead of having a rebate, cut a groove for the panel.
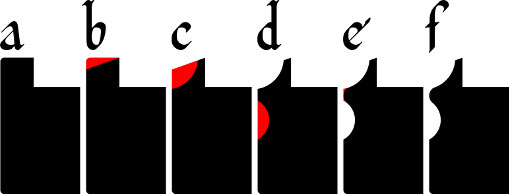 Next, we are going to cut the profiles of the mouldings:
- This is the cross-section of the moulding as it was received from the chop service - face on the left.
- Start off by marking out on the face, the distance from the sight edge for the chamfer then remove it. This feature is common to all of the mouldings so it can go right to the edge all all off them.
- Next, mark out on the face the depth of the first cavetto contour and then remove it all the way along the top rail and from the top down to around a couple of centimetres from the bottom of the stiles
- Then, mark out and remove the next cavetto contour, limiting its extent in the same way.
- Finally, remove the sharp corners from the 2mm-wide bit of face between the two cavetto profiles.
- This is the final profile for the top rail and the stiles.
Sill Cut-Order
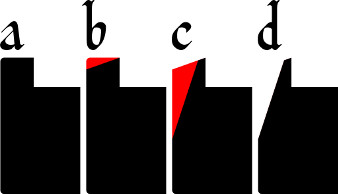 Now, for the sill.
- Again, this is the cross-section of the moulding.
- First, mark out on the face and remove the chamfer - along the fill length of the sill as it is common to the sill and the cavetto profiles.
- Next, mark out the sill chamfer. This needs to reach across the face as far as the cavetto profile did across the cavetto profile so that at the
corners where the two profiles meet, they match up correctly. However, you cannot extend it to the ends of the rail because at the corners, it meets the other profile. That is gonig to have to be completed after the frame has been assembled
- This is the final sill profile.
Gluing the rails and stiles
Making the glue
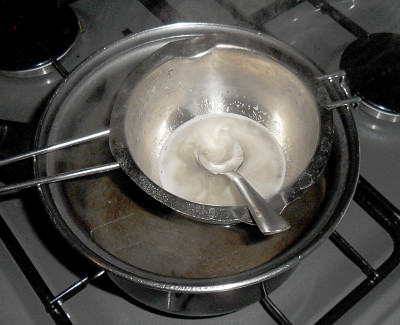 Next, we need to make some glue. For this, we'll use 4g of powdered Acacia resin with 3g of acacia honey and 10mls of water. Mix them all together
and then place over a pan with some hot water in it.
In this way, it won't get so hot that it starts to decompose and will remain strong.
Watching the temperature
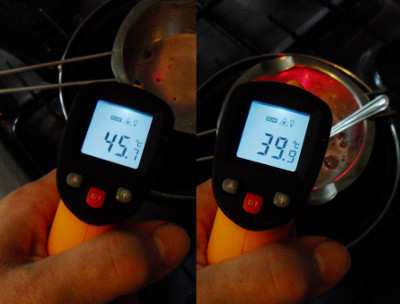 Here, you can see me using an infrared thermometer to display the temperature of the water and the glue.
After around half an hour, it goes clear and you can filter it through a piece of muslin cloth to get out any bits.
Holding it together
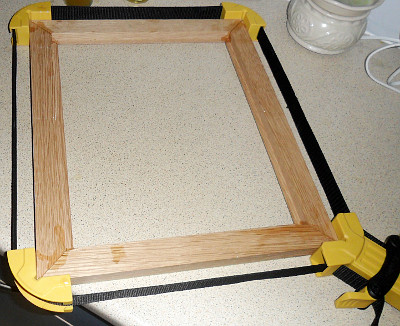 Brush on the glue to all eight ends and then, on a flat surface, position them so that they are as good as you can get and put them in
a device that holds them in place whilst the glue sets solid but before you leave it...
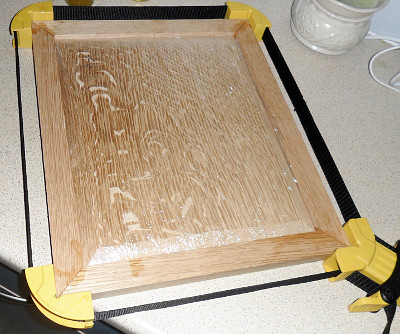 ...put the panel into the rebate (wrap the edges with clingfilm so that they don't stick) so that we know that it will fit.
Once the glue has hardened and the panel and the clamps have been removed, carefully drill the holes and glue the dowels in place, finishing off with the marking
knife to get a nice flat finish.
Finishing the carving between the cavetto stiles and the sill
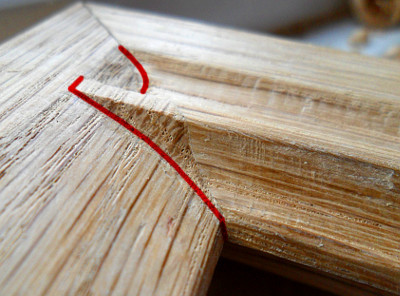 You can see here, how the two profiles meet up and all that has to be done is extend the existing profiles from the sill and the stiles so that they meet
each other to form the intersection that is determined by their shape and not by the mitre. Remember that the mitre is not going to be seen once the
painting is covered with paint.
Use the marking knife to get nice sharply defined internal corners.
Incidentally, it is at times like this where oak really comes into its own because you can make nice fine cuts with this stuff that softer woods would not allow you to do as they would just splinter.
Sizing the frame
Making the Size
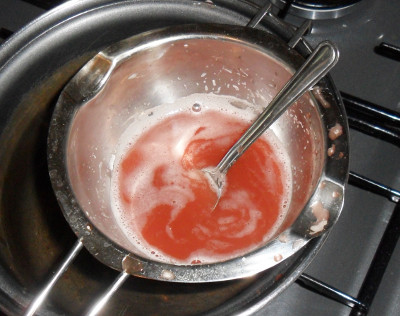 This is the same mixture of gum Arabic and honey as before but it has around four times as much water in. The purpose of this is to sealed
the porous wood so that things can be painted on the surface of it and anything in the paint that is mobile will stay with the paint and not
soak in.
If a liquid that binds the pigment soaks into the wood instead of staying on the surface, it leaves a weakened paint on the surface
which, apart from not being as strong, can be weak enough to either fall apart or separate from the surface it was painted on.
In this case, the red bole is there so that you can tell where it has been painted and when you have something like this, it is very useful.
Painting it on
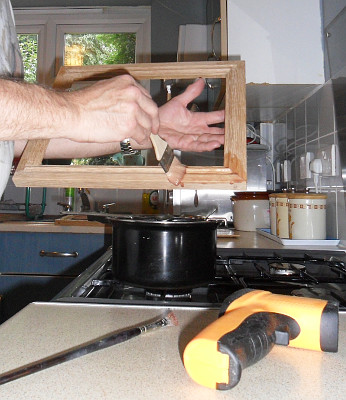 Here, you can see me painting the frame with the
size from above. The pink appearance means that I can tell where it has been painted - apart from that it is pretty straight forward.
The thing to note in this picture is that the wall fixture has been attached and I am bracing my hand between the cord and the frame
itself. This allows me to have a firm grip of the frame which makes the exercise a lot easier.
Applying first coats of Gesso
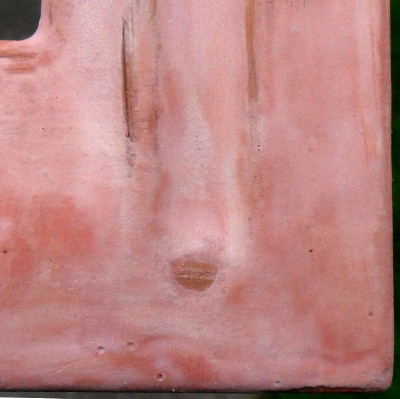 Make up some of the glue mixture and add some red bole and chalk to it so that it is pink. This is your first coat. Paint it
on fairly evenly and let it dry.
Subsequent Layers
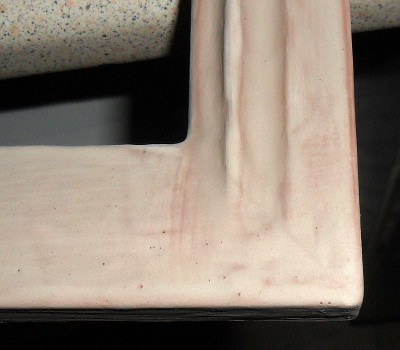 Now, make up some normal white gesso and paint on as many layers of that as you think is necessary, letting it dry out each time.
When you make up the gesso, try not to get any air bubbles in it as these will stay in there (although you can filter out most of
them by using some muslin) and when you paint on the gesso, they will dry in there.
Final sanding
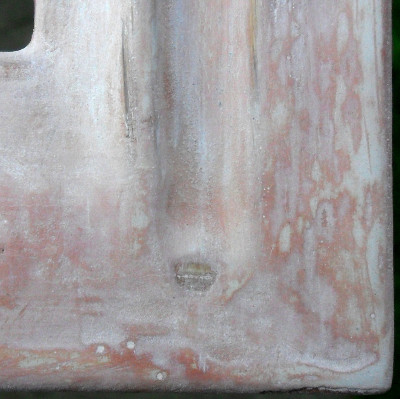 Finally, sand it down so that the contours that you want come through the way you want them to. You will notice any bubbles that have
stayed in there as they will turn into little craters that need filling with something.
When you are sanding, you might notice that the surface turns pink if you take off too much. Don't bee too worried about seeing this - it is just letting you know that that is the last layer of gesso before you hit wood.
One thing to remember is that the first layer of gesso you put down had an irregular surface (as did all of them but subsequent layers fill in the depressions left by previous layers) so if you do see some pink showing through, don't worry about it. The job of the gesso is to even out the surface, not make the frame heavier.
And there you have it. Next thing is to paint it and varnish it. To finish it off, get some 'rotten earth' in some water with a little bit of acacia gum in it and paint it on then wipe almost all of it off. This will dull the glossy varnish surface and will also 'age' the frame.
All images and original artwork Copyright ©2017 Paul Alan Grosse.