Miscellaneous Knowledge & Cheats
Understanding of how to make things easier and how things work.
On this page you will find...
Knowledge:
Cheats:
Cheats :: ingredients to make things easier
All of the way through this, I have used, and have urged you to use fresh ingredients. If you work on the principle that the only place where food should be processed is your own kitchen (as far as possible), then you are in the best position.
 | Buy in bulk, mince and then freeze,
taking what you want, when you need it. |
However, it might not always be possible to do this, and there are some ingredients where having something that is already prepared can save you a lot of time - both in terms of food preparation and in terms of storing ingredients that you only occasionally use.
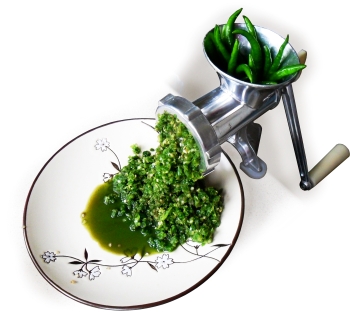
- Chillies - you can use an ingredient like the Mr Naga pickle or, you can buy frozen blocks of chillies that have been ground down - just defrost and add.
Alternatively, you can buy a large quantity of long green chillies, process them yourself (mince or chop) and freeze them into blocks or into a thin slab that you can break bits off.
- Turmeric root - buy turmeric root, wash it and cut it into sections around 5mm (¼") thick. Press them through your strong garlic press, put the pressed turmeric and the juice that is generated into an ice cube tray or into a sealable plastic freezer bag - squashing it down to around 5mm thick - and freezing it. When you need it, just take a cube or break off a bit of the frozen sheet, defrost it and use it in the mormal manner. Using turmeric you have prepared earlier in this way makes it a lot more convenient both for access to the resource and also in terms of cleaning it up afterwards - you only have to do that once, when you freeze it.
- Ginger - you can buy ginger paste in bottles or you can buy frozen cubes of it, just like the chillies above. In addition, you can mince your own and freeze them.
- Galangal - Like the ginger paste above, you can buy galangal paste in bottles from the Chinese supermarket. Also, you can mince your own and freeze them to make cubes.
- Garlic - As above, you can buy garlic paste in bottles or you can buy frozen cubes of it. You can also mince your own and freeze them.
- Coriander leaf - you can buy this as a paste in jars from the local Chinese supermarket or you can freeze your own. Freezing will damage the cells in the leaves and assist in releasing the flavours and scents when you cook with them - freezing will lock in the volatile scents and flavours of the leaves. Like the ingredients above, you can mince them yourself and freeze it into a thin slab, ready for inclusion in parathas and so on.
- Spinach (palak) - you can buy tins of this and also, you can buy frozen briquettes of it from the local supermarket - just defrost and add as much or as little as you need.
and so on.
Knowledge :: Spices/flavours :: when to add them in cooking
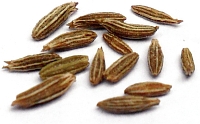 | Jeera seed - hard as bullets and needs
a high temperature to change flavour. |
The flavours that we use in cooking come in a variety of forms: some prefer to dissolve in oil rather than water; some are very volatile and others not.
Subjecting a delicate flavour to too much heat will degrade it but other ingredients need to be heated to quite a high temperature in order to work properly within the meal.
It makes sense to start off with the highest temperatures and work downwards so you need to have a feel for what needs to go into a meal and when.
Generally, the small seeds like jeera, coriander seed/powder, mustard seeds, black onion seeds, black cumin and sesame seeds can take a lot of heat.
In addition, hing - asafoetida - is a resin that needs to be treated with a lot of heat in oil in order to get it to dissolve - adding it in a cooler stage of cooking will not let it dissolve and it will be wasted.
At the other end of the scale, obviously delicate ingredients such as coriander leaf will be damaged by too much heat and garlic needs just the right amount of heat treatment in order to taste correct - too early (hot) and it will burn, too late (cold) and it will still have a raw taste. This is one of the reasons why it is not a good idea to buy tinned chopped tomatoes with garlic added to them - the tomatoes cook at a temperature that is lower than the temperature needed to cook the garlic so you cannot control how it tastes (the other is that it is possible for the producers of tins of chopped tomatoes to use lower quality tomatoes and hide any off-flavours with the strong-tasting ingredients).
| | very hot oil - smokey hot... | | 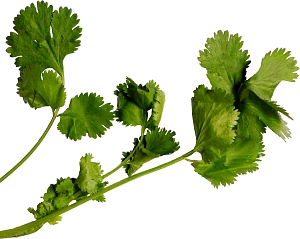 | Coriander leaf - soft and
delicate with volatile flavours. |
|
| | jeera, hing, mustard seed, sesame seeds
|
| hot oil - not hot enough to smoke... |
| | coriander powder, garam masala, cinnamon*, fresh/powdered turmeric, onion seed, fenugreek seed, green chillies, Mr Naga chilli pickle
|
| cooler oil - frying vegetables with a high water content... |
| | onions, garlic, ginger, soy sauce, stir-fry sauces, miso
|
| boiling water/sauces with water in... |
| | coriander leaf, cinnamon*, cloves, green cardamom, Kaffir lime leaves, lemon juice, basil leaves, sea weed, mint
|
| *Note - the flavour in cinnamon is in an oil which will come out in the hot oil part of the cooking process - oils extract oils. However, you will notice that it is often used in sweet rice where it is added to the water and boiled for around 20 minutes or longer (depending upon the reicpe) - under these circumstances, the oil has the opportunity to come out of the bark and get into the recipe - a large quantity of bark is used in order to make up for the fact that not much of it gets out. With cinnamon, the oil does not need to react, it just needs extracting so high temperature oil for a short time or boiling water for a long time will do similar jobs. |
If you forget to add an ingredient - such as jeera or garlic where the taste is modified by heat - you cannot just add it later on because it will not have been subjected to a high enough temperature and will taste wrong.
In that case, just put some oil in a spoon with some of the spice that you have missed out and cook it over a small flame, adding it to the meal when it has developed correctly.
Knowledge :: Cooking methods :: Tarka v Normal
 | With the boiled part already prepared,
do the frying separately. |
Normally, you would heat up some oil, add the high temperature spices such as jeera, gradually reduce the temperature and add fresh turmeric root and coriander powder, reduce it a bit more and add chillies then chopped onions, grated ginger and garlic and some sort of main component - fried tofu, potatoes and so on.
Some meals require you to boil things for a long time in order to cook them properly - I'm thinking specifically about various pulses such as yellow split peas, white kideny beans and so on, where the starch in the beans starts to thicken the liquid that they are boiling in and if you threw that away, you would lose a lot of the meal's characteristics.
In such cases, the boiling part of the meal has necessarily been reached well before you would add anything that had to be fried - you would not boil a lot of the spices for several hours before serving a meal because a lot of their flavour would have been boiled off.
Instead, you need to process the boiled part of the meal over a long period of time, according to the requirements of whatever it is you are cooking, and you also need to add the freshly cooked spices close to the end of cooking.
So, now the procedure - called tarka (ਤੜਕਾ - तड़का) - is to cook the boiled part and in another pan, fry your jeera, coriander, chillies, ginger, garlic and so on and then add that to the boiled part of the meal. One example of this generic method is the Chana Dahl recipe on this site - another is Chole Masala.
Knowledge :: Cooking with chillies
Chillies provide the heat that we enjoy so much in cooking. The compound that does this is only required in small quantities to produce that heat so we need to be aware of what they can do and how it happens.
The compound in chilli that gives us the heat is oil-soluble.
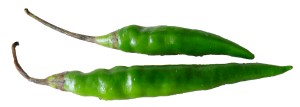 | These chillies can add heat to your meals
and even gas everyone out of the house. |
When you put oils or oil-soluble compounds into boiling water, they will 'steam-distil'.
Steam distillation is where two compounds that would not normally mix to any great extent in liquid form (hence oil and water), form a mixture in the vapour state (their partial vapour pressure added together are greater than atmospheric pressure therefore it boils) that will travel just like steam.
This is used in industry (orange oil production for example) and the ratio of one compound to another depends upon the relative masses of the molecules.
Water is not a very heavy molecule so a lot of water is distilled with not a great deal of the other compound.
However, you don't need much of the heat-giving compound in chilli to act as tear-gas - this being so small that when vaporised, enough of it stays in the air to act like tear gas and without wanting to condense back into a liquid form - it is effectively a gas.
When you add the chilli, you will have a limited time before you will gas out the house so use an extractor fan if you have one or make it quick - I find that 30 seconds doesn't give it enough time to cause a problem in my house and that is without using an extractor fan.
So, where are we likely to encounter this problem?
Literally anywhere where you add water or something that has a lot of water in it to something that has chillies in it - such as when you add chillies to water when making Khichiya Papads or when adding onions to something with chillies in it like when making a curry.
Additionally, if you are cleaning out with warm water, a bottle/jar that has had chillies in it - such as an empty Mr Naga jar - you run a serious risk of gassing.
When cleaning out chilli containers, don't use warm water, use cold instead.
Knowledge :: Fillings for paratha and other stuffed flatbreads
 | Mooli is largely interchangeable with kadoo and torai.
|
If you have worked your way through these recipes - especially those that seem to have a similar theme - you might be thinking about how generic some of them are when it comes to using a particular vegetable.
In the case of paratha, you can use just about anything to stuff it and people often do - vegetables that are left over from previous meals, anything that is lying around in the cupboard or the refrigerator....
A lot of real cooking isn't so much about following a particular set of ingredients, it is more about understanding how things work together and paratha is one example of this.
Once you have worked out the rough proportions of things like chillies, coriander leaf, onions, garlic and ginger that you like to use, you can add or substitute virtually anything to make a meal.
In the case of paratha, you can have potato, mooli, lauki, torai or any of hundreds of vegetables that you will find in your local shops that either I haven't covered here (such as eddoes for instance) or that I don't even know about. Nobody knows everything and there is no such thing as 'the only way' of making a particular meal.
You have access to different resources from those I have access to and there are vegetables that will be more available to you than me so experiment and have fun.
Knowledge :: Playing with formats
 | You can play with colours in the food: red - chilli; yellow - turmeric; green spinach...
You might even resort to using food dyes. Anyone for 'Indian flag' patterned Khichiya Papads? |
Once you know what a particular 'format' is - paratha, for example, being essentially a flat envelope full of spicey veg - you can 'play around' with that format
You can add, for example and continuing with paratha, add turmeric to the filling to make it yellow or orange and you can add thawed-out, frozen chopped Spinach (palak) to the dough so that you end up with yellow and green colours.
In addition, there is no reason why you can't take a paratha and instead of having it as a savoury meal, have it as a sweet one. You can stuff it with mango, pineapple, passion fruit and so on, flavour it with sugar and lemon/orange juice and so on. In fact, writing this here, now, I'm thinking of giving it a try.
We have already seen this with English samosas (you saw my recipe on this website first) and English paratha.
Other seeds for thought could include khichiya papads being sweet/coloured; sweet sushi; and, so on.
Experiment.
You are not restricted to having to produce something with a label - you see such apalling labels as tikka masala sauce and so on, as though it was a recipe that was written down in Sanskrit, 5,000 years ago - you can make what you like and you can do this because you are making it for yourself.
Cheats :: Microwave cake mould lining
Cooking cakes in conventional ovens tends to form a dehydrated/overcooked crust around the outside and along the top of the cake. Whilst this introduces a caramelised surface layer that generally tastes nice, if you are going to ice the whole cake, this enhanced texture/flavour boundary redefining the 'edge of the cake' might not be what you want to have beneath the layer of icing, inside the cake.
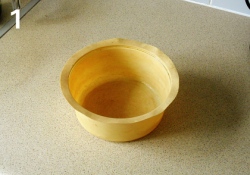 | The humble microwave cake mould
|
Nowadays, with microwave ovens, we can prepare a cake that has no overcooked layer on the outside - instead, it is the texture and flavour of middle of the cake, right from the outside on one side, all of the way through the middle to the outside on the other side, giving us a consistency that could only ever have been achieved by steaming a cake over a long period of time.
The cake mould still needs to be lined with something though. I have tried oil, margarine and all sorts of things and depending upon the consistency and ingredients of the cake, various amounts break off and stay with the mould - something that should consistently never happen.
So, something that does not contaminate the cake, does not stick to the cake and does not stick to the mould is required for best results.
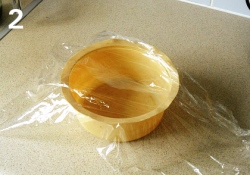 | Top left to bottom right with cling-film.
|
The best one I have found so far is cling-film.
If possible, use a holder/cutter that allows you to hold the roll in one hand whilst holding the other end in the other hand, in place.
Pull out and cut a length, around 15cm/6" longer at each end than the mould and let it float down over the mould in a top-left to bottom-right position.
 | Now the other way to make an 'x'.
|
Now lay out another sheet, the same size, so that it lands across the first so that it forms an 'x'.
You should now have the centre covered and enough of the cross-over to cover the depth of the mould.
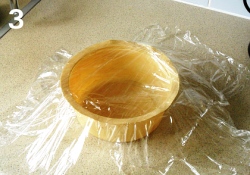
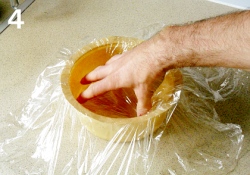 | Press the bottom down.
|
Spread out your fingers so that they just fit inside the mould and push the flat part down to the bottom, allowing the sides to follow it down.
Make sure that the bottom of the mould lining is reasonably flat.
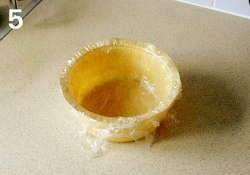 | Gather up the loose ends and wrap around.
|
On the inside, smooth out the cling-film so that there is a minimum of 'pockets' that any cake mixture could get into.
On the outside, fold away any surplus so that it doesn't get in the way - it will have a tendency to grip onto anything it can.
The mould is now ready to use.
Put it to one side, away from anything that might get into it or otherwise damage it.
Lining the mould takes a bit of time and is best not performed whilst you have mixture waiting to be poured into the mould so make the mould like this and then look after it until it is ready.
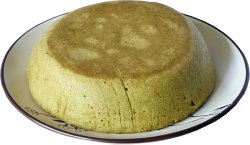 | Finished cake. Let cool, slice in half,
fill, reassemble and cover. Simple. |
When the time comes, pour the mixture in, tap it a few times to make the surface level and then put it into the microwave oven for the required amount of time.
When it has finished, the middle will have risen slightly more than the outside (although not by as much as with baking in conventionally heated ovens) so remove any excess with a fork or a spoon (fork is better for this job) and then turn out onto a plate or other surface so that it ends up upside down (see photograph below).
You will probably find that the cling-film stays in the mould but it might stay on the cake. Just peal it off carefully if it is on the cake.
Put the cake to one side and let it cool down. You might notice that there is a slight loss of water from the surface of the cake but this is just a bit of dehydration, it is not cooking a crust.
Another thing you will probably notice is that some water vapour permeates the cling-film and condenses on the inside of the mould. This is only water that has travelled through the cling-film as vapour so it just needs wiping off with a bit of kitchen towel.
Knowledge :: Cooking with pasta/ noodles /starch
Pasta is fairly straight forward - it is just flour of some sort, moulded into a shape and allowed to dry out.
However, you can turn cooking it into a disaster.
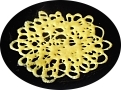
 | Pasta is just little balls of Durham wheat,
stuck together to make shapes. |
First of all, starch is a polymer of glucose and the starch grains are just lumps of this dried polymer.
Pasta is just starch grains that have been allowed to dry together so that they stick together in whatever shape the manufacturing process needed.
If you heat it up above around 80C, the bits of the polymer on the outside of the grains will expand into the water, taking water on in a process called 'hydrolysis'. Whilst it is often called a solution, it is technically more of a suspension because the molecules are too big to dissolve - we'll call it a solution just to be consistent.
If you continue heating this solution, the starch molecules will start to break down - truly hydrolysing - making shorter and shorter chains until, eventually, you are left with a glucose solution.
Out of interest, adding a strong acid (that is an acid that forms an acid solution easily, as opposed to an acid that is in high concentration, thus, hydrocholic acid is a strong acid whereas citric acid is a weak acid, regardless of the ir respective concentrations) will speed up this reaction.
So, how does this apply to cooking?
Firstly:
You should not put pasta into cold water that you then bring to the boil. If you do that, the pasta on the outside of the dried shape will tend to disperse into the water and you will end up with a lot of it lost into the liquid.
Instead, you should put pasta into boiling water. By doing that, the pasta on the outside cooks as it absorbs water (hydrolyses) and prevents the still dry, uncooked pasta beneath it from dispersing in the water.
Starch needs to be above 80C for this to happen so putting it in boiling water - even cold pasta - will prevent you from getting a saucepan of mush.
Secondly:
Whilst we can use loose starch flour (cornflour for example) to thicken up sauces, if we add too much we end up with a viscous gloop, instead of the sauce we wanted.
We can rescue this situation just by boiling the starch solution - stirring continuously so that it doesn't burn in the saucepan - and after a few minutes, it will start to thin.
Knowledge :: Boiling potatoes
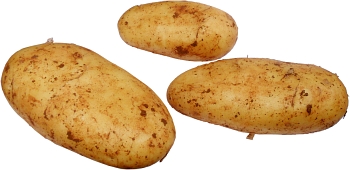 | Not new potatoes but if you are going to
mash them, cook them with the skins on. |
Many of us have cooked new potatoes with the skins on and when we boil potatoes for mashing, we usually remove the skins - it is the English way of doing it (this is a nation that likes brussel sprouts and boiled cabbage - not necessarily together).
Well, I'm always looking out for better ways of cooking things...
It can work out better if you treat older potatoes more like new potatoes and leave the skins on whilst boiling them.
When they are cooked, simply break them open and the skins should just come away easily, leaving dry, fluffy potato.
This has the advantage that water has not had such an opportunity to get into the potato during cooking and you are left with a drier mash.
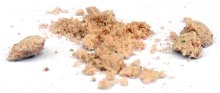
Knowledge :: Substituting eggs
 | Correct flow from
this is important. |
Eggs are not healthy things to eat and many cultures reject them any way - many people ask me about egg-free cooking, especially when it comes to things like cake and biscuits.
Whilst the cake recipe does not need egg at all, there are some qualities of eggs that are needed in order to make a recipe better: pre-cooked stringiness; and, setting on cooking and, we can add that other quality of eggs when eating them, the eggy smell.
Pre-cooked stringiness is about egg white making liquids more viscous and also making them 'string' better. In the Roti Jala recipe, we need the batter to 'string' in order for it to flow properly out of the home-made mould spouts. This allows it to form thin threads that do not 'bead' before or when they come into contact with the tava. The long chains of molecules in the egg white - which is what Roti Jala is normally made with regardless of the mould used - hold the inside of the batter stream together, preventing it from breaking up and forming beads.
Long chains of molecules are not the sole preserve of egg white though. We can modify the fluid properties of water without resorting to eggs. You might have noticed on many ingredient lists that there is an ingredient that is called 'hydrolysed starch' or similar. That is what we are going to do here.
 | Not eggwhite -
tapioca and water instead. |
Ingredients:
- 2tsp cornflour or tapioca flour (to substitute eggs) if you have made your own mould (see below) and need to thicken up your batter
- 20mls cold water
- 200-300mls boiling water
Into a plastic bowl, place 2 heaped teaspoons of tapioca flour or cornflour - some finely divided, fairly pure starch. Add around 20ml of cold water to it and stir it up so that it is evenly dispersed and there are no lumps in it.
Stir it quickly whilst you add around 200-300mls of boiling water, making sure that the starch disperses in the water before it starts to react. Adding the boiling water to the starch will make it hydrolyse - expand as it takes on water, making the molecules open out, becoming more larger and tangling to some extent.
The reason for adding the cold water to start with is that it allows the starch granules in the flour to disperse before they start to hydrolyse - stirring quickly makes this happen. If you don't stir quickly enough, you will end up with glutinous blobs of gel. As you stir, over the next minute or so, you will see the water change from a mobile fluid, to a thicker, more viscous one. If it starts to get too thick, just add some cold water.
Once it has finished thickening up, stop stirring it - you only really need to stir it when you are making sure it is dispersed properly and when you are checking how thick it is - and let it cool down. In the case of Roti Jala, you don't want to add hot water to the flour any way because it will start to cook that before you need to.
Setting on cooking Another property of egg white is that it sets when it is heated up. Starch suspensions do this and whilst we have already reproduced the 'thickened' property of eggs above, just using starch in the form of flour reproduces this.
 | A tiny pinch of kala namak will add
that 'eggy' quality to your food. |
The vegan recipe for chocolate cake does this and doesn't need egg adding to it at all. In fact, when you get used to the nice, light texture of egg-free cake, the texture of cake with egg in it is rather like foam rubber and not very pleasant at all.
That 'eggy' smell The eggy smell in eggs is from hydrogen sulphide that results from the break-down of sulphur-containing compounds in the egg.
Kala namak is a natural source of this and a tiny pinch of it added to the food is all that is needed to convince an egg-eater that there is egg in there.
Knowledge :: Sourcing foods
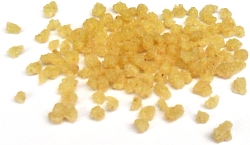
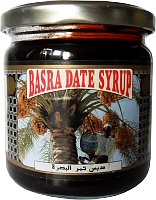 | Basra date syrup. How would
you have found that? |
Amongst the various foodstuffs and tools on the ingredients and tools page, there are some, or even many, things that you will have problems finding - some of them, you will eventually find if you keep your eyes open for them and are lucky.
If you do have a local foreign community, their shops will have things in them that you just will not find in even the most esoterically stocked supermarket's delicatessen department - and the real thing at a lower price.
If you understand the role of various ingredients in the recipes here, you can find an interesting food and try using that instead - adding an interesting taste.
The date syrup on the right is one such product - it is nice and sweet and it has no sharp quality, unlike golden syrup.
Keep your eyes open, look around the shops and don't be affraid to ask the people that work there how you would use various things that you find.
Cheats :: Improvising tools
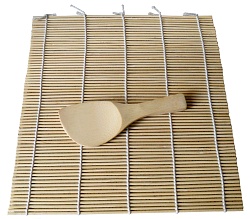 | Instead of this real sushi mat, you
can use a silicone rubber mat. |
| 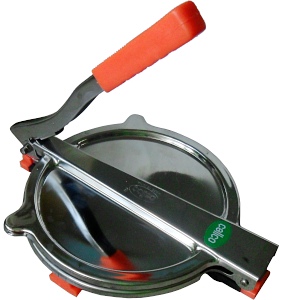 | A rolling pin and some plastic sheet can
largely substitue a puri press like this. |
|
Some pieces of equipment are difficult to find and some are expensive.
Until you know that you would probably be better off with the real thing, you might want to play around, making the food it helps with, without making the financial investment - you never know, you might not like what it makes.
In these recipes, where a piece of equipment is difficult to find, I have tried to suggest how you can get it and, what you can use instead.
Sometimes, they are a good substitute but other times, you are better off with the real thing, for example, when making sushi, instead of using a bamboo sushi mat, you can use a silicone rubber mat although the latter is substantially more expensive than the real thing, it is far easier to get hold of (unless you live or shop close to a Chinese supermarket).
Another example is the puri press when making khichiya papads, but more profoundly when making tortillas - the shape and uniform thickness when producing thin, flat shapes with non-ductile materials such as the dough used to make tortillas are very difficult to achieve using a rolling pin.
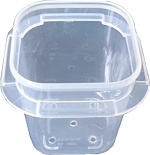
An example of complete improvisation is the Roti Jala mould below. I found this extremely difficult to get hold of so I made one out of a budget supermarket container.
Cheats :: Improvising tools :: Example: Roti Jala Mould
 | The real Roti Jala mould -
Perfect for the job. |
|  | Five holes that are easy to clean.
|
|
The plastic container on the right is a Roti Jala mould and as far as I know, it isn't used for anything else.
Roti Jala is a south-east Asia thing that to date, has not spread outside the region (give me a little time on this one).
As a result, unless you:
- live in south-east Asia;
- visit the area; or,
- have friends that live there,
the only way of getting one is online - this is how I eventually managed to track down the one on the right.
Before that, I only had the option of making one and the only source I had for information about what they should look like and how they should perform was on the internet.
So, what does it need to do and how does it do it?
- It needs to run several streams of 'normal' batter onto a hot tava at a speed that is fast enough not to allow 'beeding' of the stream and slow enough for you to be able to move
 | something
like this. |
it around the surface of the tava;
- Each hole needs to be the same size;
- It needs to hold enough batter to make a Roti Jala;
- You need to be able to seal off the holes when not using it so that batter does not leak out - this is best done by having them all in the same plane then resting it on a flat surface;
- You need to be able to maintain enough pressure, for as much time as possible so that all of the batter is used properly with minimal waste. There is a level below which the pressure is not enough to maintain a high enough flow rate in order to stop beading. This is done in the real mould by having the holes on the end of 'legs';
- It needs to be cheap to make;
- Any parts need to be easy to find in the shops;
- It needs to be fairly easy to make; and,
- The final mould needs to be reasonably easy to clean.
The real mould has legs that are 2.5cm long, the body is 6.5cm deep and 6.5 to 7cm in diameter (bottom and top repsectively) The holes are roughly 2.5mm in diameter and internally, they are on the side of a cone whose straight edges - both inside and out - go all of the way to the bottom of the vessel so there are no corners that are difficult to clean.
So, with that in mind - except that I didn't have the real thing to measure at the time - I came up with the following...
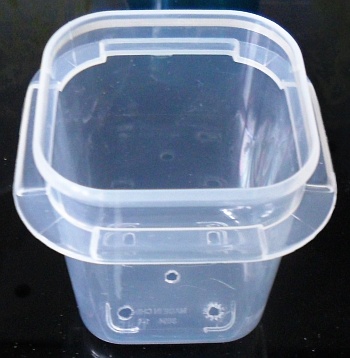 | A small, cheap container, with
a few holes in the bottom... |
| 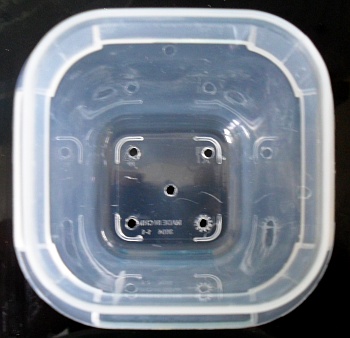 | ...soon becomes a home-made
Roti Jala mould. |
|
First of all, I bought a small, plastic container - this one is around 4cm square and 6cm high.
You don't need to buy an expensive one - this is from the local supermarket's 'cheap and cheerful' range. It came as a 'two pack' and if I messed up one - for instance, by making the holes too big - I had a second one to play around with.
Next, using a sharp point - I used the smaller of the two needles that were supplied with the jam syringe - I made five holes in the base.
These need to be cleanly cut, round and pretty much the same size as each other.
You can make them in the pattern in the photographs or you can have them in a straight line but don't put them too close to each other or you won't get spaces between them in the batter on the tava when you use it.
These holes are around about 2mm in diameter.
Don't worry if yours are different, you can make the batter a slightly different consistency to compensate.
This is okay to use although it does not seal when batter is poured into it (4) and it doesn't have legs on it (5) so the last inch of batter will not work very well (it's only your last one though).
However, the holes are around the right size(1), the holes ae the same size as each other(2), it does hold enough batter(3), it was cheap(6), easy to source(7), reasonably easy to make(8) and it is easy to clean(9).
The real one is still better though - the handle makes it easier to hold for one thing....
Copyright
©2005 - 2021
P.A.Grosse. All Rights Reserved
|